
Making An Act
Making a new act is such a fun process. To bring into existence something which only exists in your mind. It’s magic really.
I’m a creative hermit by nature though. Lock me up in a workshop and I’m happy to disappear from this world into my own. You won’t see me again until I surface with a finished product of some sort. I want you to see the final piece, not the messy process itself. Maybe I just love the element of surprise.
However, I am trying to break habits of old and get better at sharing things from ‘behind the scenes’.
I’m also interested in the juxtaposition of what you see on stage for 5 minutes and the countless hours and graft that go into what you don’t see. As a member of the audience you’re obviously not supposed to fixate on the inner workings and cogs inside the machine of a performer, but it always crosses my mind.
So here we are at my first blog post on the new site and I thought I’d throw open the doors to the whole factory, hand you a golden ticket and invite you into how I go about creating a new cabaret/variety act. From the very beginning.

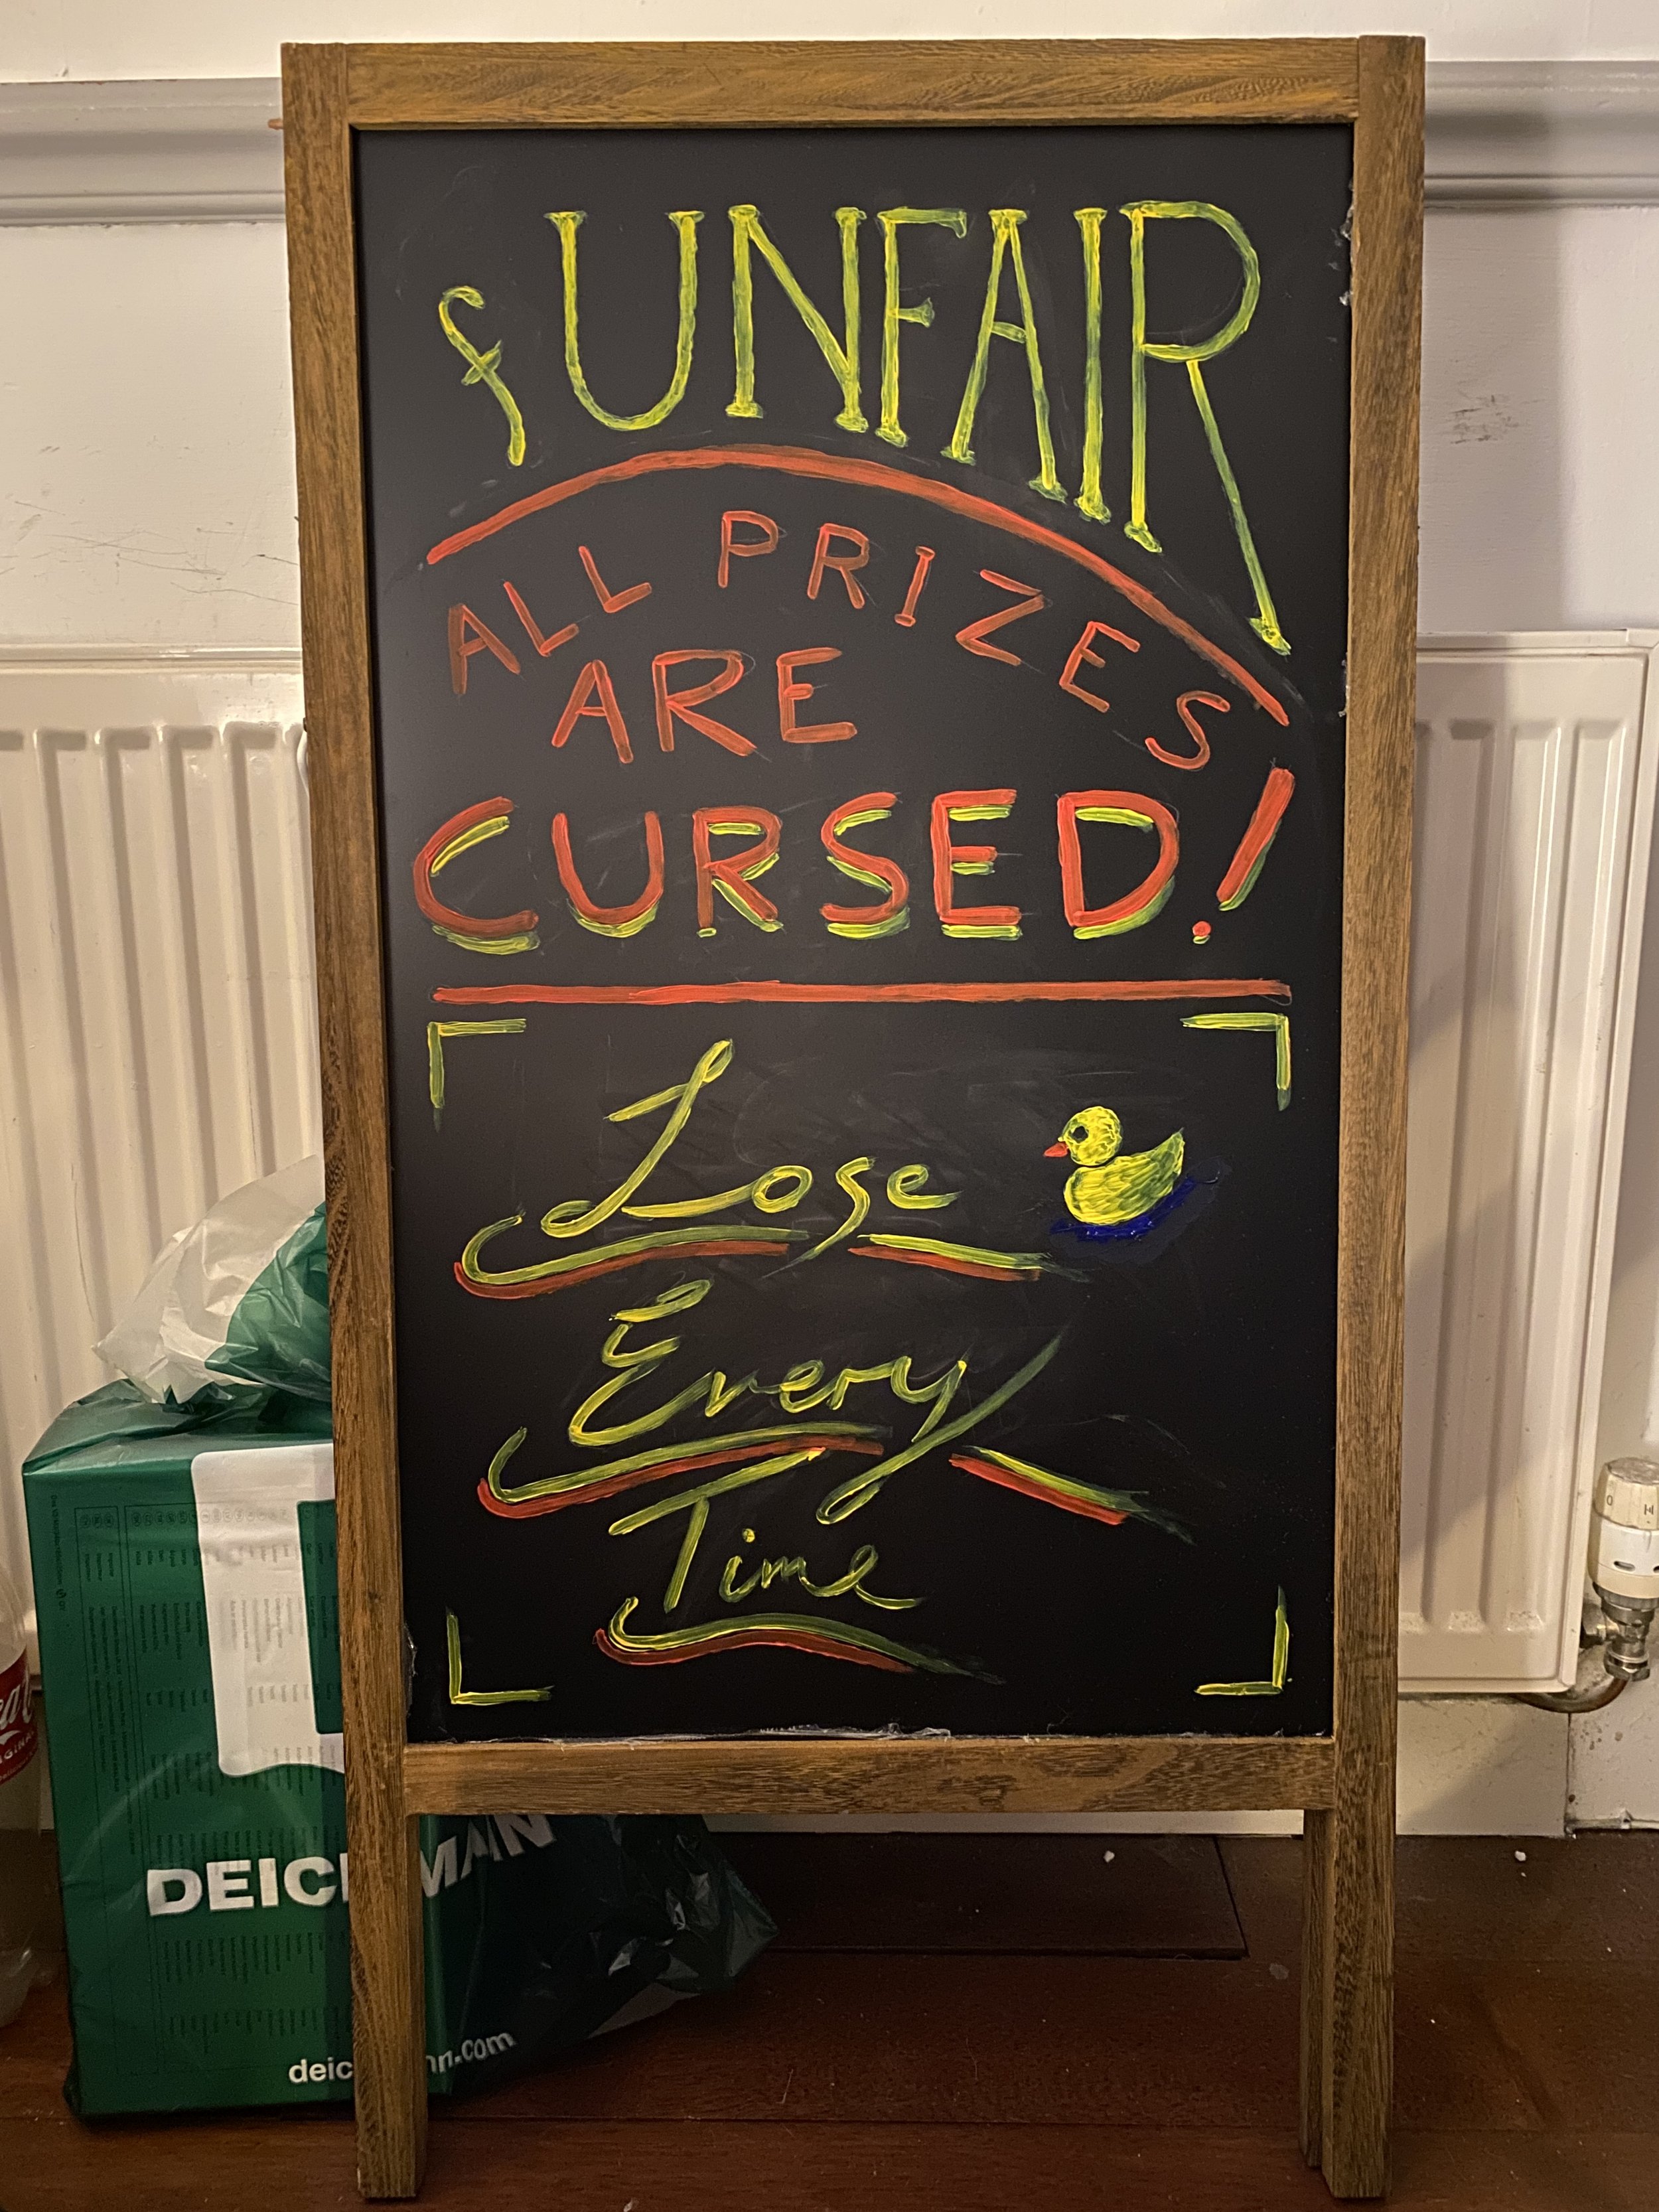
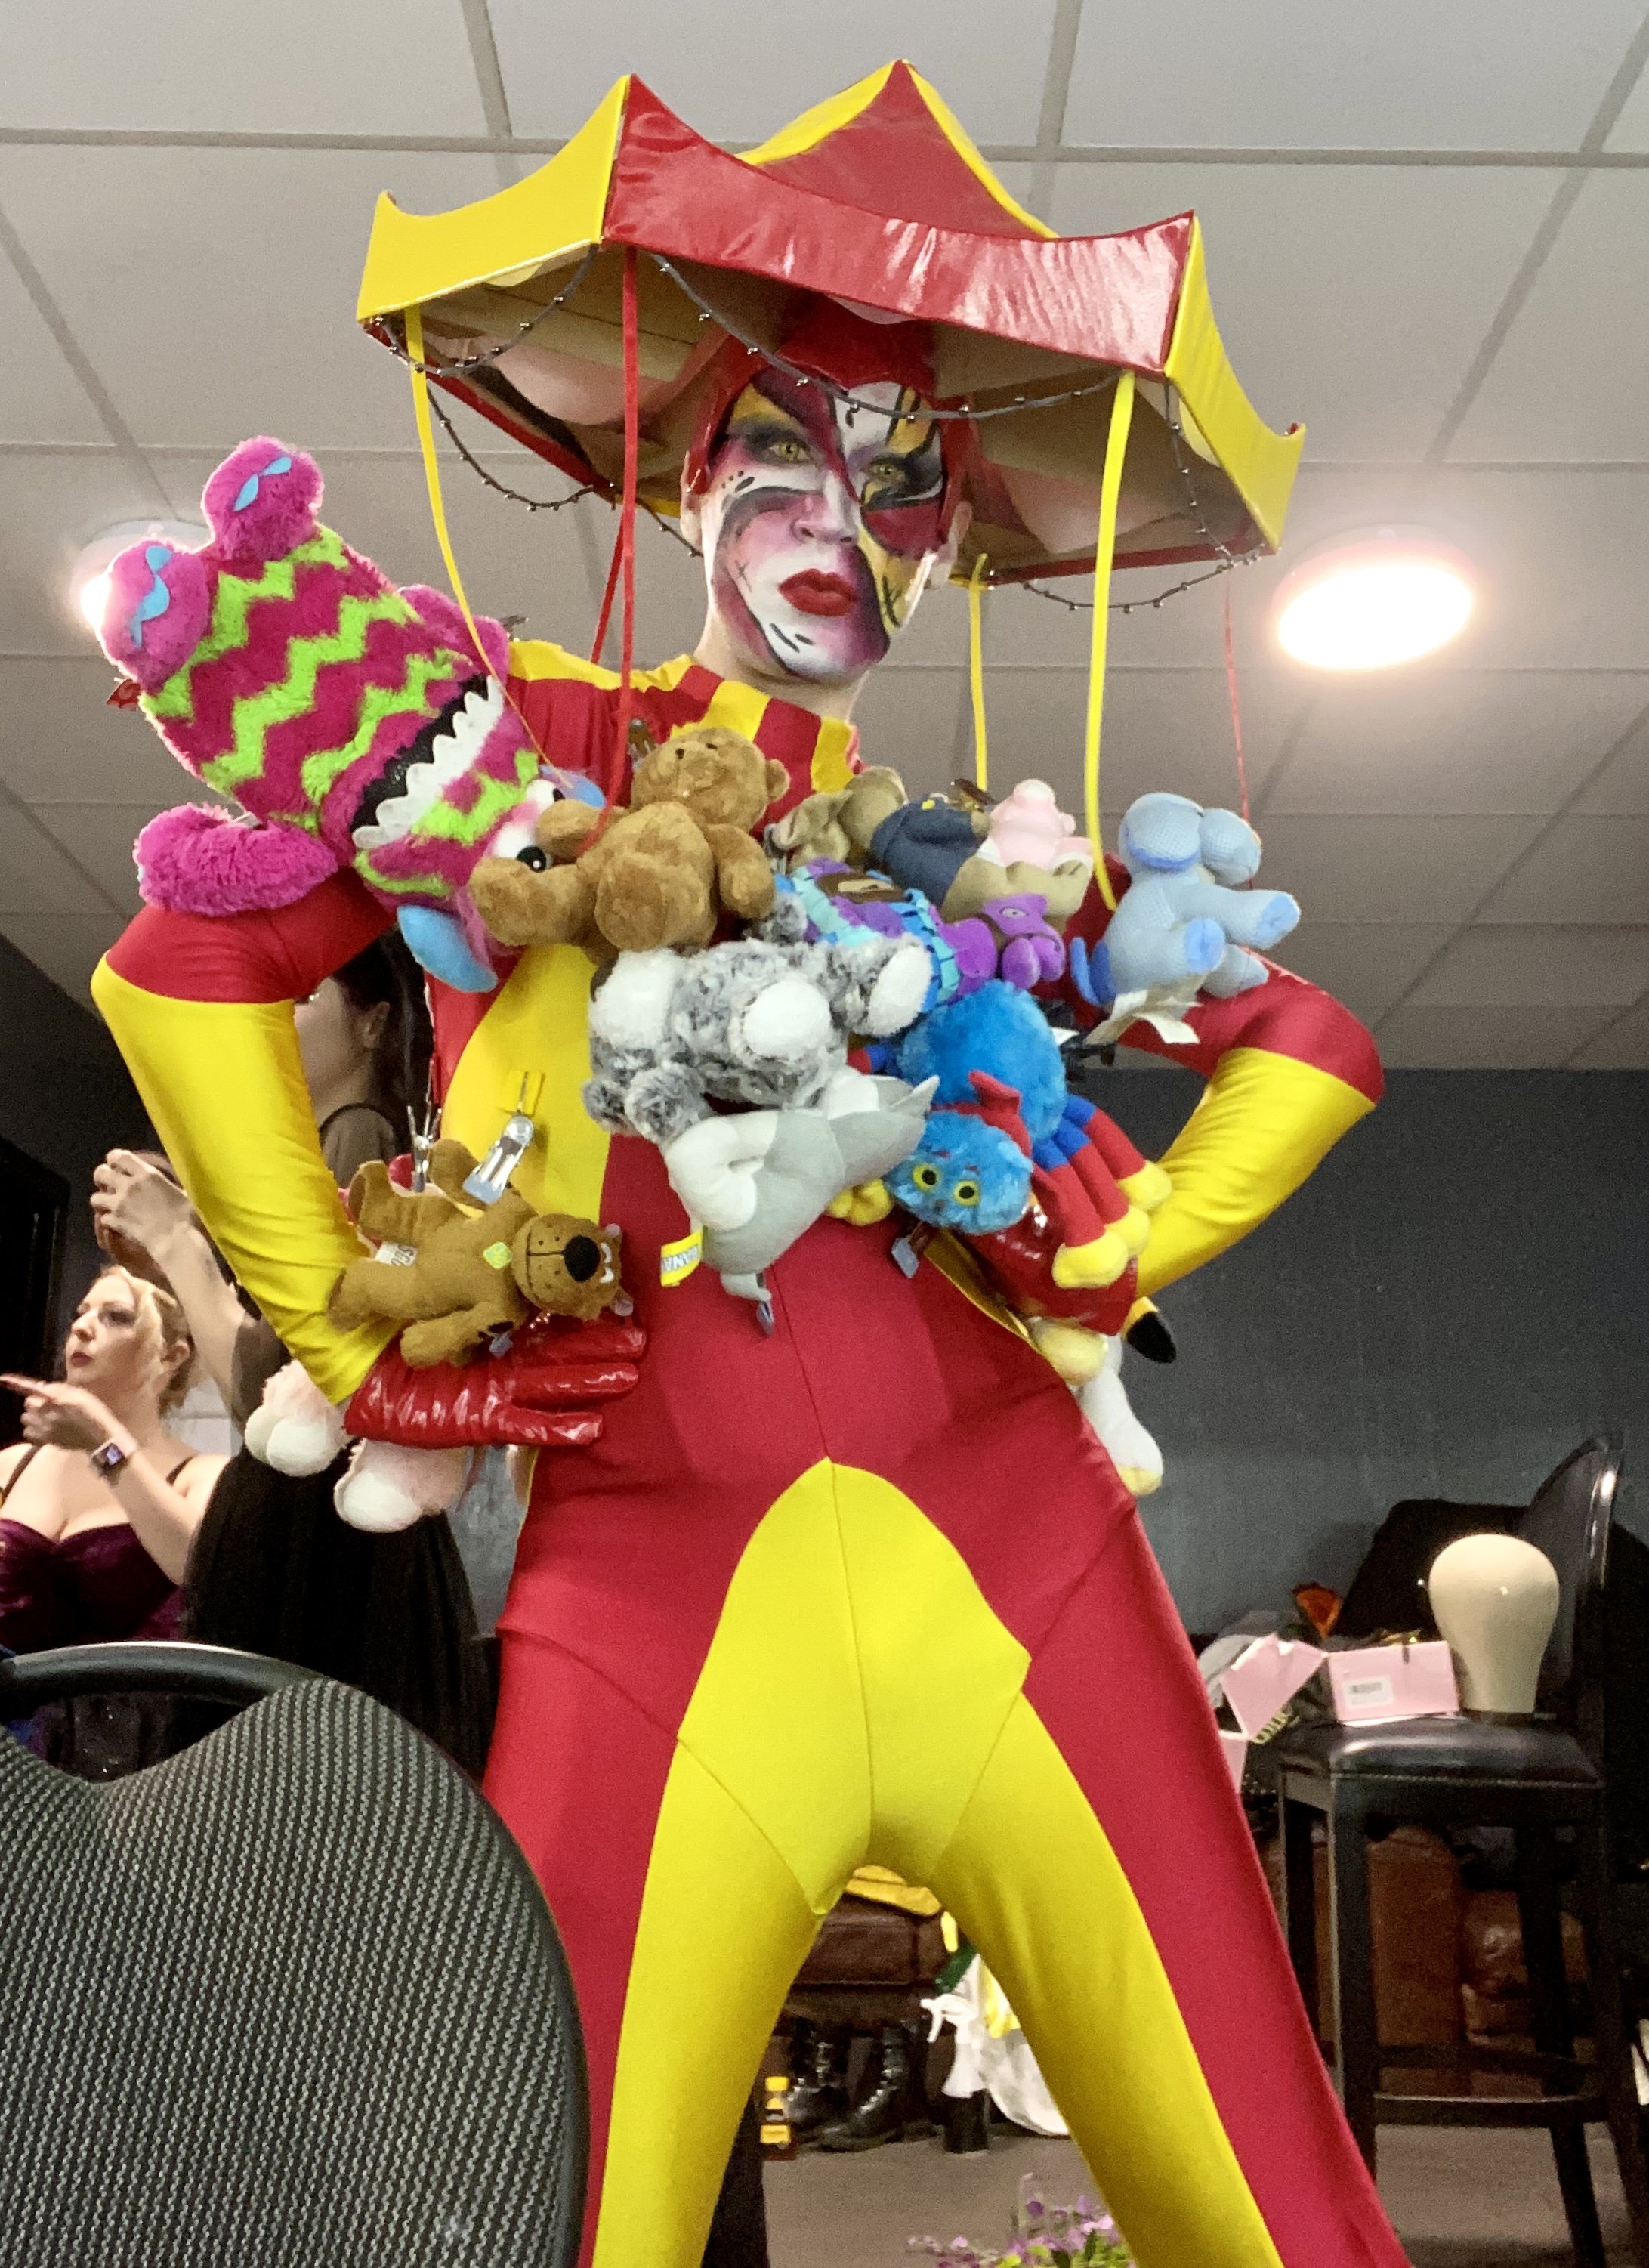
Let’s do a case study of my most recent and probably most ambitious act, ‘Hook A Duck‘. When a simple idea unleashes a total beast!
I hope I can help inject some inspiration into your creative veins from reading this, or spark some joy in looking over my pipeline behind the act. So if you are a performer yourself or perhaps an inquisitive audience member wanting a peek behind the curtain, I hope you get something out of it. Let’s go!

NOTES
Everything you have ever seen me do has come from my ‘Notes’ app.
I keep what I call my ‘Little Black Book’, housing all my performance ideas. Some of these have escaped into the real world, however most still live and breathe in between the pages, brewing away.
Onto the concept for ‘Hook-A-Duck’. It was in my notes for over 2 years before I started production.
As a kid it was my absolute favourite carnival attraction. ‘Winner every time!’. Bright colours, fun game, a prize at the end! What’s not to love? It’s funny because even as a kid you knew you were always going to win. You were never in any doubt you weren’t going to ‘hook the duck’, but the experience was still super fun. I remember there were two versions of it; the ‘water’ ones which offered a more purist experience or most went for the ‘dry’ carousel option, spinning around.
What if I could ‘become’ the whole game stall itself? Build the game around my actual body. Get people involved to play the game that way, and base it inside a larger performance concept that would work on most stages?
RESEARCH
I am a proud super-nerd. I love to research and learn new techniques. An unquenchable thirst for knowledge. Student for life!
My ultimate, ever-unreachable aim and dream is to show you something that you have never seen before. So I’m desperate to know what’s out there, what’s been done, what’s possible and how I can make my ideas happen.

I made a folder full of visual references. Old carnival stalls, vintage rubber ducks, lots of primary colour fabrics and general inspirational images. Zooming right in to look at the smaller details. How did they construct that? What is that finish? I’m interested in the close-up details.
After a while I decided that a timber construction could be the direction to take for the costume. It’s sturdy, strong, relatively easy to work with and it has the vintage stall style I was going for. I thought seeing the grain of the wood could really add to it.
The carnival stalls tend to have a tent-style cover with primary red/yellow segments going around it. The costume had to be similarly circular, however I thought a more ‘hexagon’ style could work, using these coloured segments to help divide it all the way around. Curves could be much more difficult to create with timber.
Other elements to research; A good bodysuit pattern. Plush toy bulk sellers. Custom hooks that could somehow hold them and attach them to fabric easily. Lots to figure out.

And the yellow ducks! I think I spent most of my research time trying find affordable rubber ducks that I could buy in bulk. I was so particular about the style of them. They had to be a very specific size too so that they could fit around the costume and feel in ‘scale’ with the rest of it. Too big or small and the whole look would just be off. Eventually I found a seller on Ebay with the exact ones, 40 all together, but the search took forever!

SKETCH!
Some things can only be cemented into existence by drawing. You absolutely do not need to be ‘good’ at it. For me at the initial stages it’s more of an exploratory exercise.
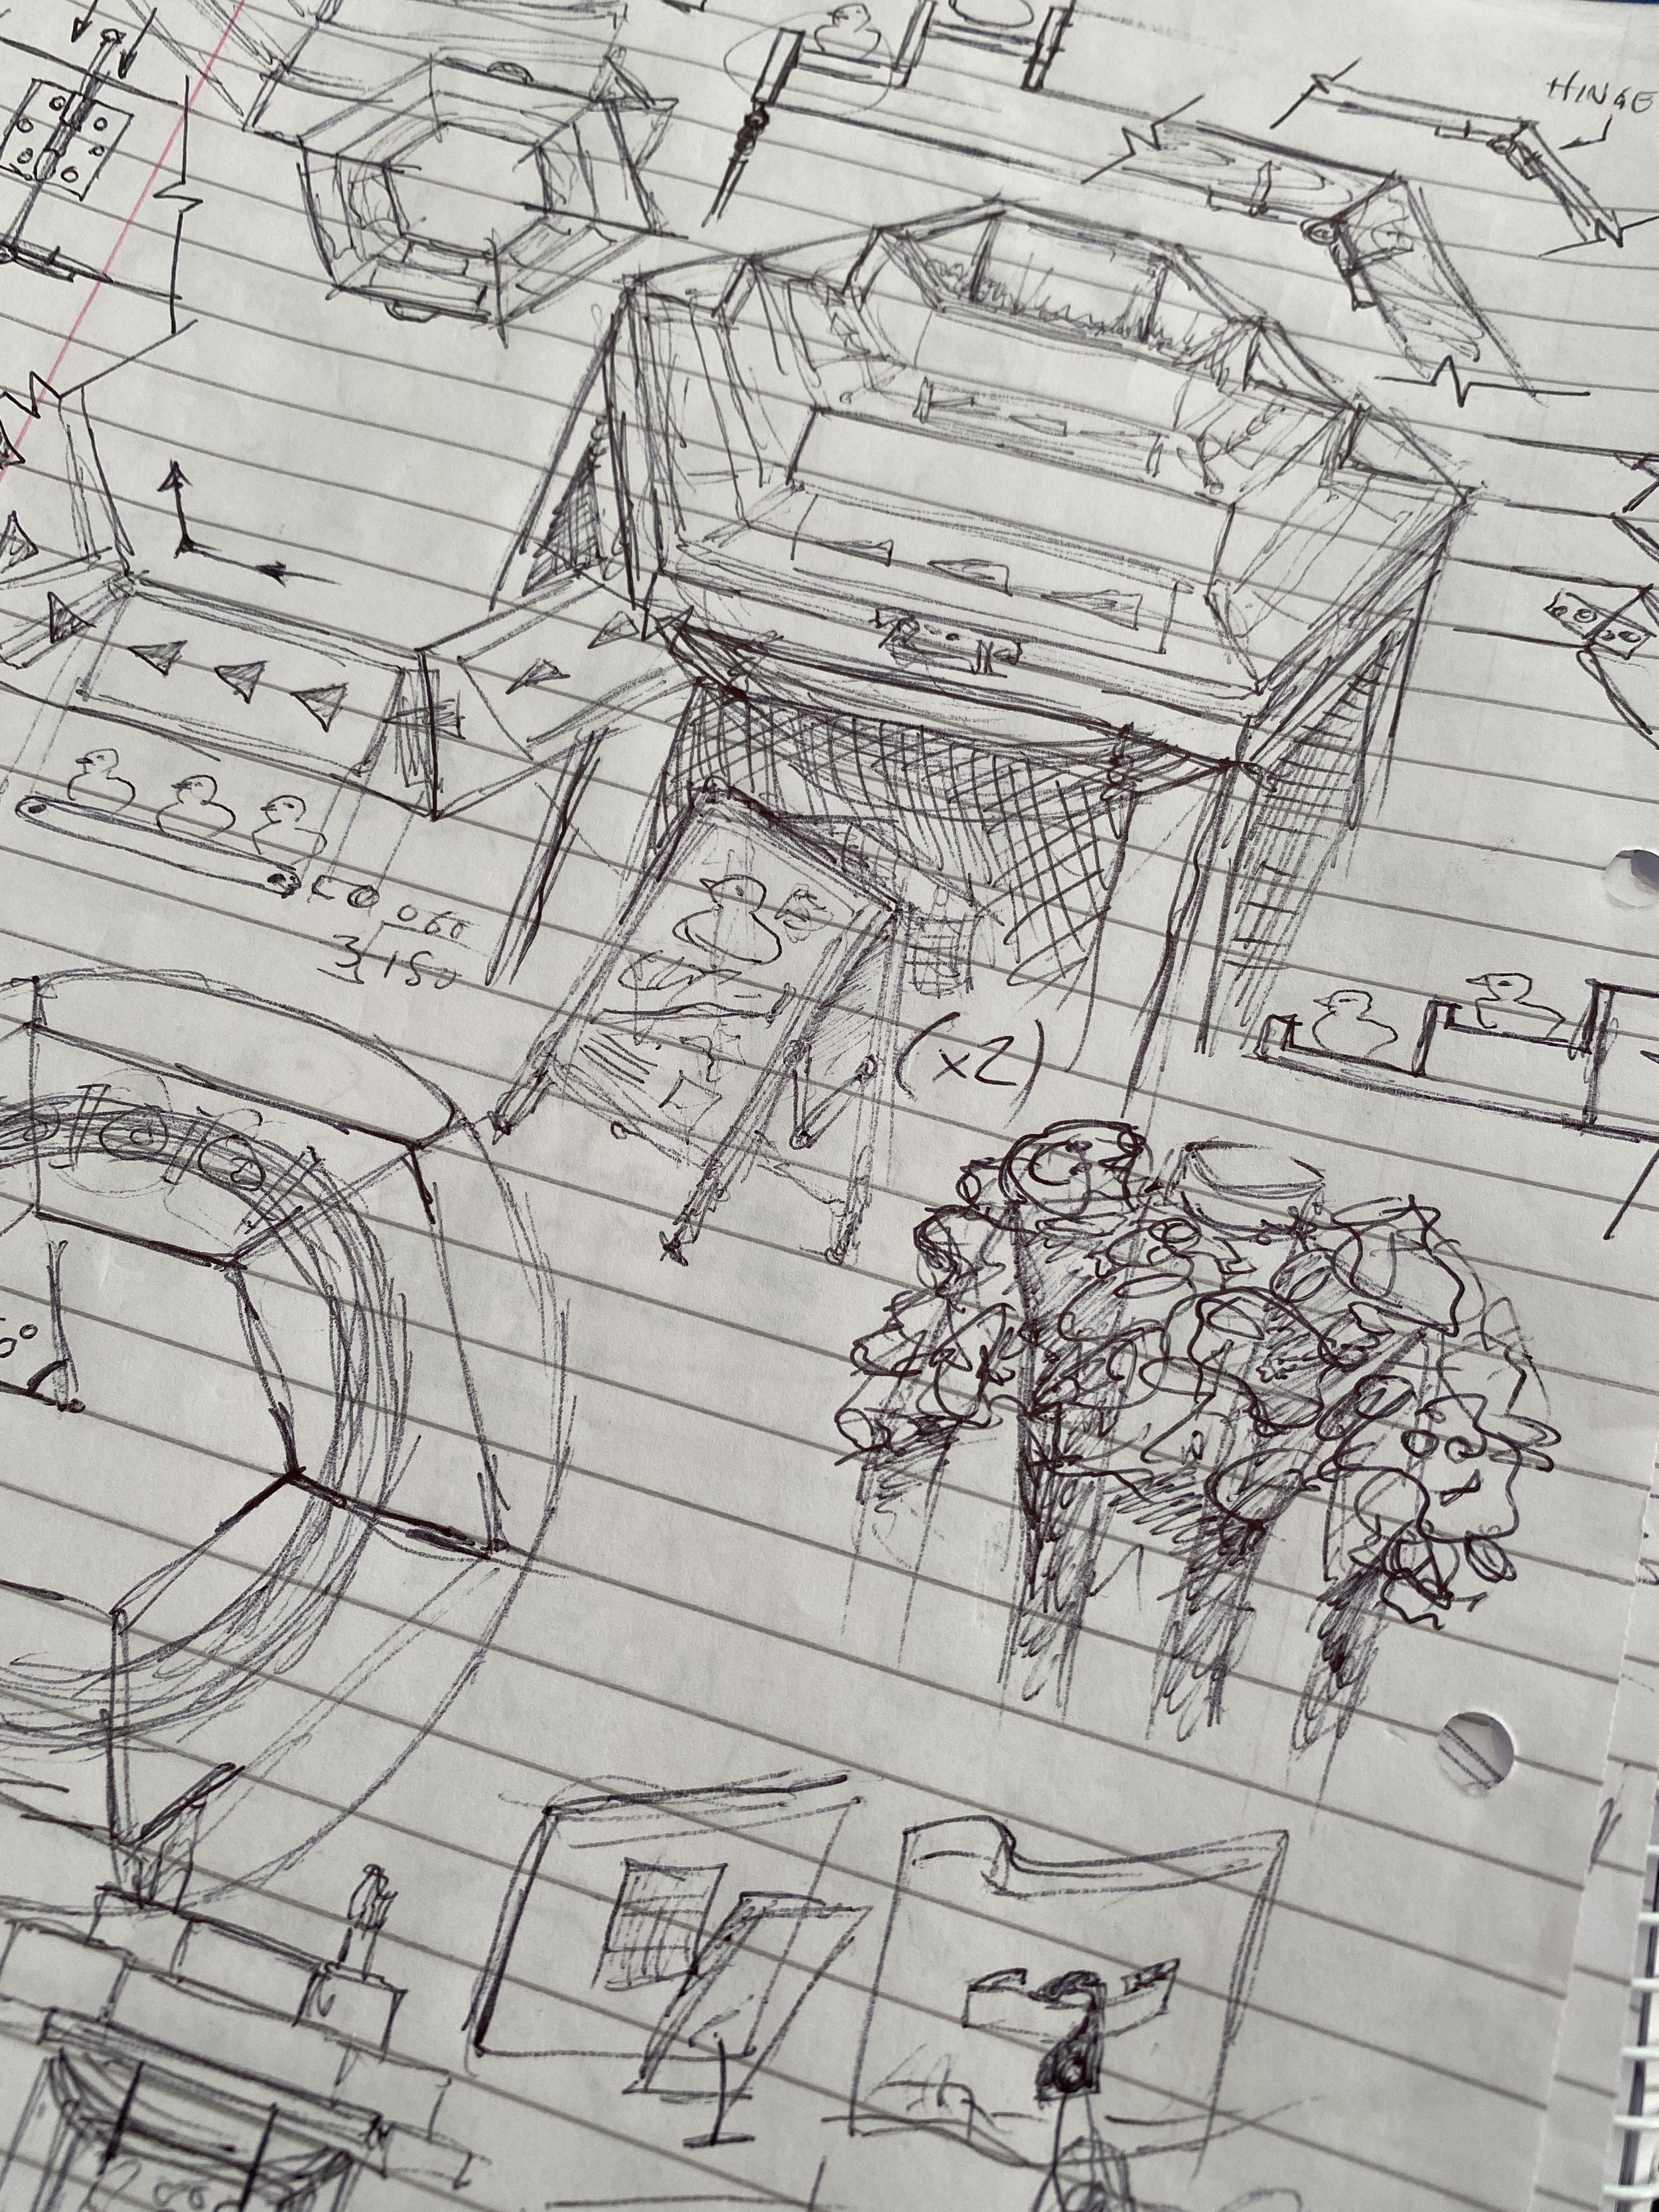
One of the first sketches I did when figuring out the new act was that small scribbly thing above. Not the most polished drawing, but it works to communicate the general idea. Some vague form of how it sits on a stage. You’re not producing final refined artwork here (although you could if you wanted!) but it’s more like visual brainstorming and communicating the idea to my future self, so I can refer back and understand what on earth I was thinking.
Looking back, it is surprisingly close to the final product, so these drawings are really important.
There were many technical elements to creating Hook-A-Duck, mostly in the main costume piece. It had to attach to my body somehow, hold 40 yellow duckies, rotate perhaps, all whilst visually resembling the carnival stalls we’re used to seeing.
Bring in my army of drawings and sketches! I had to break things down into smaller elements to fully understand how I could construct such a costume. Does everything connect together? Are they all separate pieces? Do I make a functional conveyer belt like Yo-Sushi? What materials could I construct ‘shelves’ from that sit around my body? How are they supported? Lots of strange questions had to be addressed.


Schedule
A deadline can be such a gift. I’m more productive when there’s a goal in sight.
I was booked to perform at ‘Cauldron of Delights Cabaret’, a brand new event, debuting at Slay, Glasgow, 25th February 2022. New events are exciting. A blank slate, no previous event to compare with. I thought a new night deserved a new act!
I had two months to prepare for it, and tried to plan my time as best I could. The whole first month was spent planning the act, figuring out the design. While the second month was for all the practical build work.
I kept a diary to spread out the tasks needing done. Aiming to not fill an individual day with too much production activity. It’s important to not burn-out or overburden your time too much. Doing so can easily take the fun out of things, at least for me anyway, and I wanted this to be fun!
Prototyping
‘Don’t assume that things will always work the first time.’
This project was the first time I fully embraced prototyping. I usually don’t put time aside for this, but wanted to test everything before the final costume build. For a few reasons. Firstly to have more control on the final quality of the costume pieces, and secondly to ‘iterate’ along the way for better results/construction.
I’m a 3D visualiser by trade and wanted to test out some of these sketches in a 3D environment, for more accuracy in sizing, scale and construction. If it works in the world of 3D, it will work in real life. Or so I like to tell myself.

Early test render of costume concept made in 3ds Max
I intentionally bought more of the solid materials than I needed in order to test them out. Construction methods on the wood, for strength and suitability. Loads of screw types and nut and bolts. Paint colours over primer on the wood. Various adhesives for fabric and wood, some worked great, others were atrocious.
I ran scraps of all the fabric used through my new overlocker machine too. There were a lot of curves in the body suit so I wanted to know how it handled tight curves through such a beast of a machine. Also how cool are overlockers? I love how they cut the excess fabric as you’re going and stores it in its own little fabric bin. It’s my first time at the overlocker party and I love it!
Ultimately I get very impatient very quickly so this prototyping stage feels counter productive to me sometimes. But I had to just keep in mind it was for the greater good. There are so many things to worry about when you take your acts to the stage, your costume and props shouldn’t be one of them.
BUDGET
Lets get taboo and talk money. Nothing to hide here. Plus it’s important to highlight just how much coin performers pour into their craft. I saved up and set aside a budget of £500 before I got started. (Stay tuned till the end to see how that worked out)
I’ll be honest with you, I very rarely keep track of what I’m spending when it comes to creating acts and costumes. To the point where things can easily get out of control. It’s shocking how quickly the little costs start to pile up, and I’ve been pretty bad at managing this before. This time I really wanted to be strict with myself and keep track of all the costs.
Some costs just dent the whole project so quickly from the start. New size 12 red PVC boots? That’s £82.08 including delivery gone right away. No getting around that.
Quick tip. In terms of build materials, buy more than you need if you can, but also, keep your receipts! I ended up returning some DIY materials that I didn’t use. Recoup whatever you can instead of holding onto things you won’t use, that also just take up space.
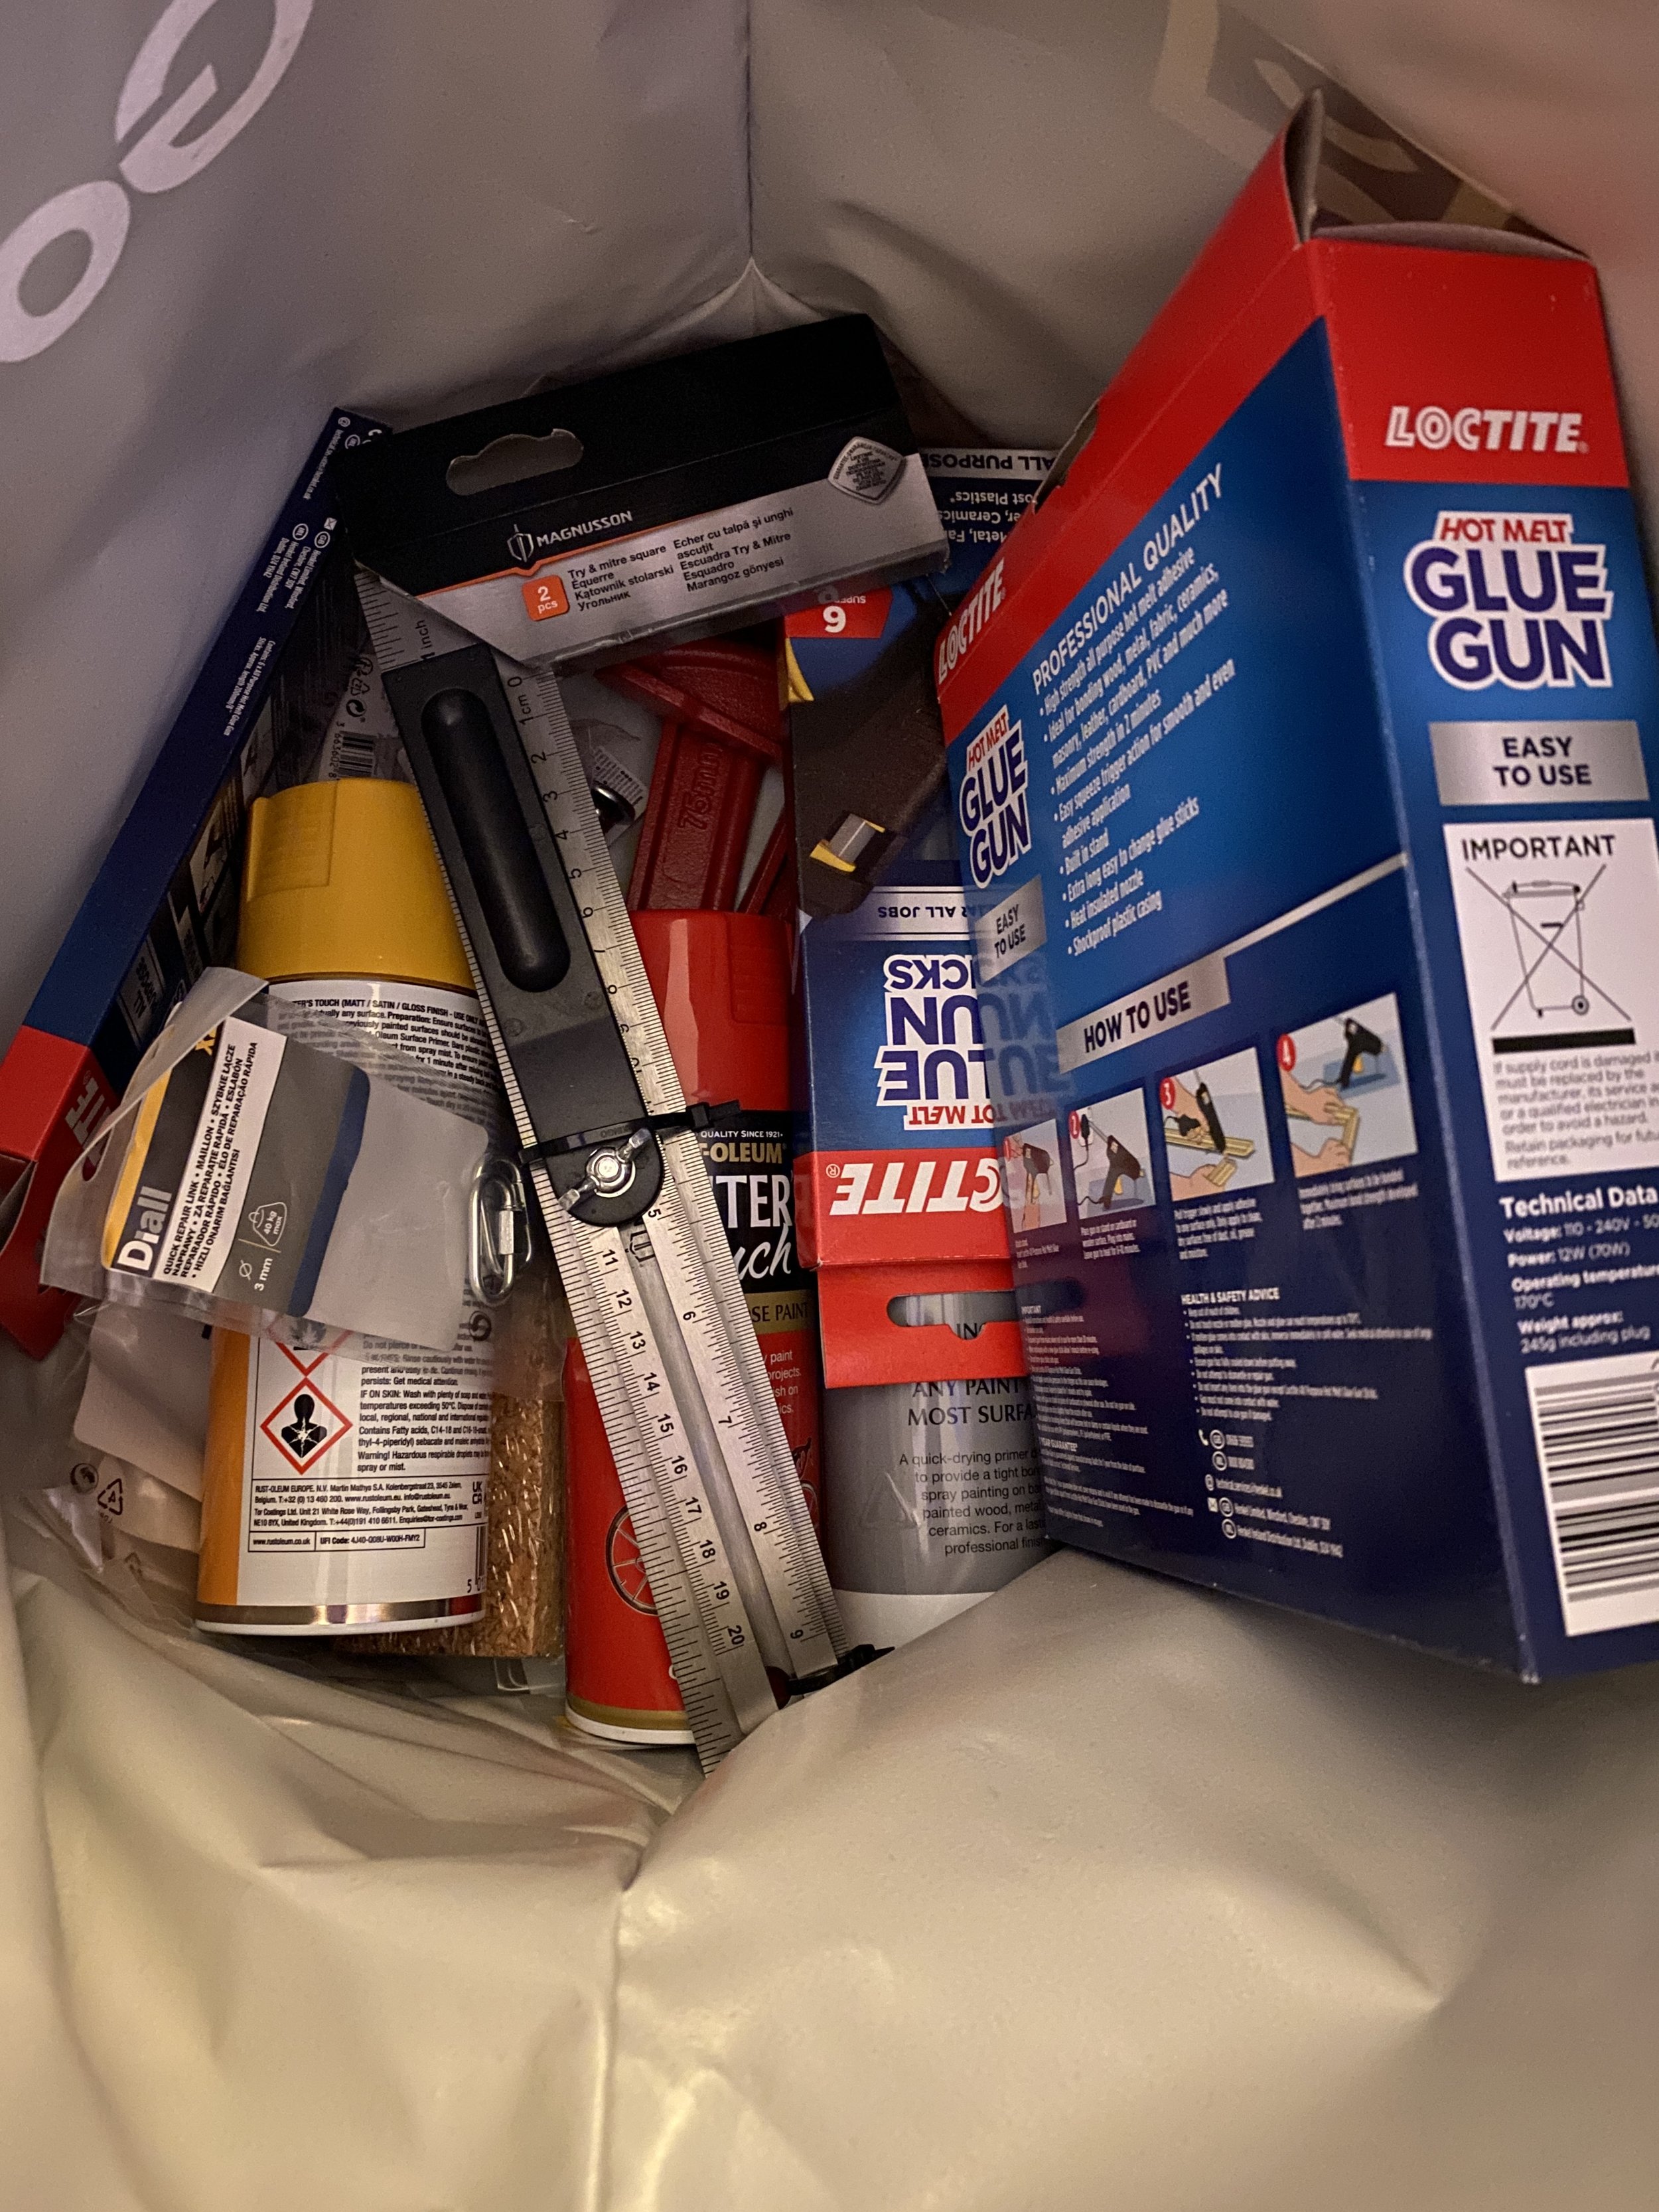
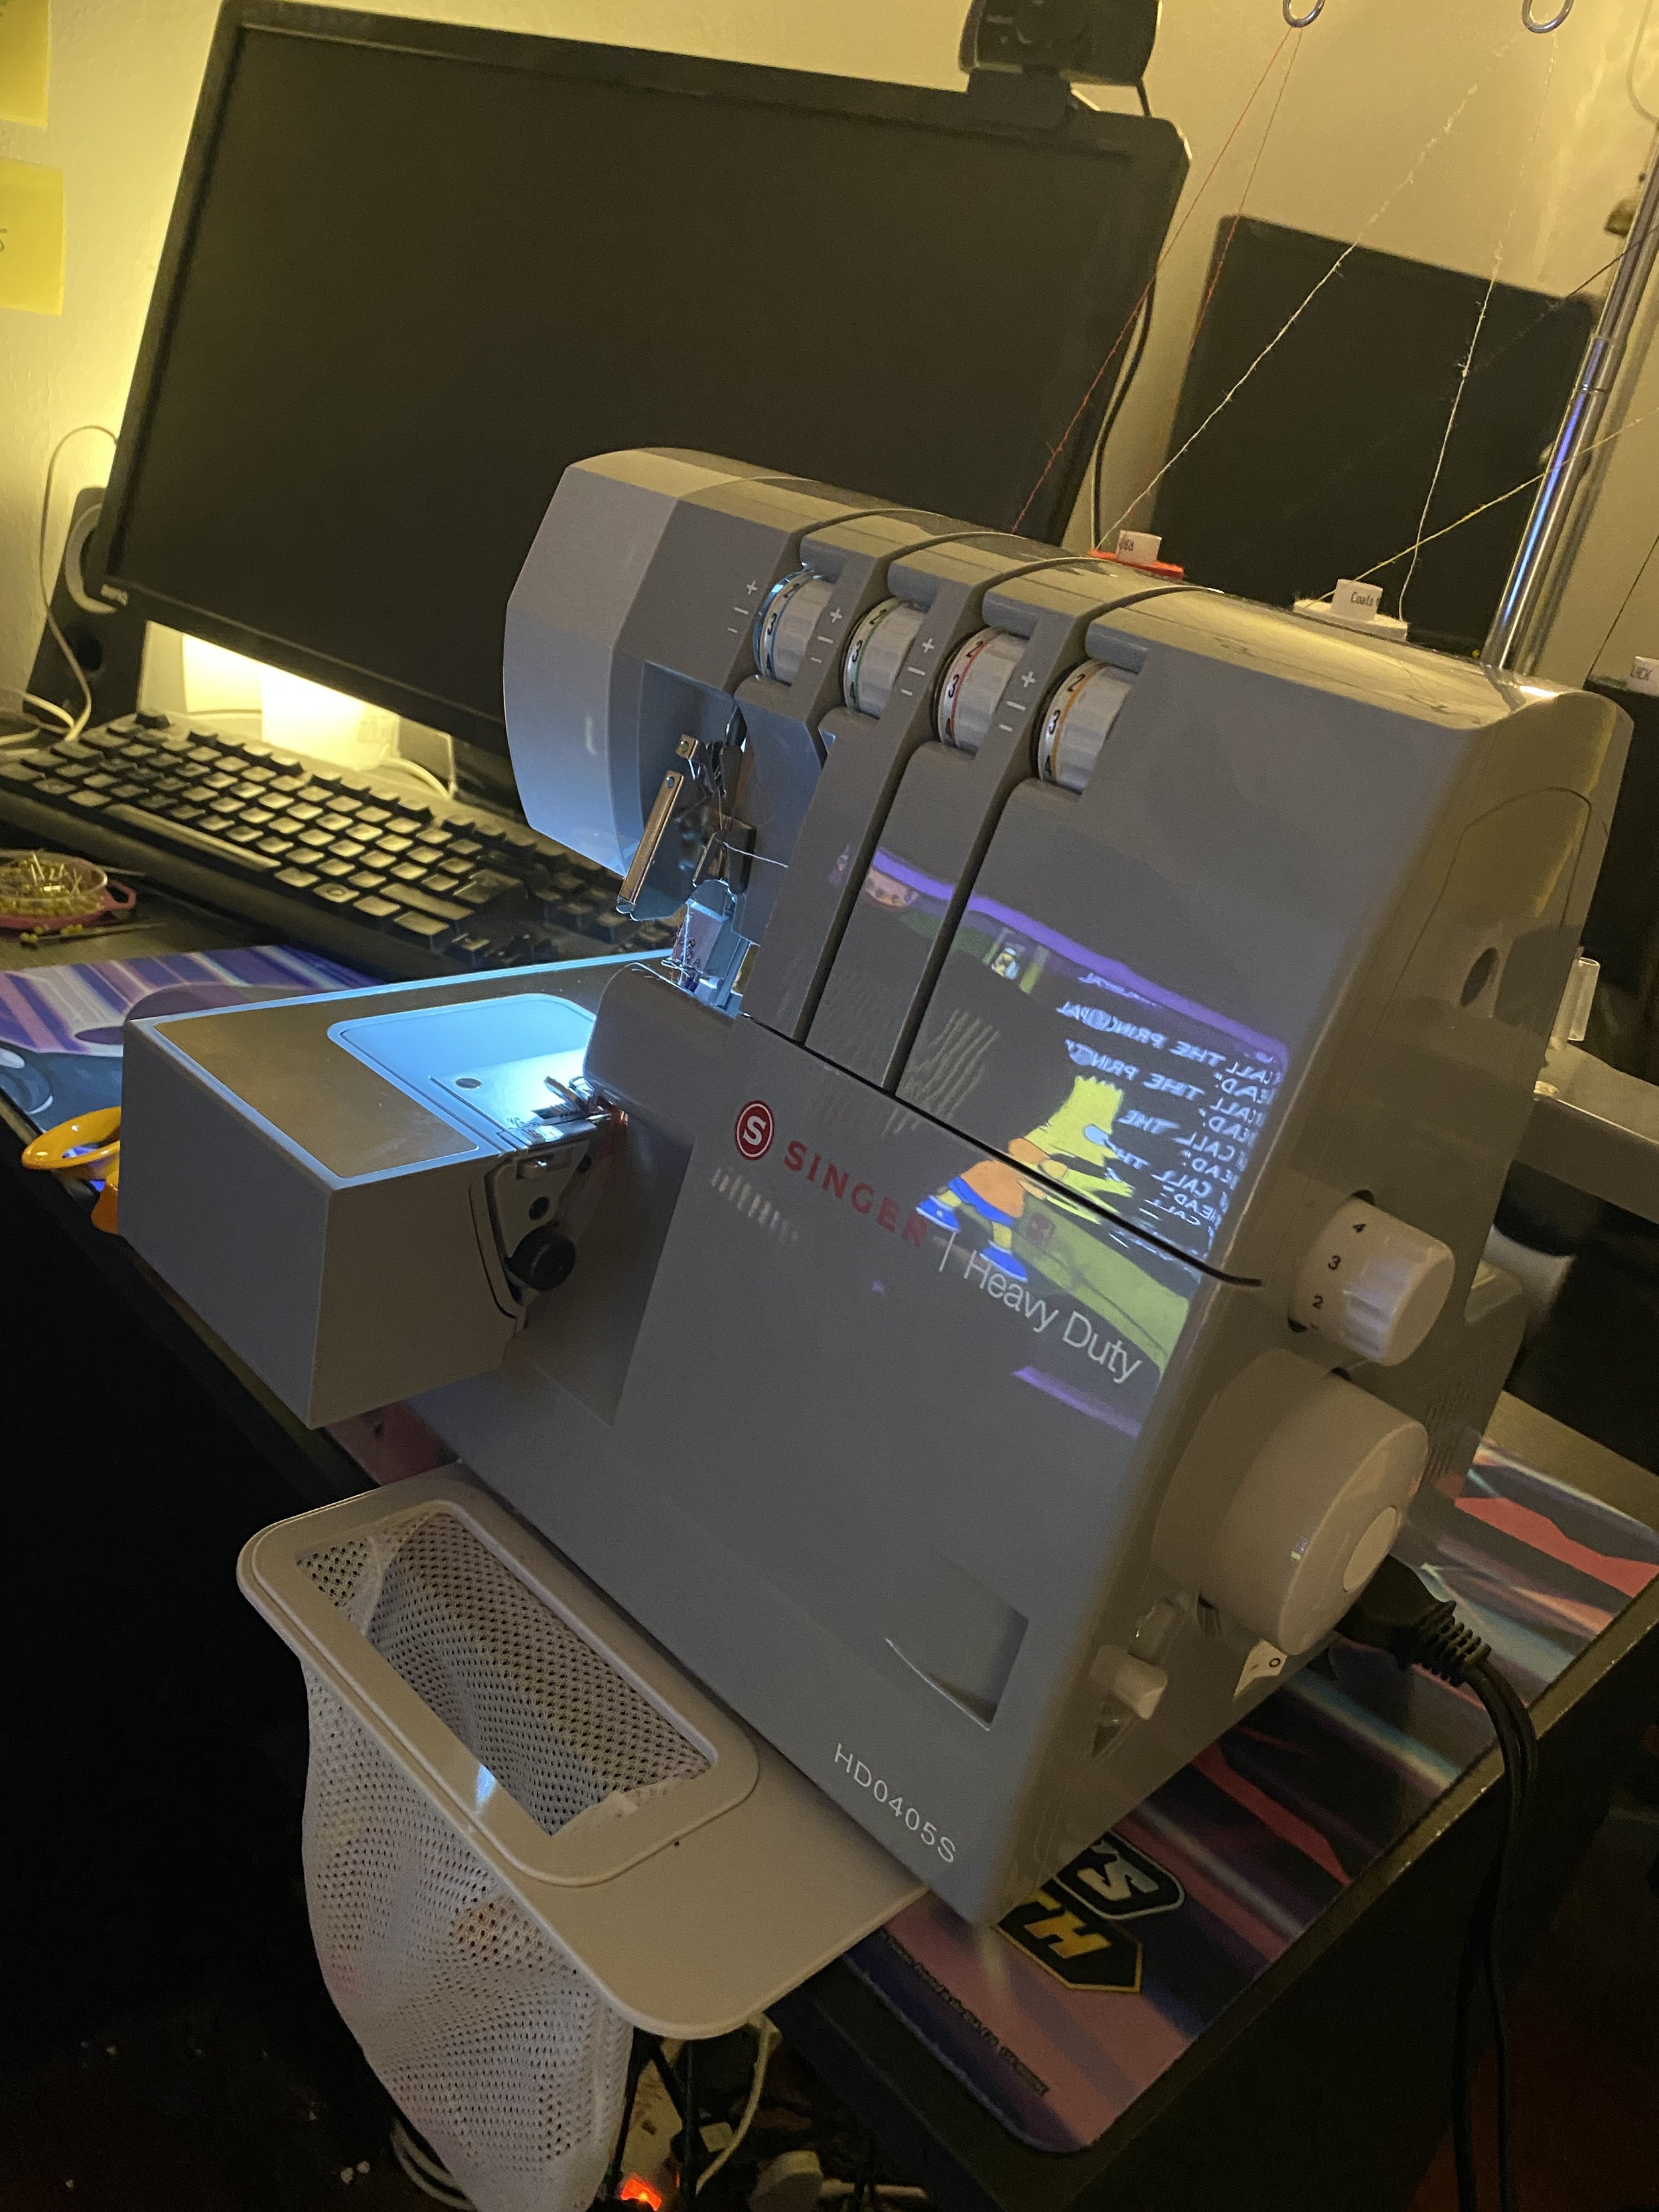
One cost I didn’t include in the budget was the new overlocker sewing machine I bought. It’s been on my wish list for ages and this seemed like the best time to dive in. More of an investment than a one-off project cost I thought. Also I had to buy a few new tools during the project, like an angled set-square, G-Clamps and a new glue gun, which I did include into the budget. I’ll keep them to use for other things. Investment!
Also worth bearing in mind I’m only referencing ‘material’ costs. I’ve not included costs for my own time spent on the project. I wish now I had logged the amount of hours I poured into it for an accurate calculation, but I’d estimate that could easily double/triple the budget.
The Costume
Divide and conquer! Time to look at the costume and prop pieces.
It’s important to not get overwhelmed at the sheer amount of work that lies ahead. I like to break things down on Post-It notes or lists and focus on one thing at a time.
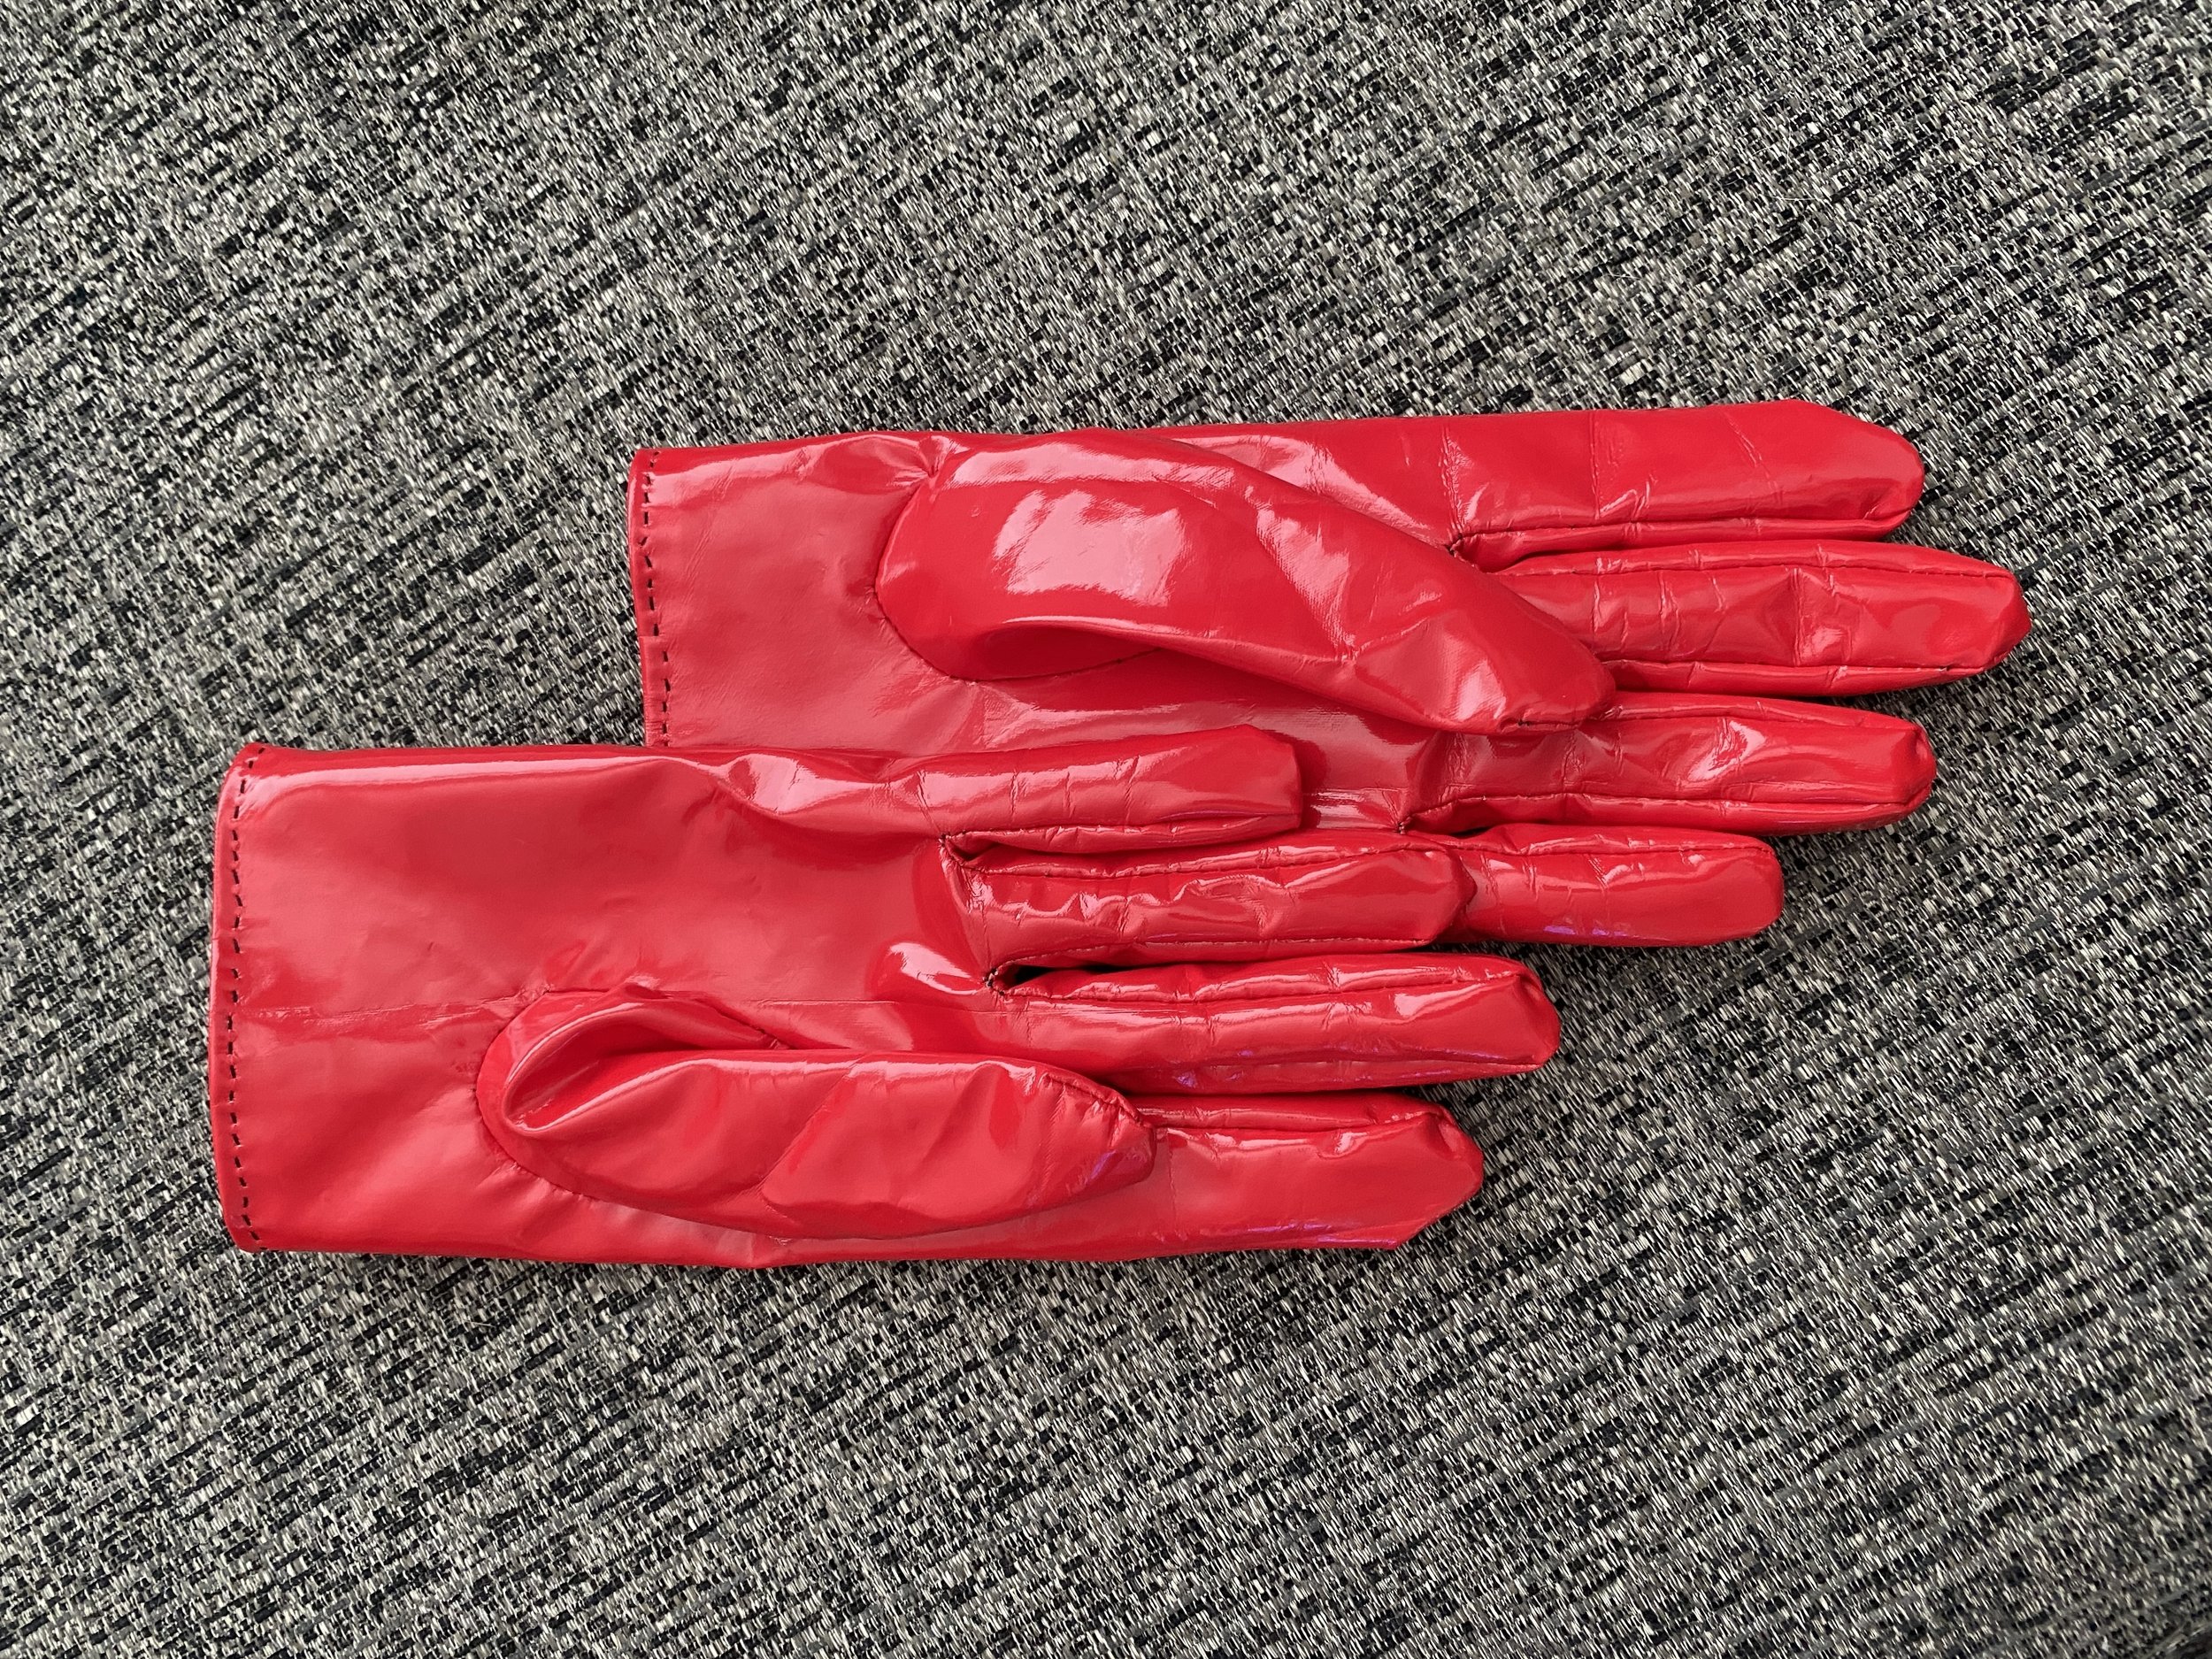
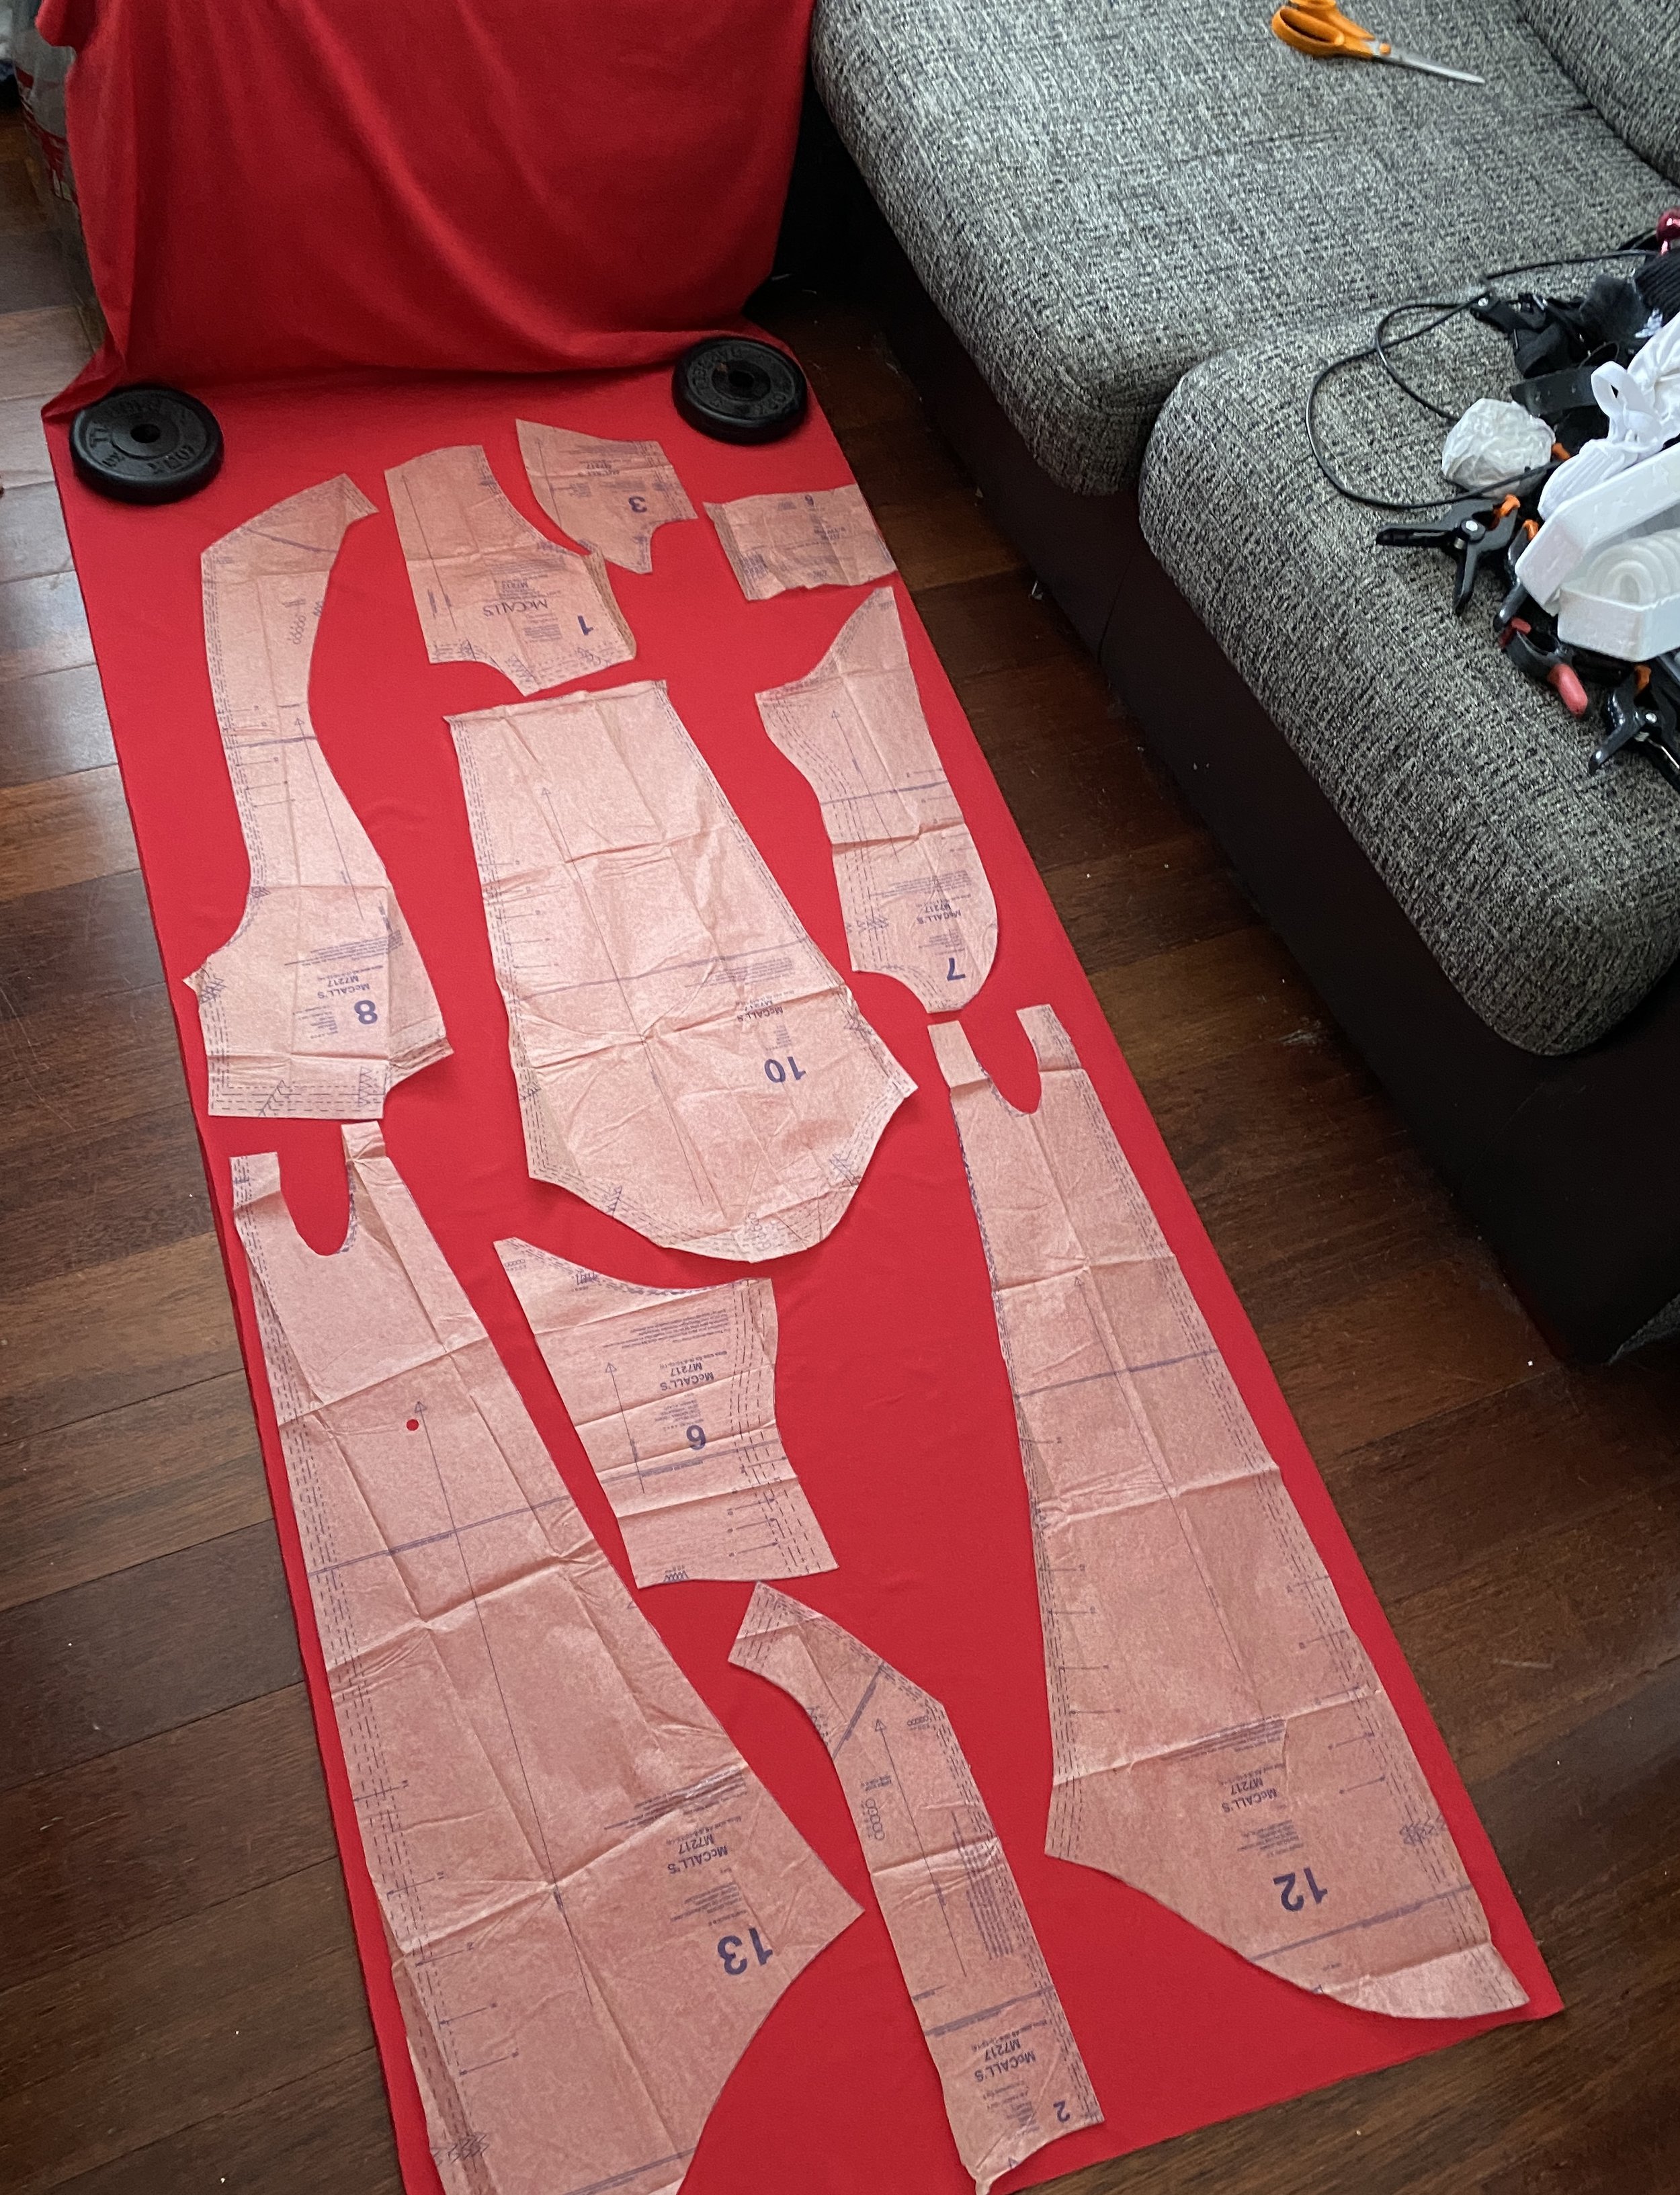
I found a free pattern online to make some large gloves and thankfully had some spare red PVC from an old project lying around. I prefer not to print things if I don’t need to so I scaled the pattern correctly with a ruler up against my monitor and ‘traced’ it onto an A4 sheet of paper. Feels so ‘untechnical’ but if the sizing is right it works really well.
I hand-stitched these, taking up most of my Saturday and Sunday weekend off! They fit nicely and crease quite easily but I like the effect of it.
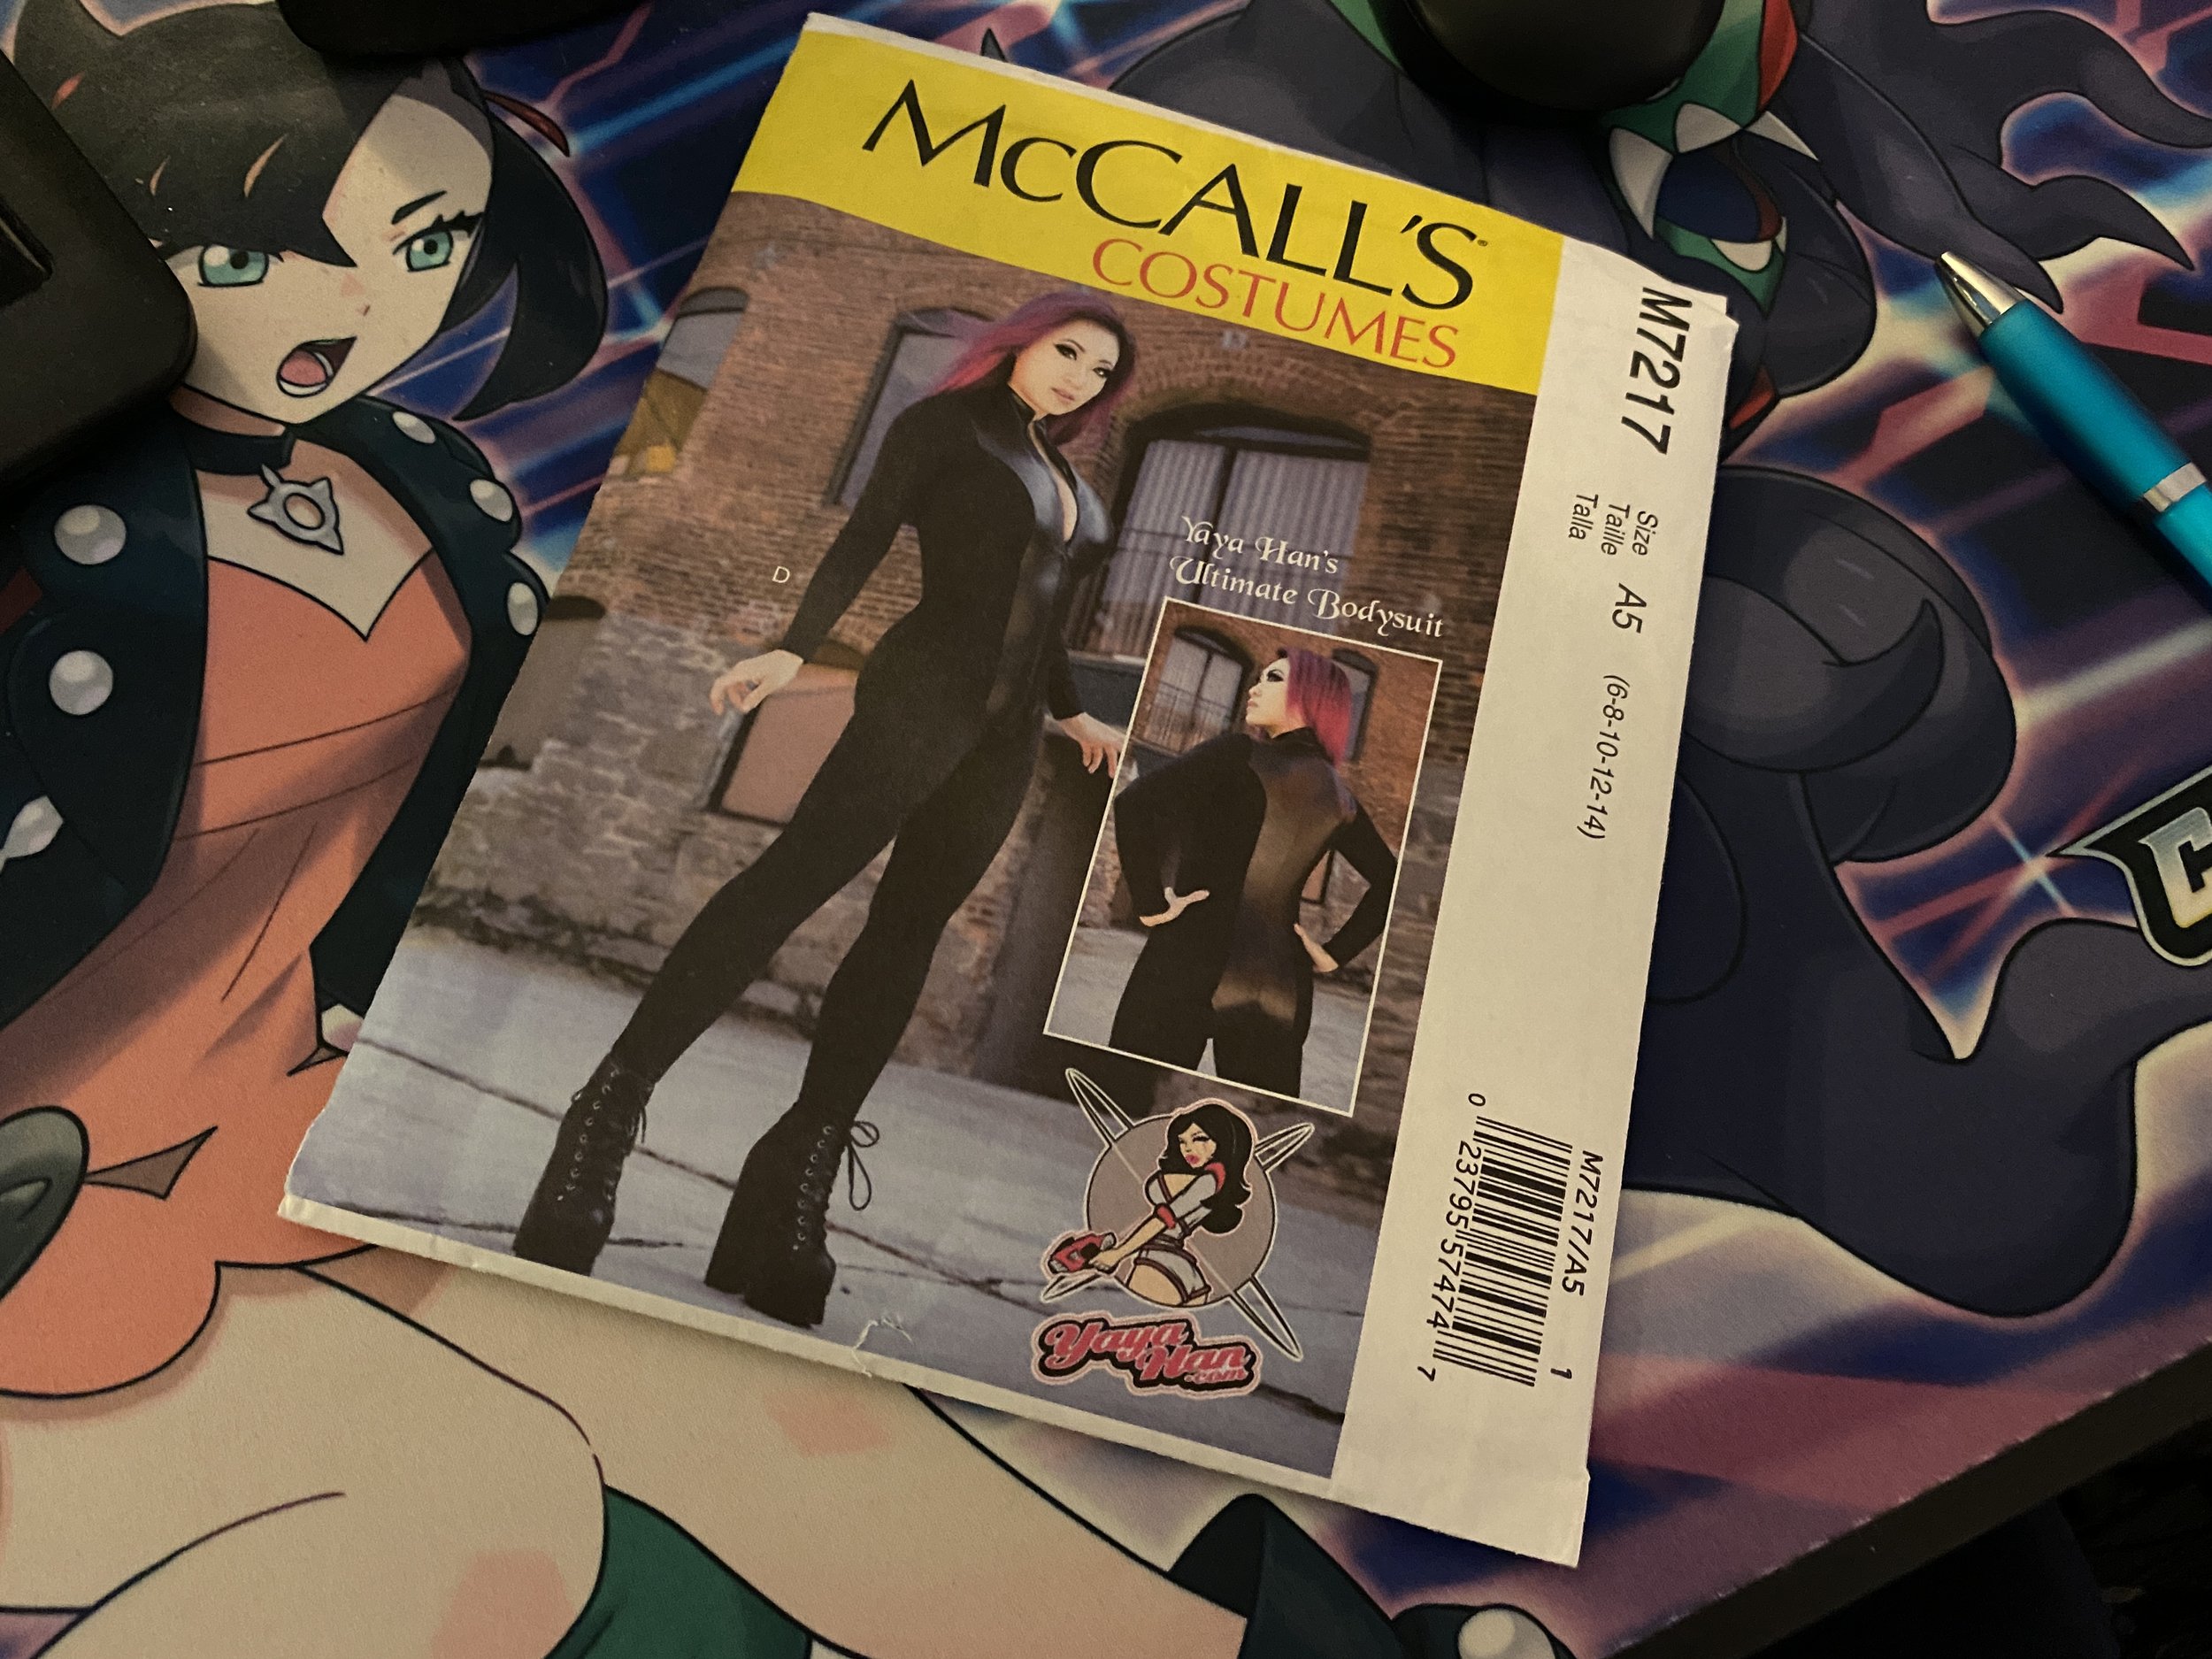
For the body suit, I found a cosplay pattern in a catalogue at Mandors fabric store. They didn’t have it in stock so ordered via Amazon.

Test Body Suit with quick zig zag stitching - Size 14
I knew I wanted to customise it, but wanted to make it fully ‘as is’ first to see if it would fit. This plays into my prototype philosophy for this project. Size 14 usually does me well if the costume has shoulder/arm elements so I went with that in the pattern cut outs.


Lucky I did that test piece first. It fitted nicely in some places and not in others. The whole torso felt way too ‘short’. The shoulders and crotch were competing with each other for space. Not comfortable! Also the spandex is very forgiving but not on the back once the solid zipper is installed. Had to factor that in too.


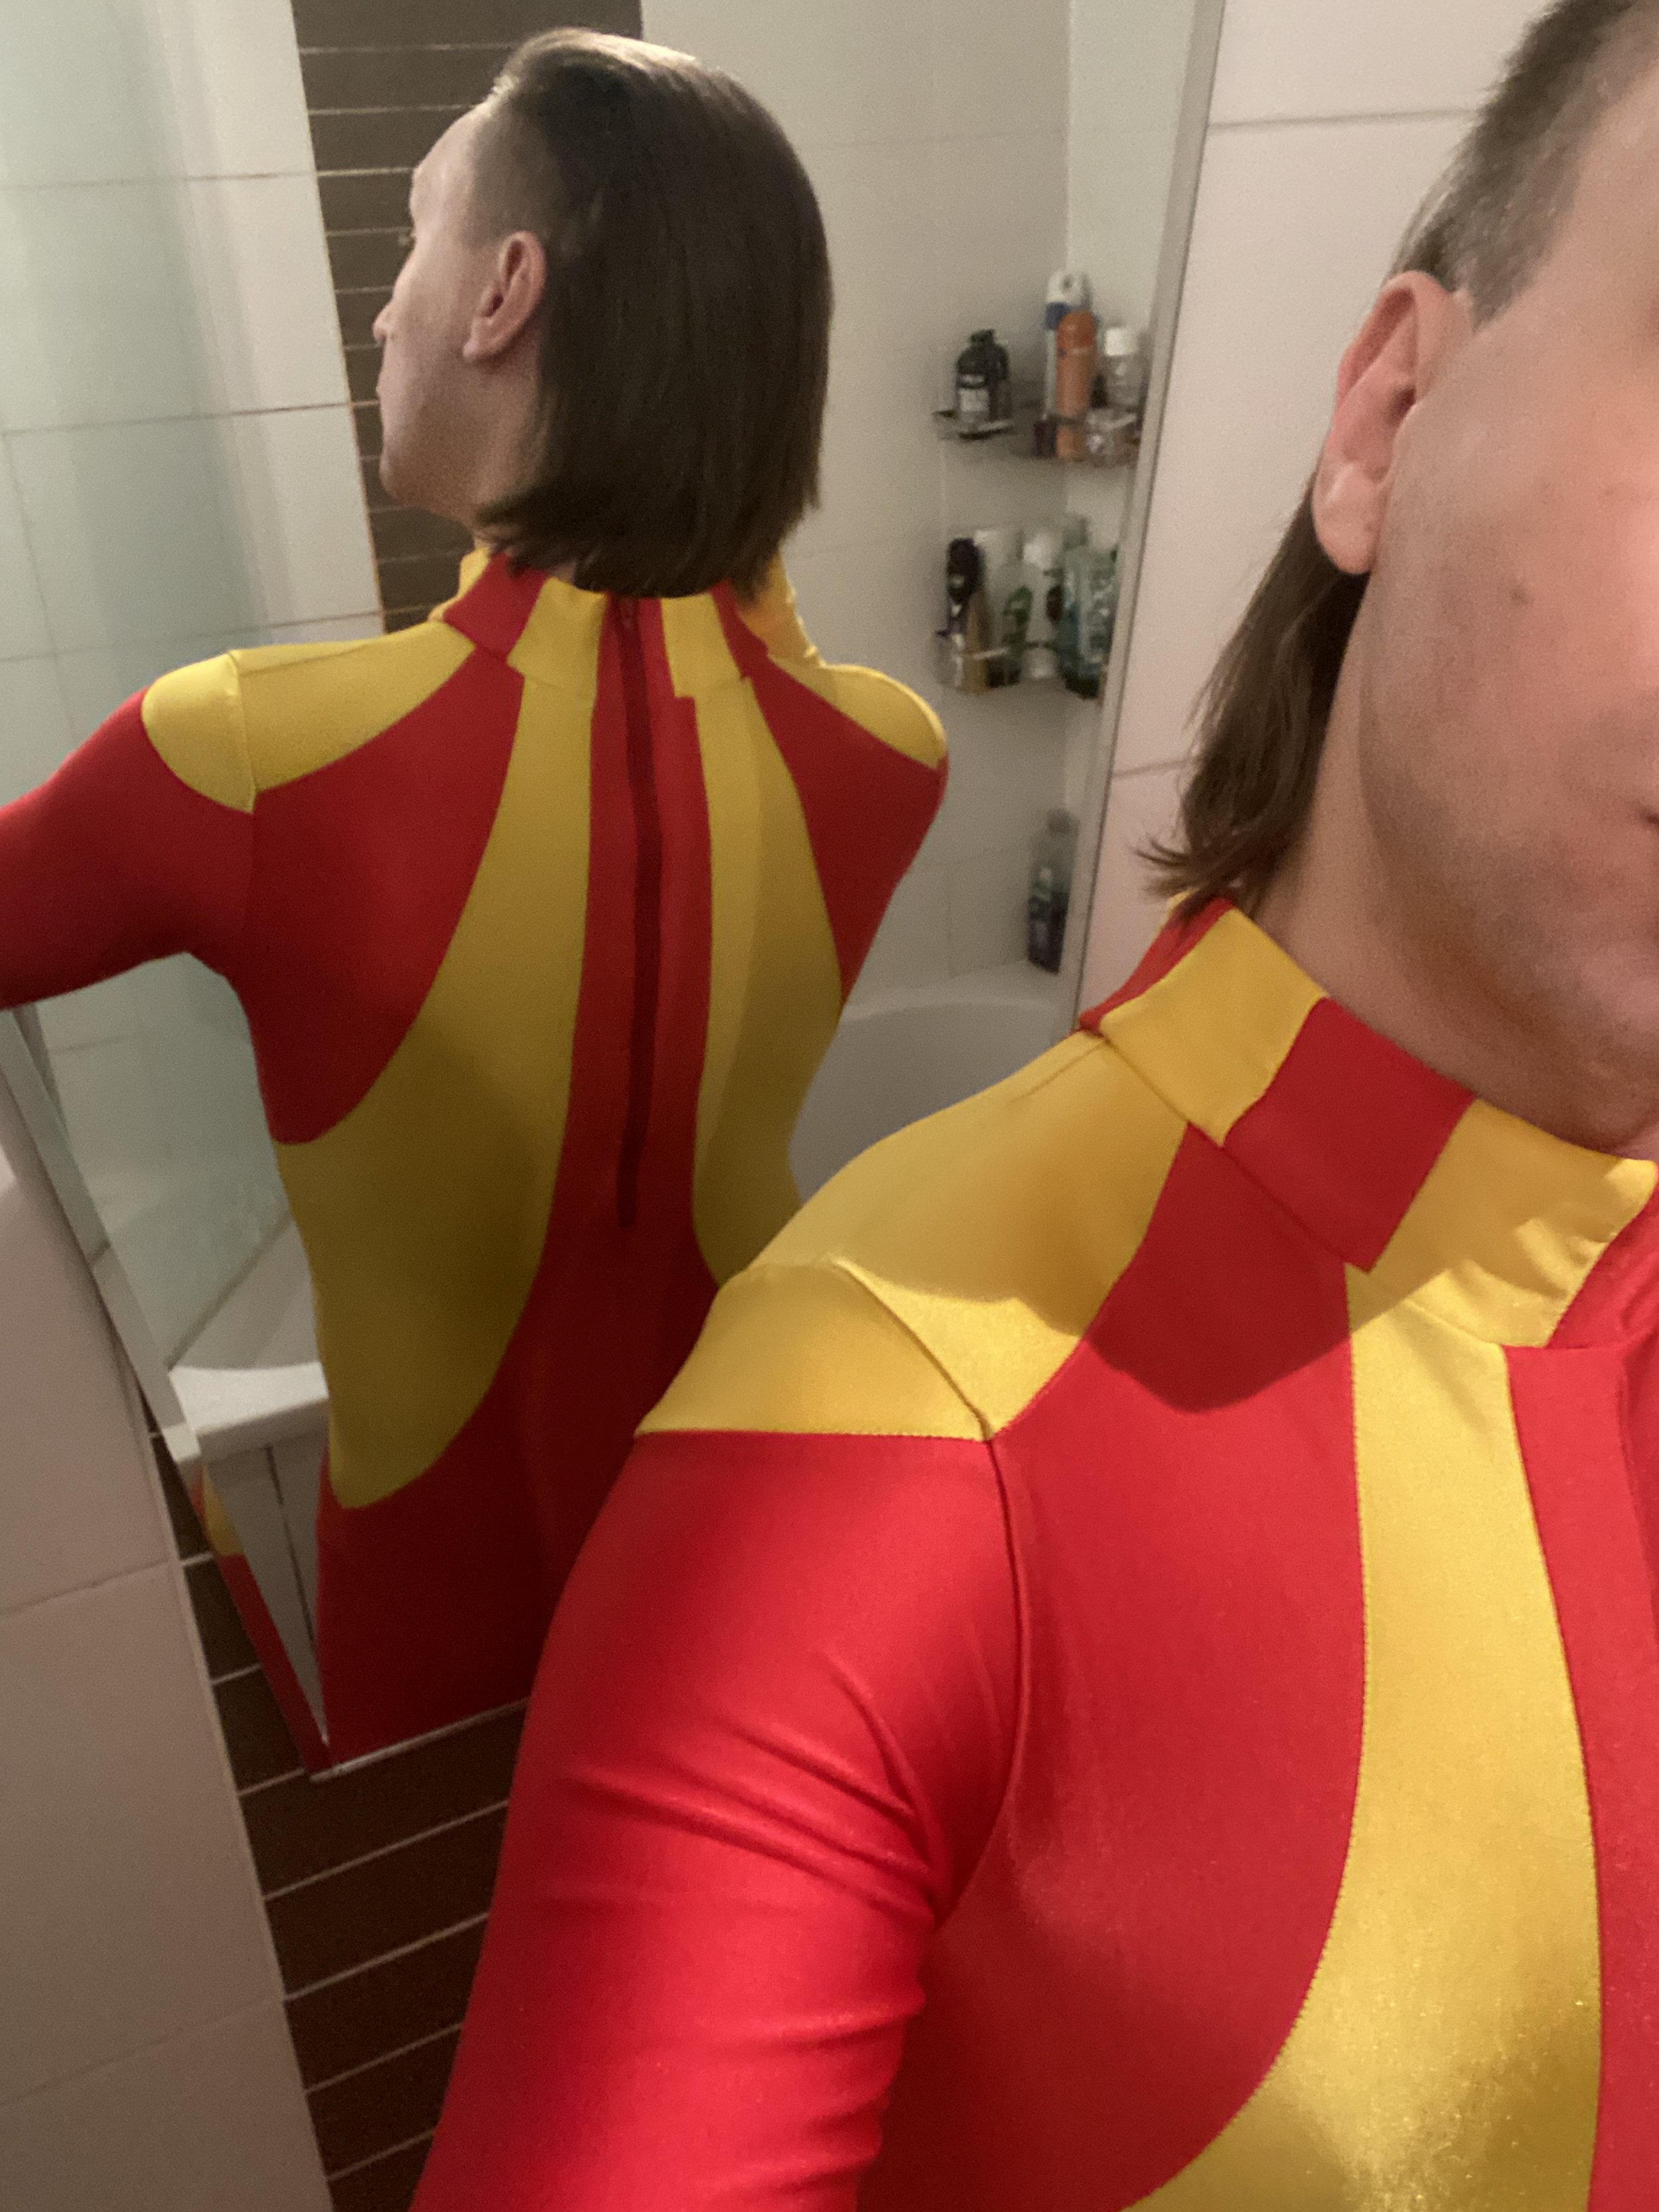
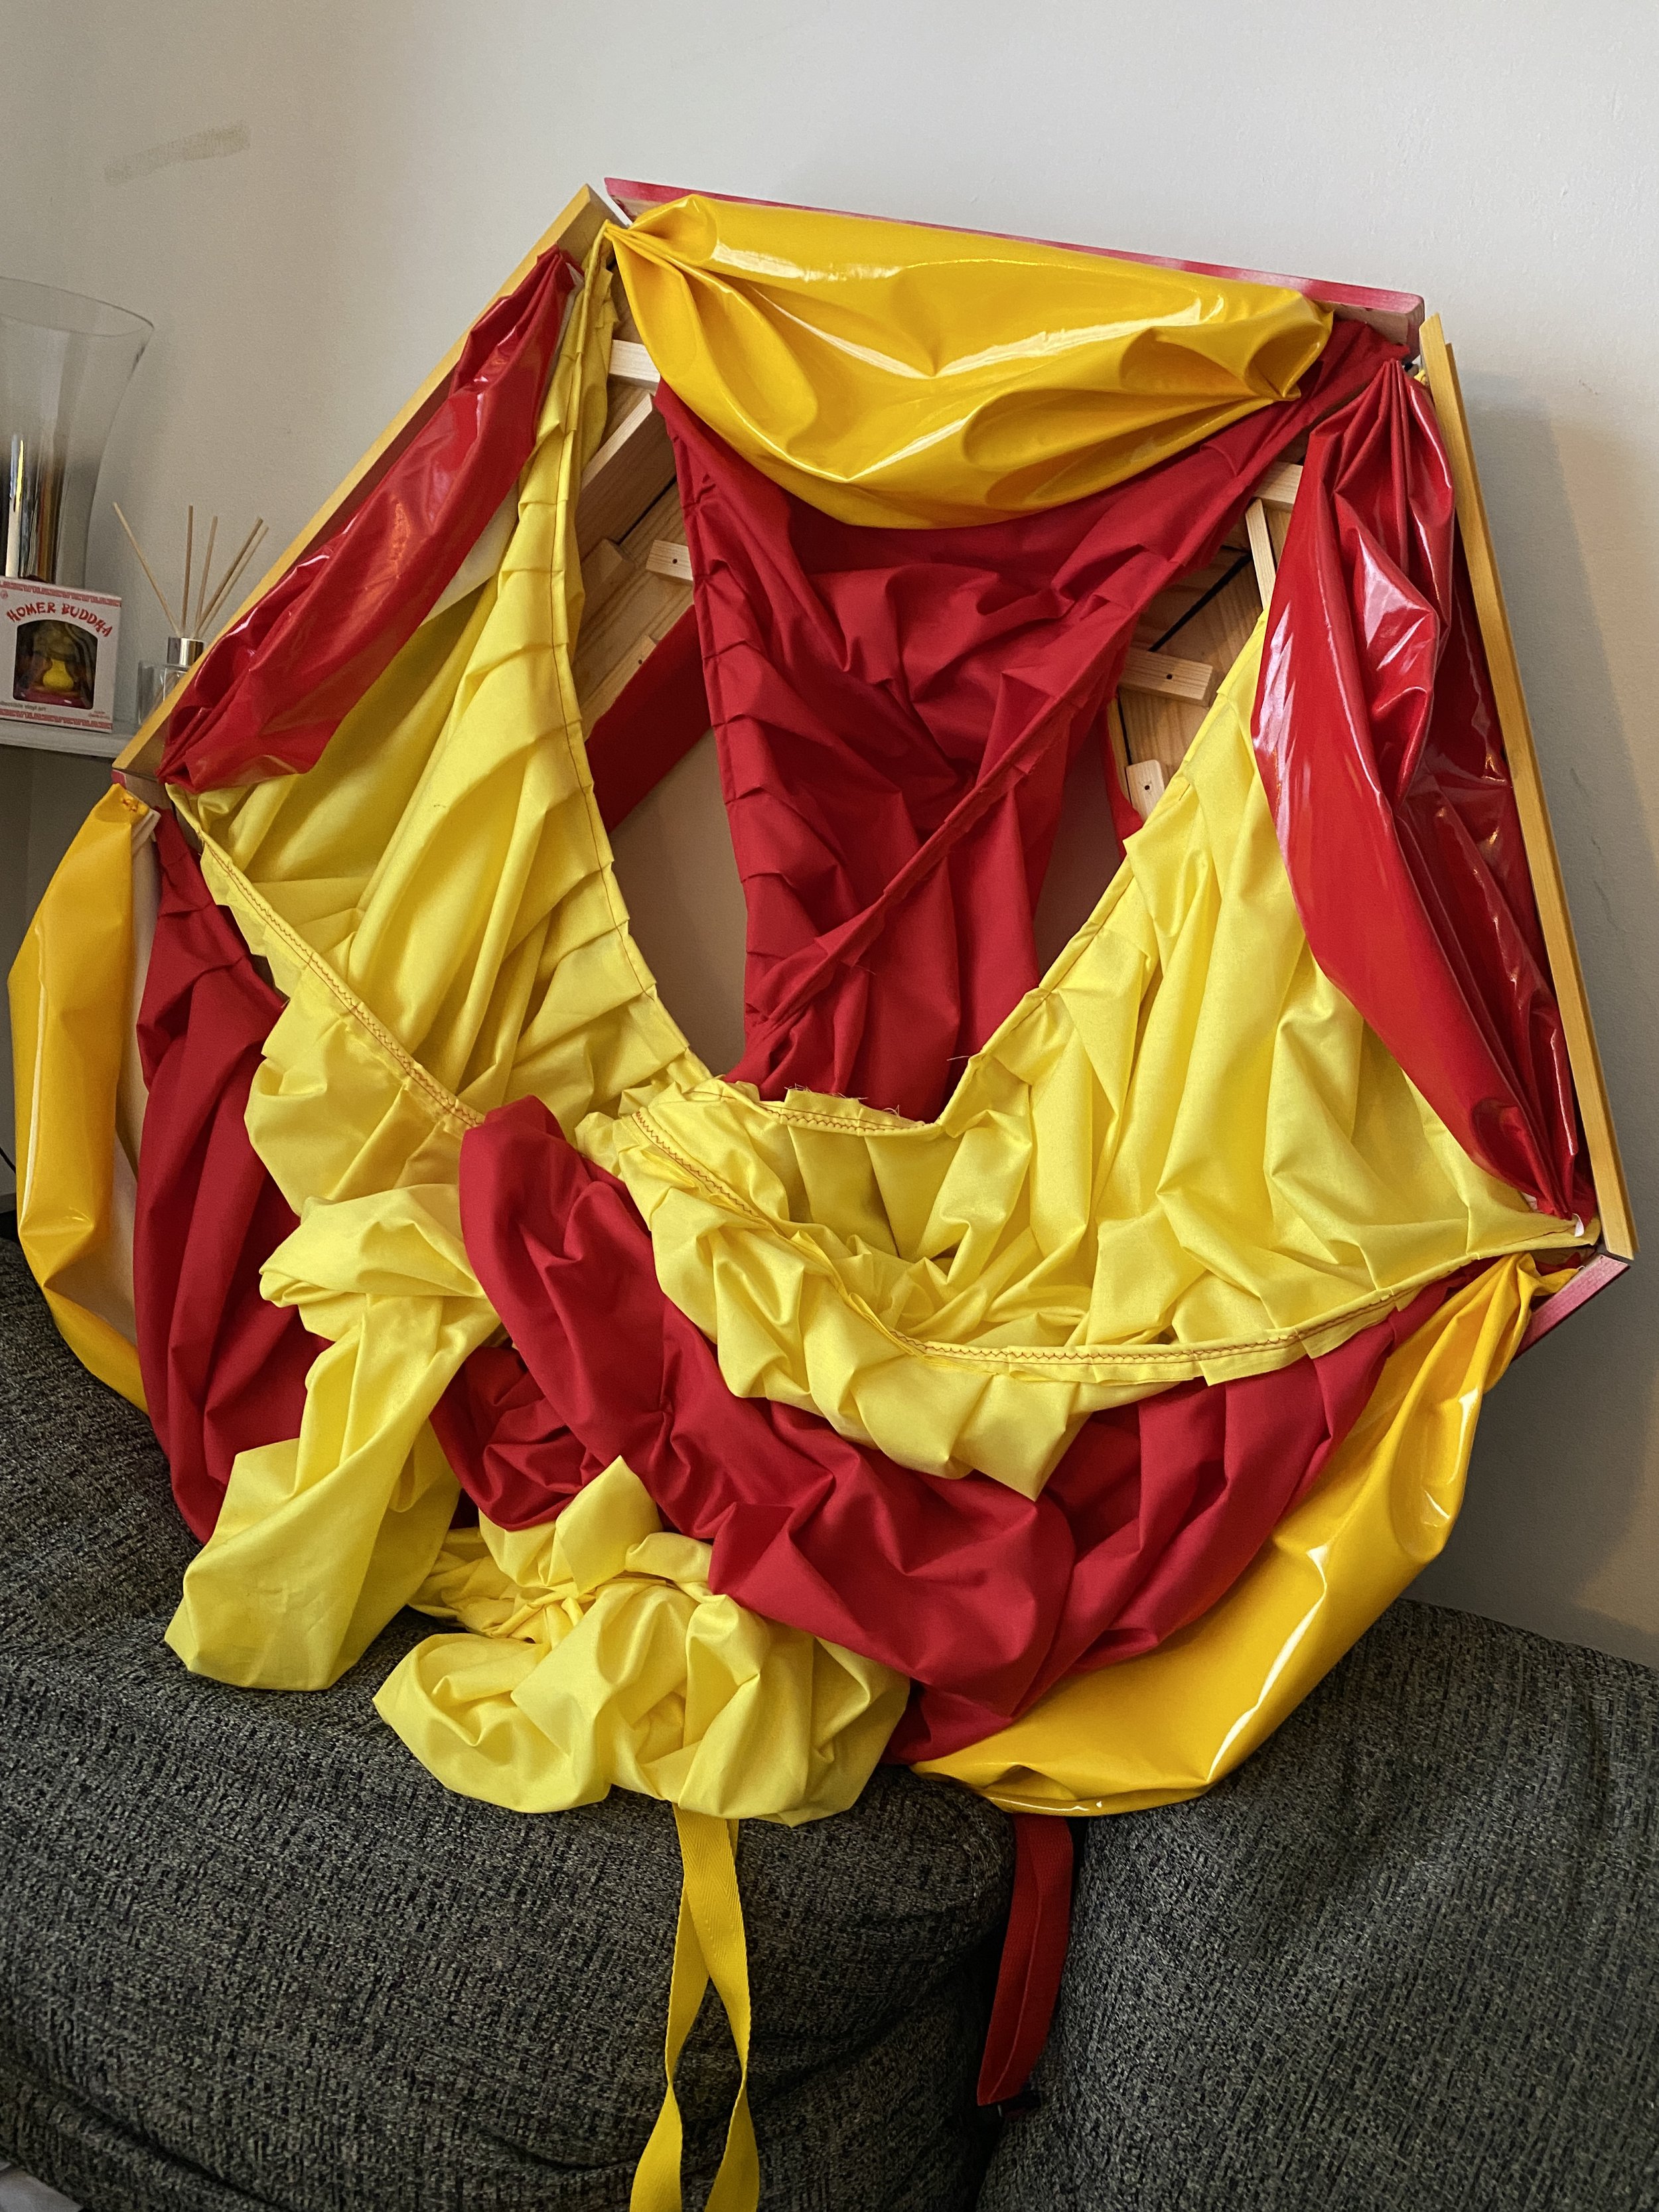
Going forward from the test piece I wanted to do a few things. Elongate the torso in general. Shorten the zipper length for more ‘stretch’ and ‘give’ over the back. Plus I wanted to make a custom pattern of red and yellow pieces to recreate a sort of carnival stall perspective form over the body.
I argued with myself because I know the bodysuit effectively sits beneath every other costume element. You won’t see it on its own but layering this red and yellow pattern as a foundation for the other pieces could give it some depth.

Always good to have a little helper
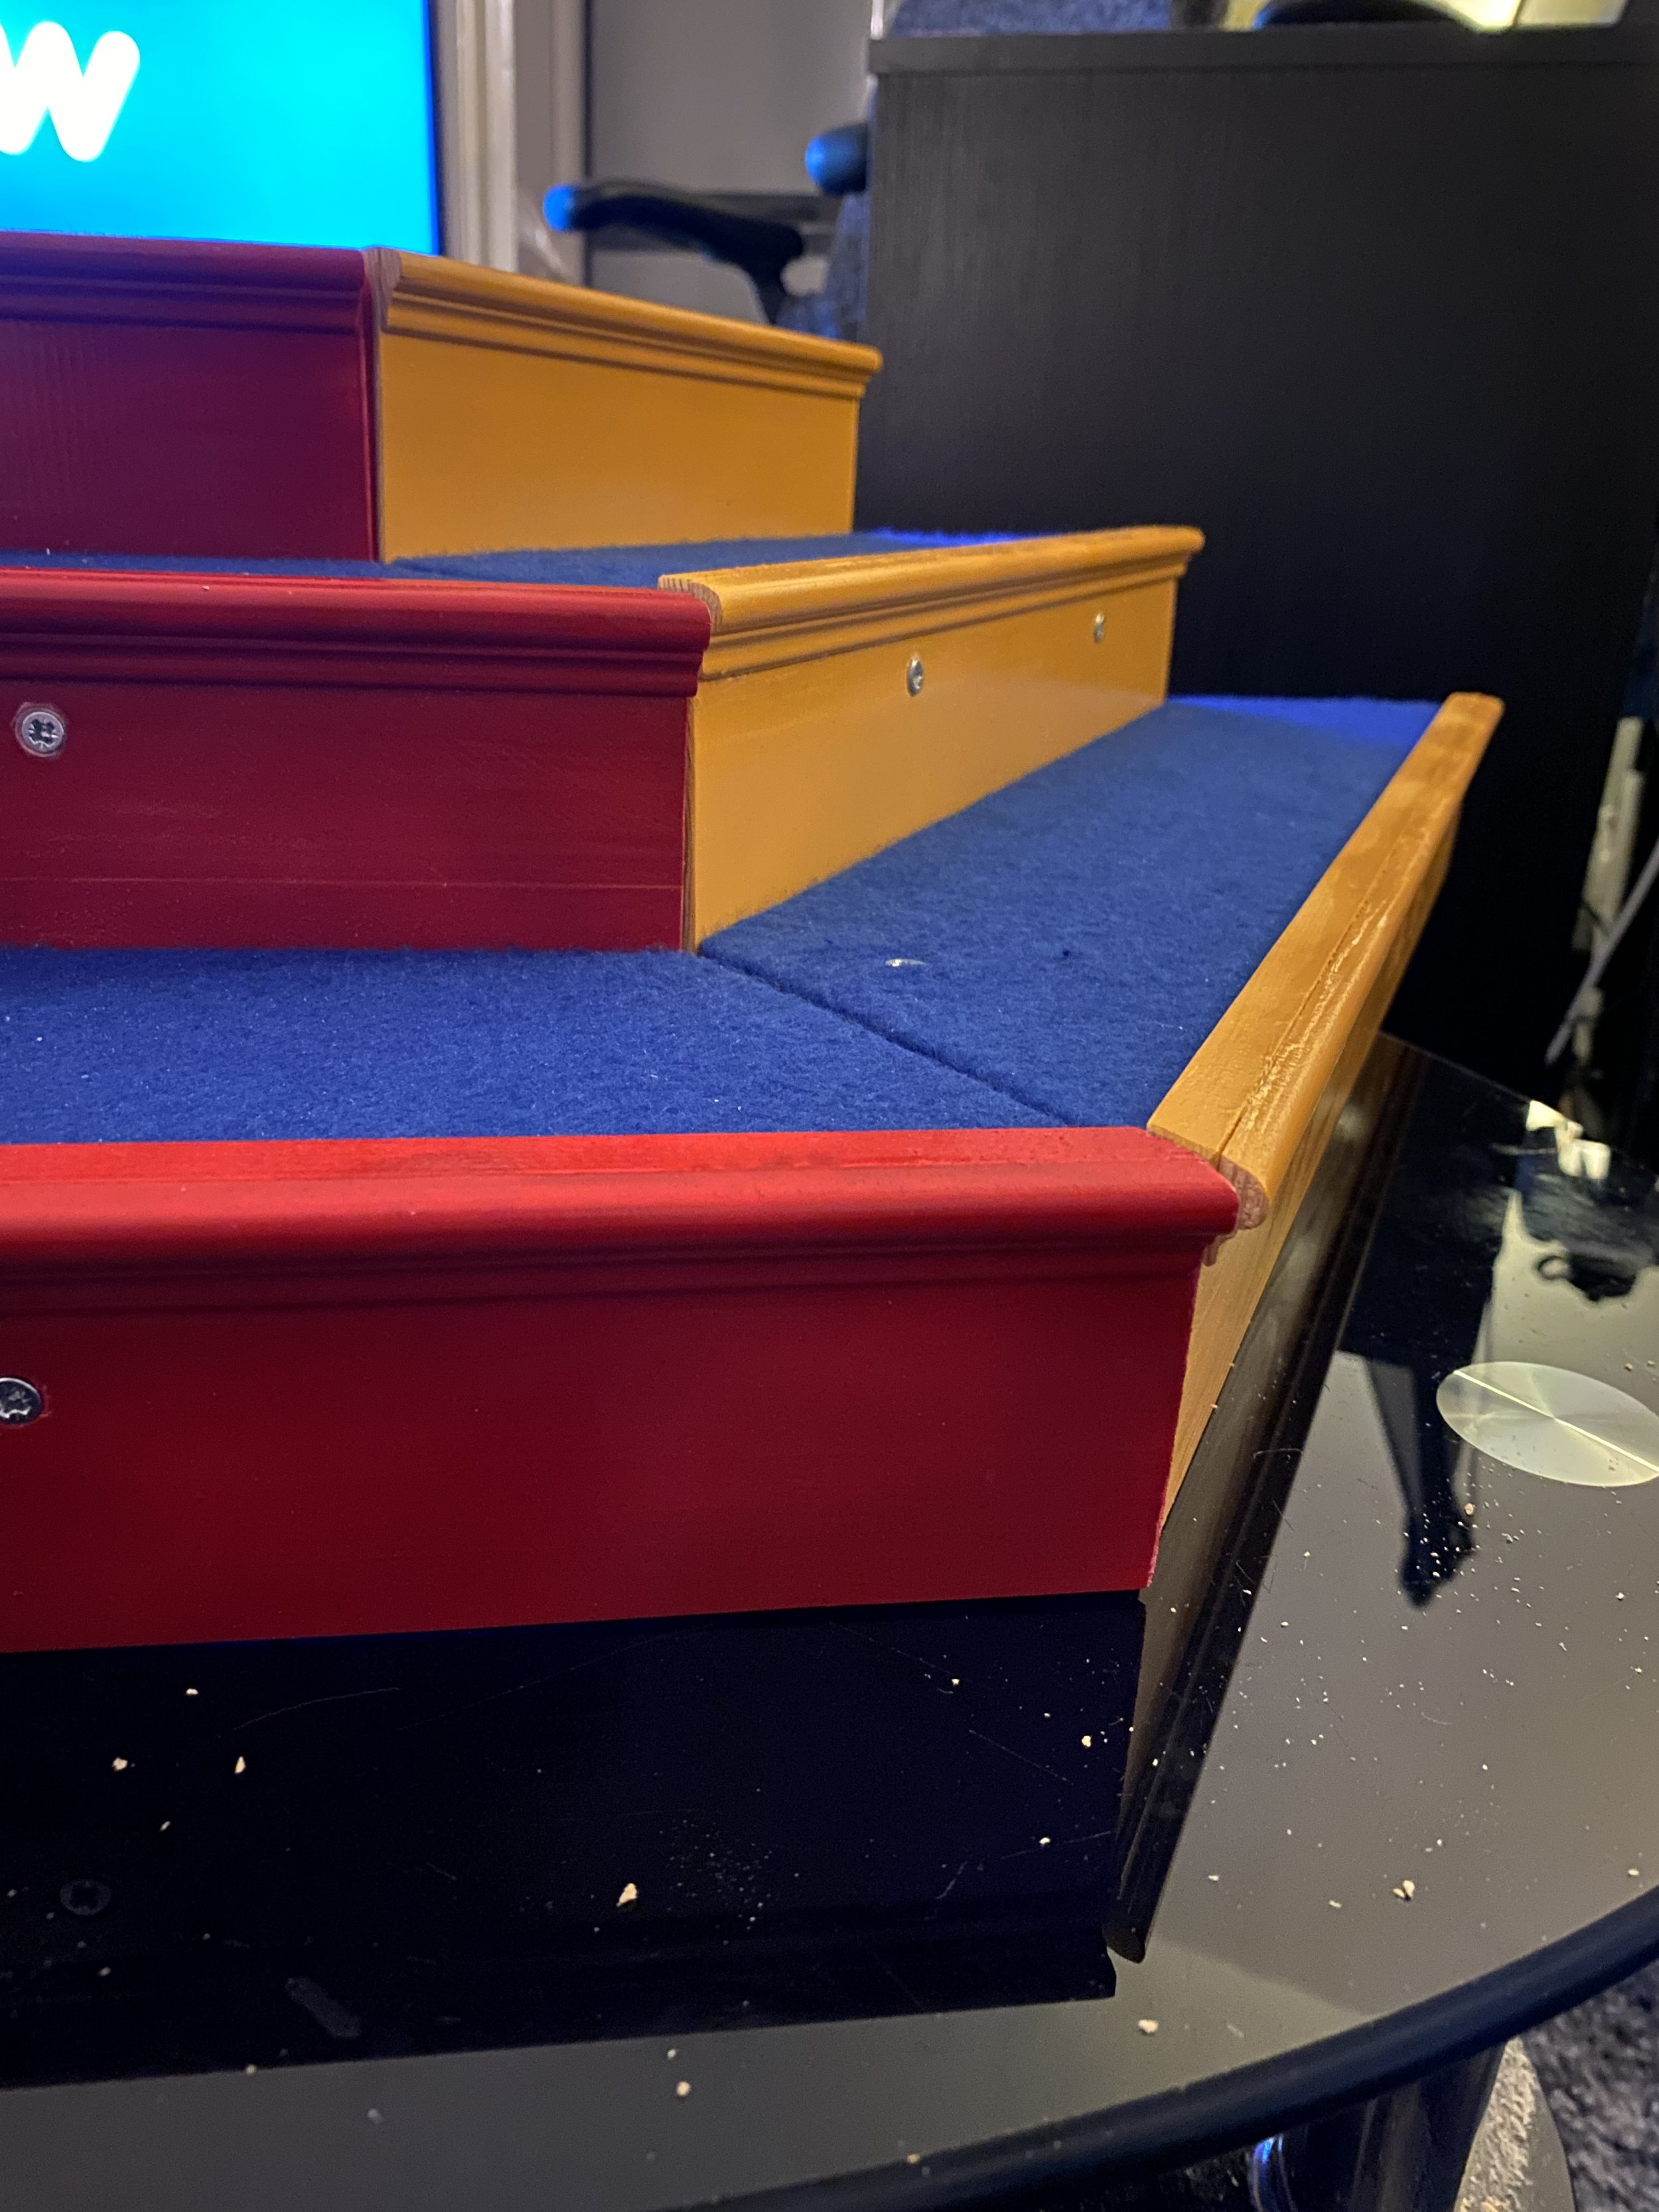
Now onto the turntable stall. I have never made anything like this before.
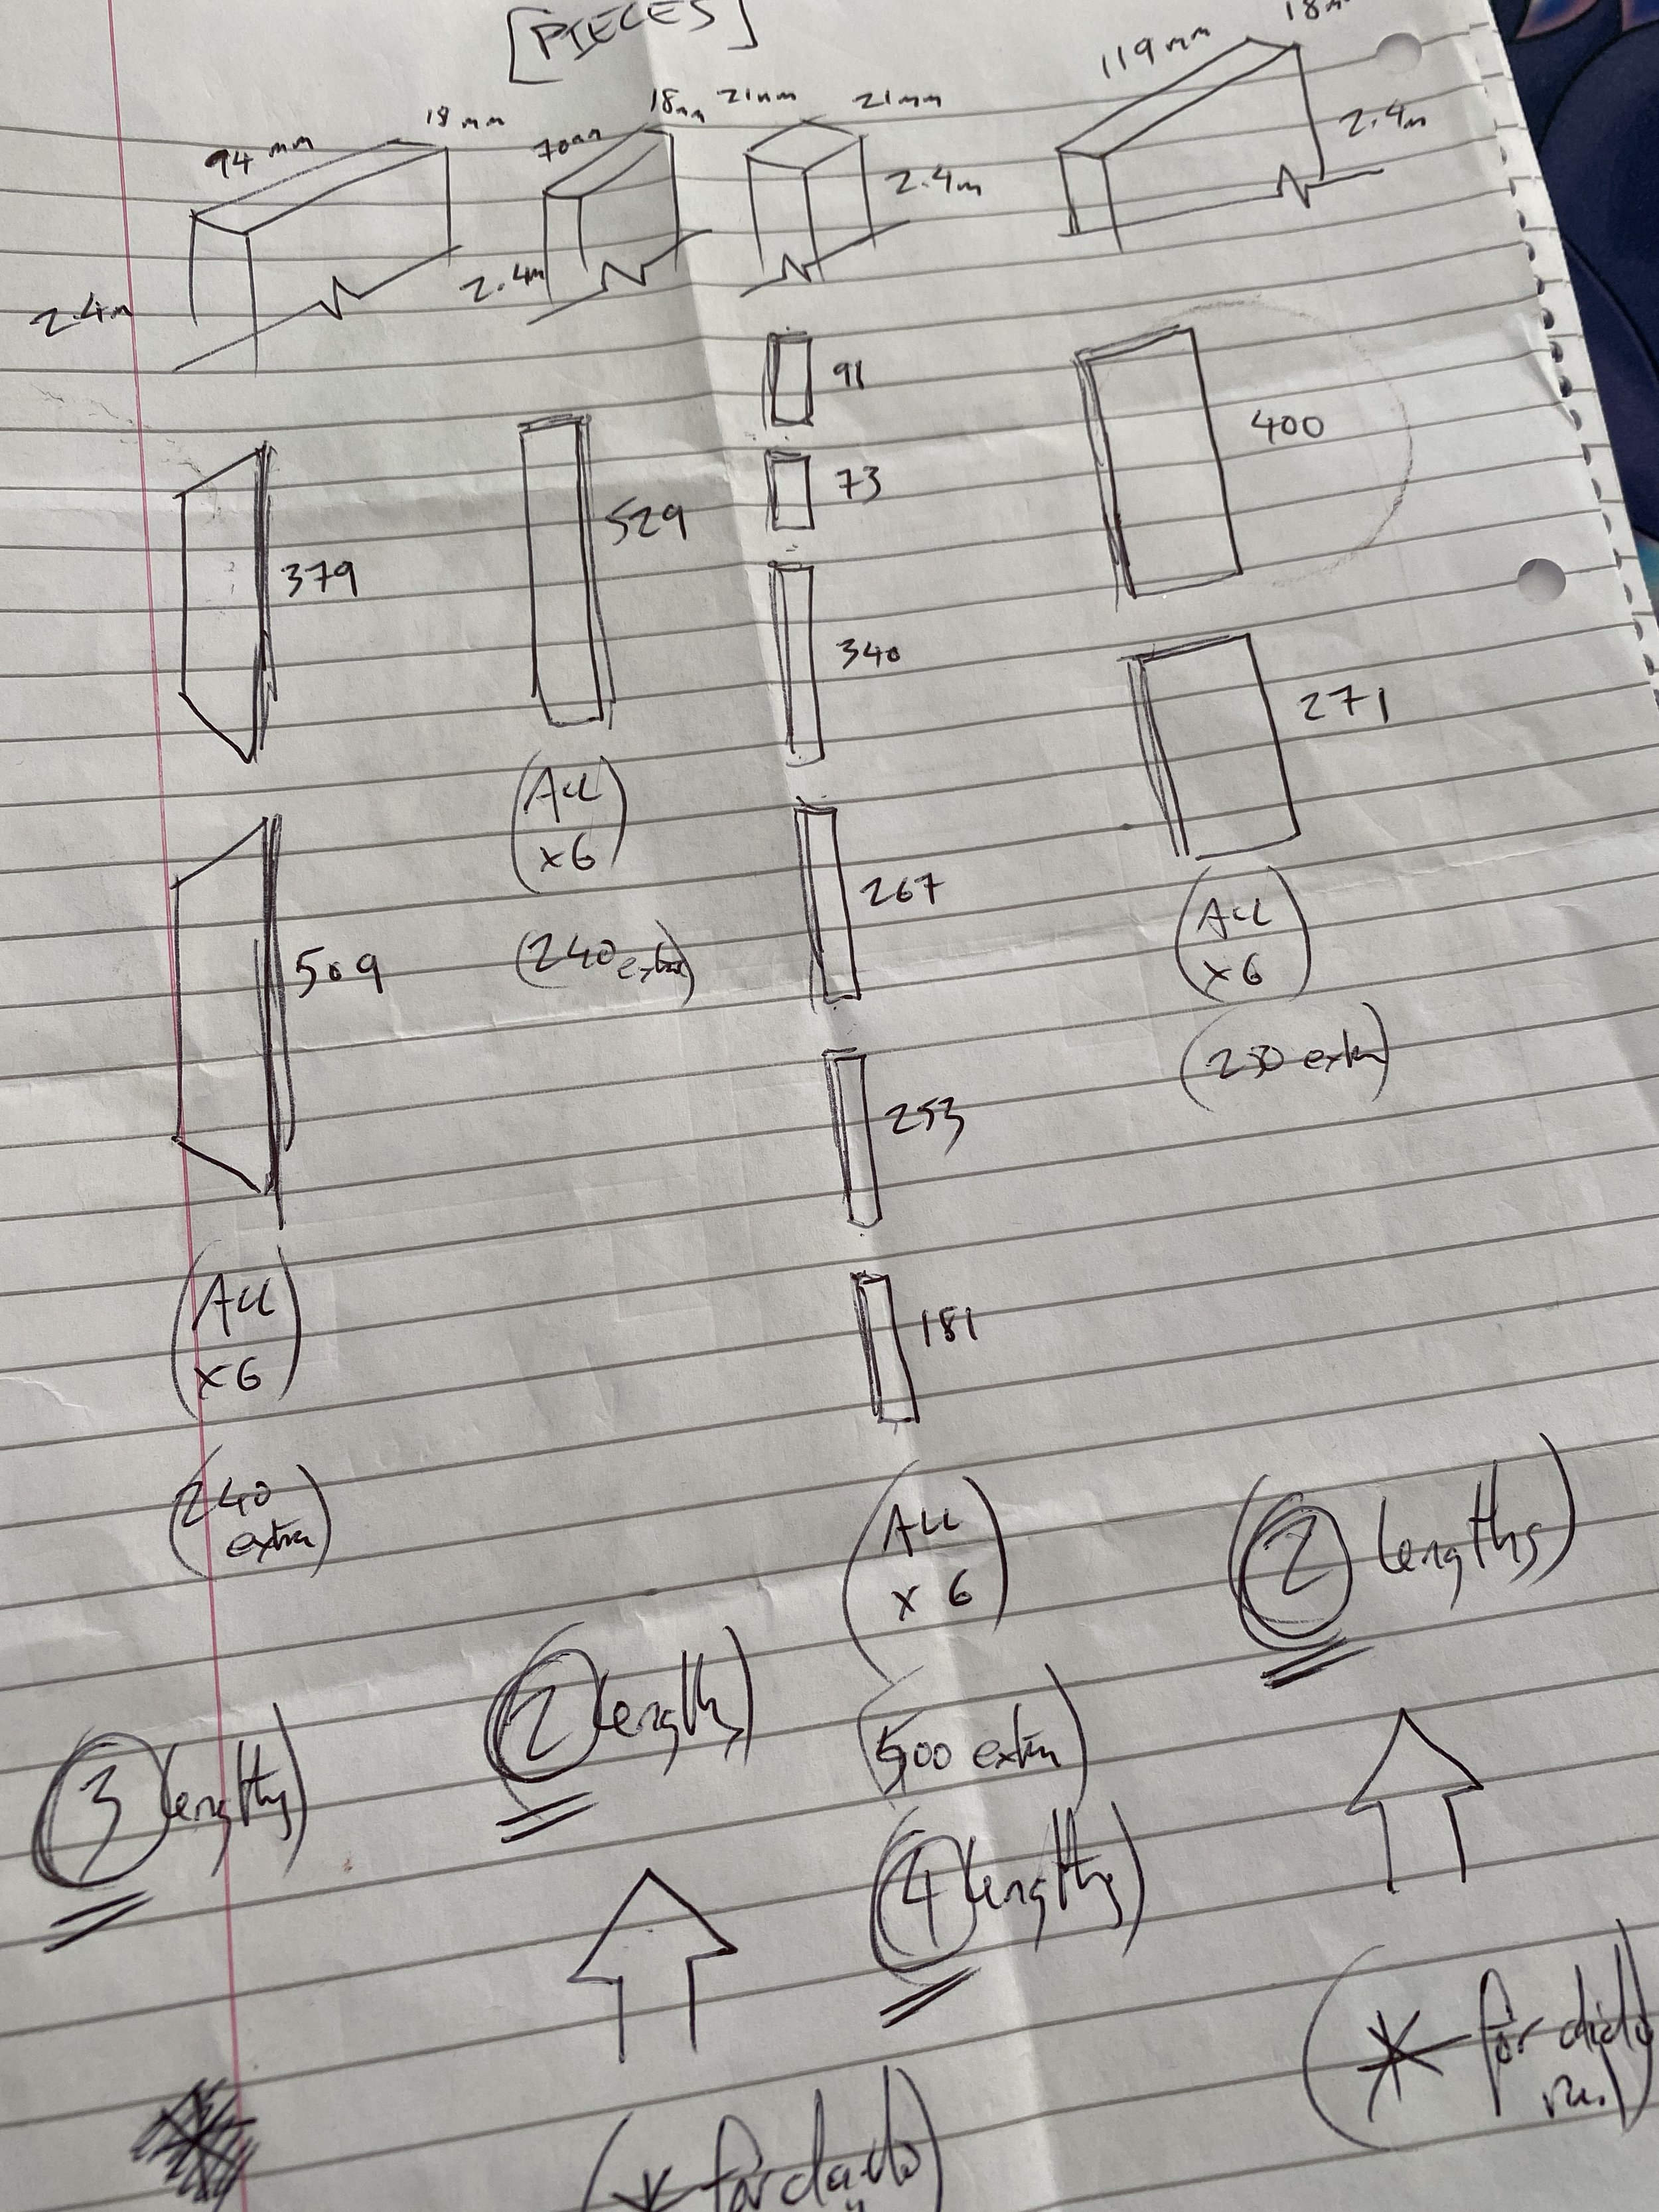
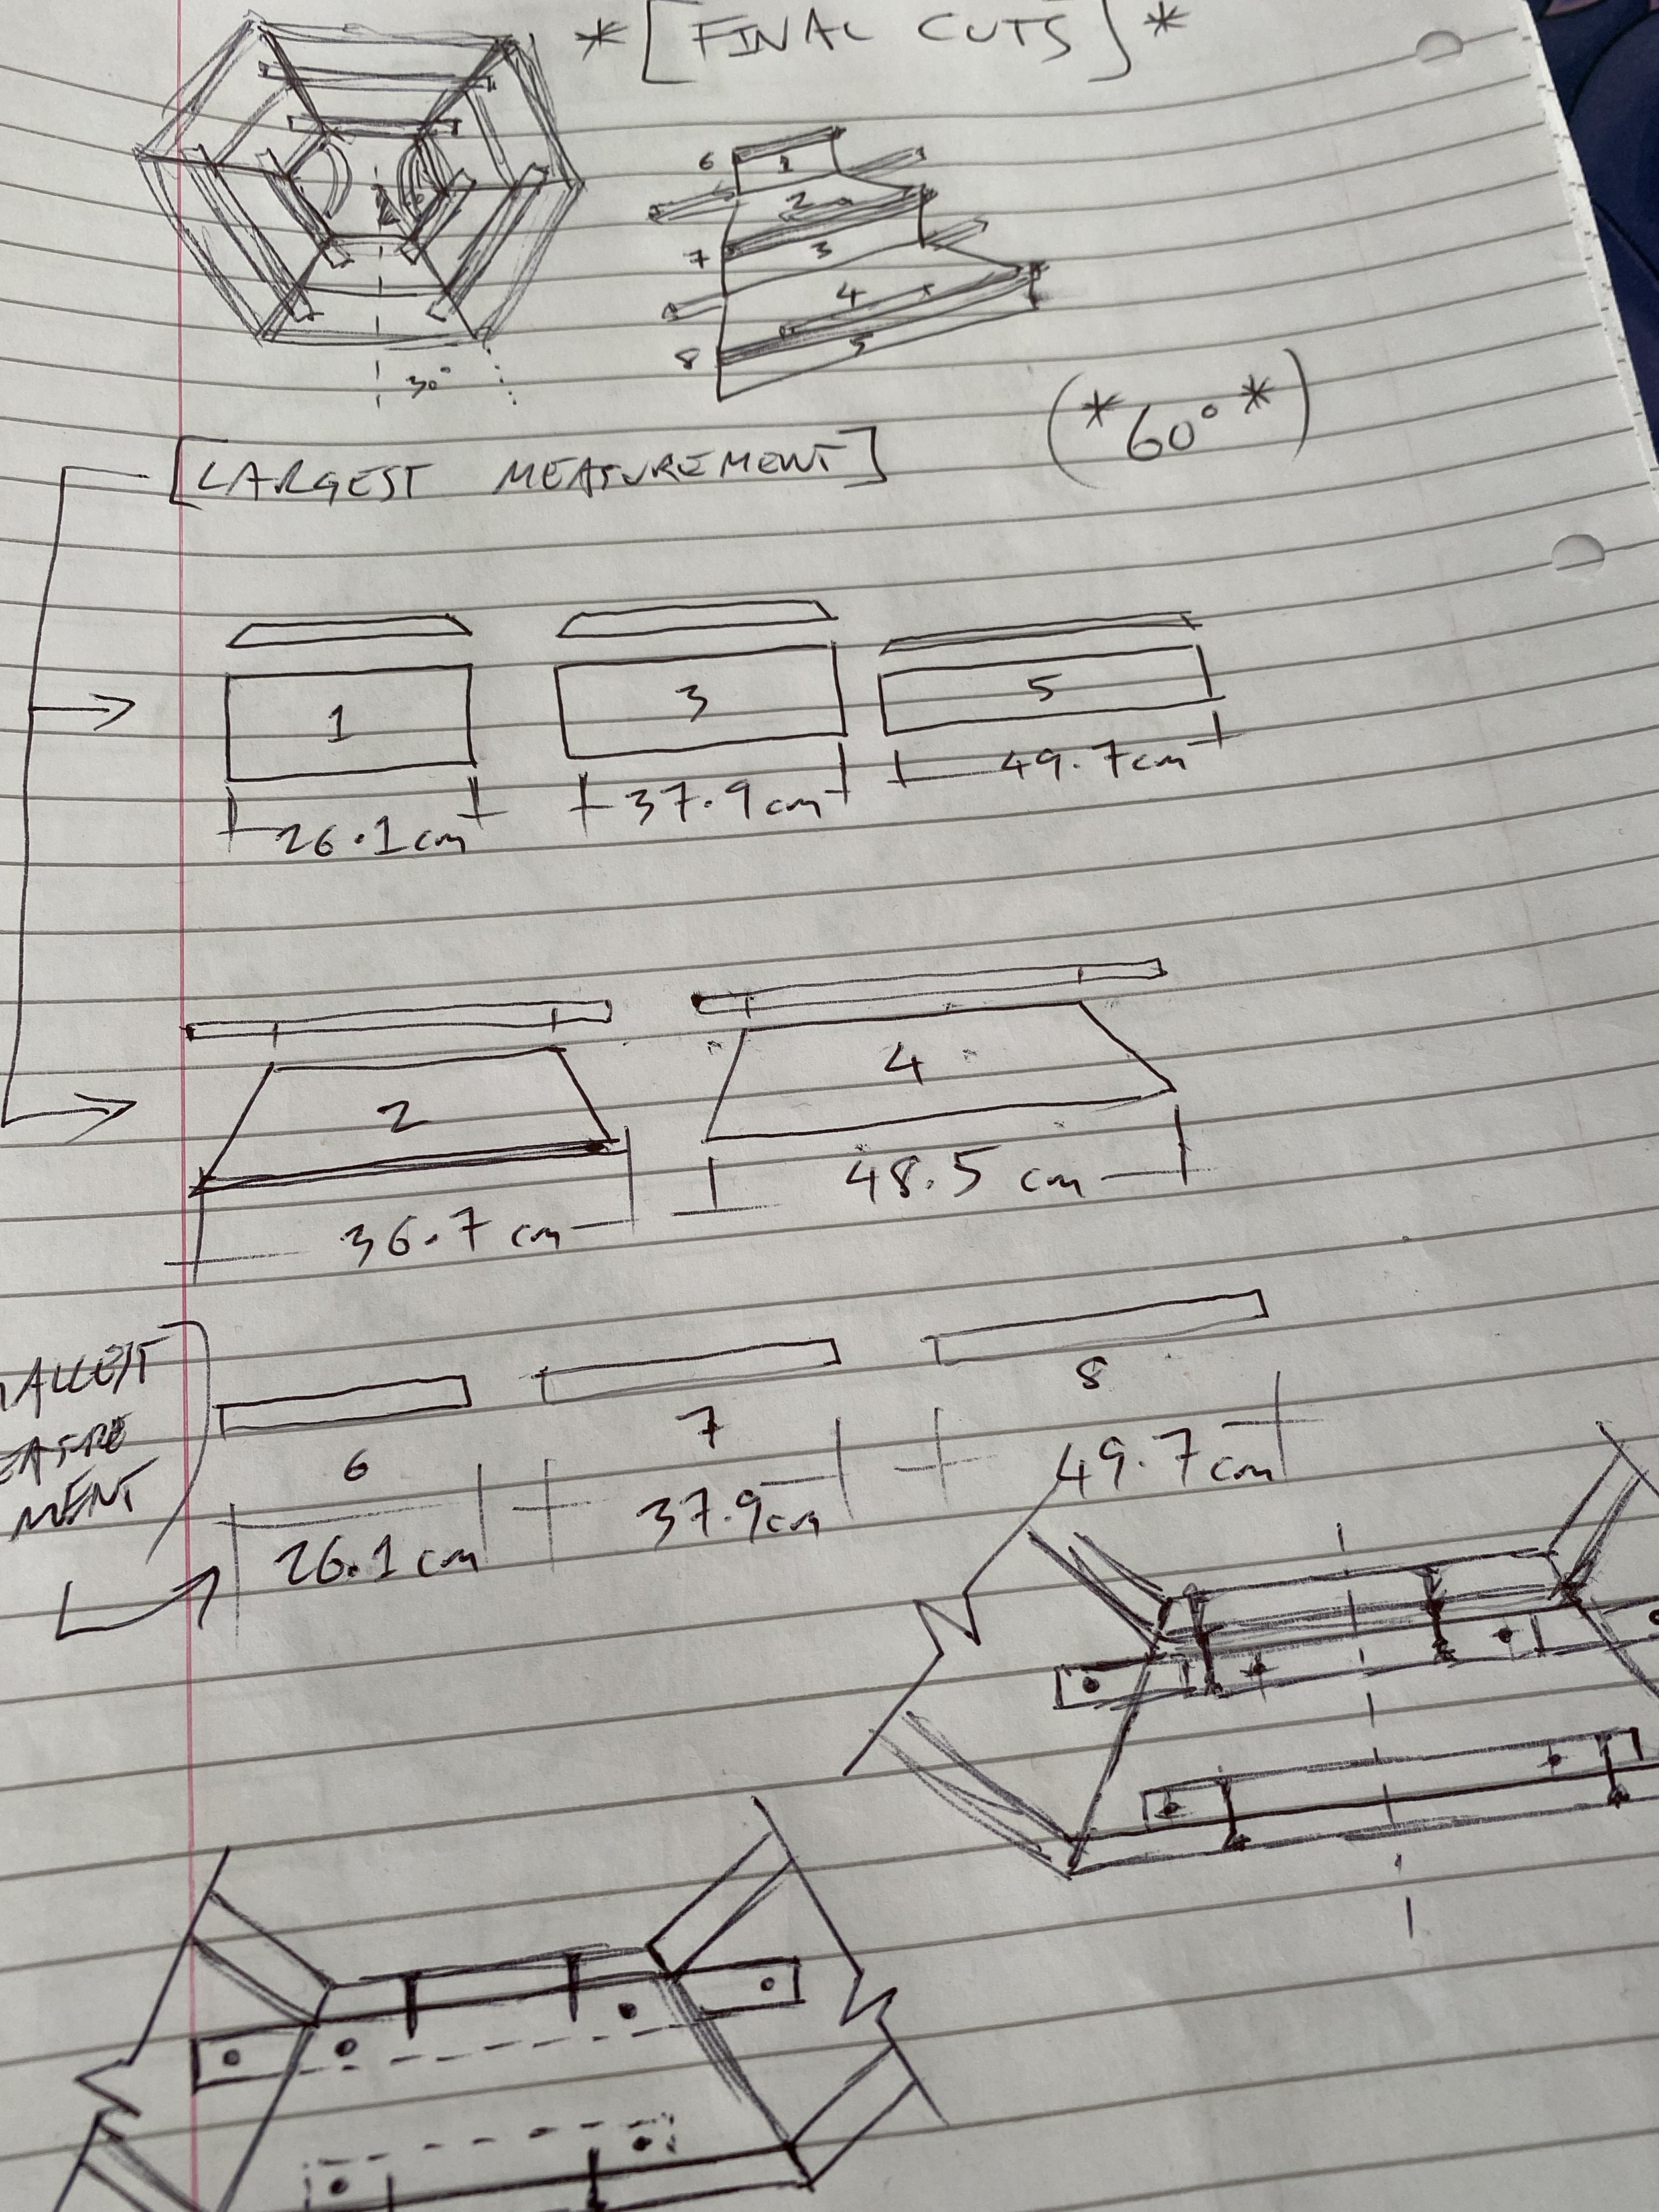
Plenty of back and forth trips to our local B&Q. Figuring out what standard sizes of wood strips were available, then factoring those sizes back into my 3D programs to see how I could construct this around a body.

Testing various construction methods and sizes based on what B&Q had in stock
Initially I had one shelf for the ducks to sit on but thought it would add more interest and depth to have a second shelf, staggered slightly higher. 2 rows with the ducks facing a different direction on each looked pretty cute.
Another tip. I wouldn’t recommend turning your glass coffee table into a make-shift work bench, but that is what I did for this. With some custom little jigs and clamps to help secure the wood and saw the perfect angles needed to make the hexagonal form. I also have a huge love for maths, and found plenty of joy in figuring out the dimensions of every little piece of the construction.


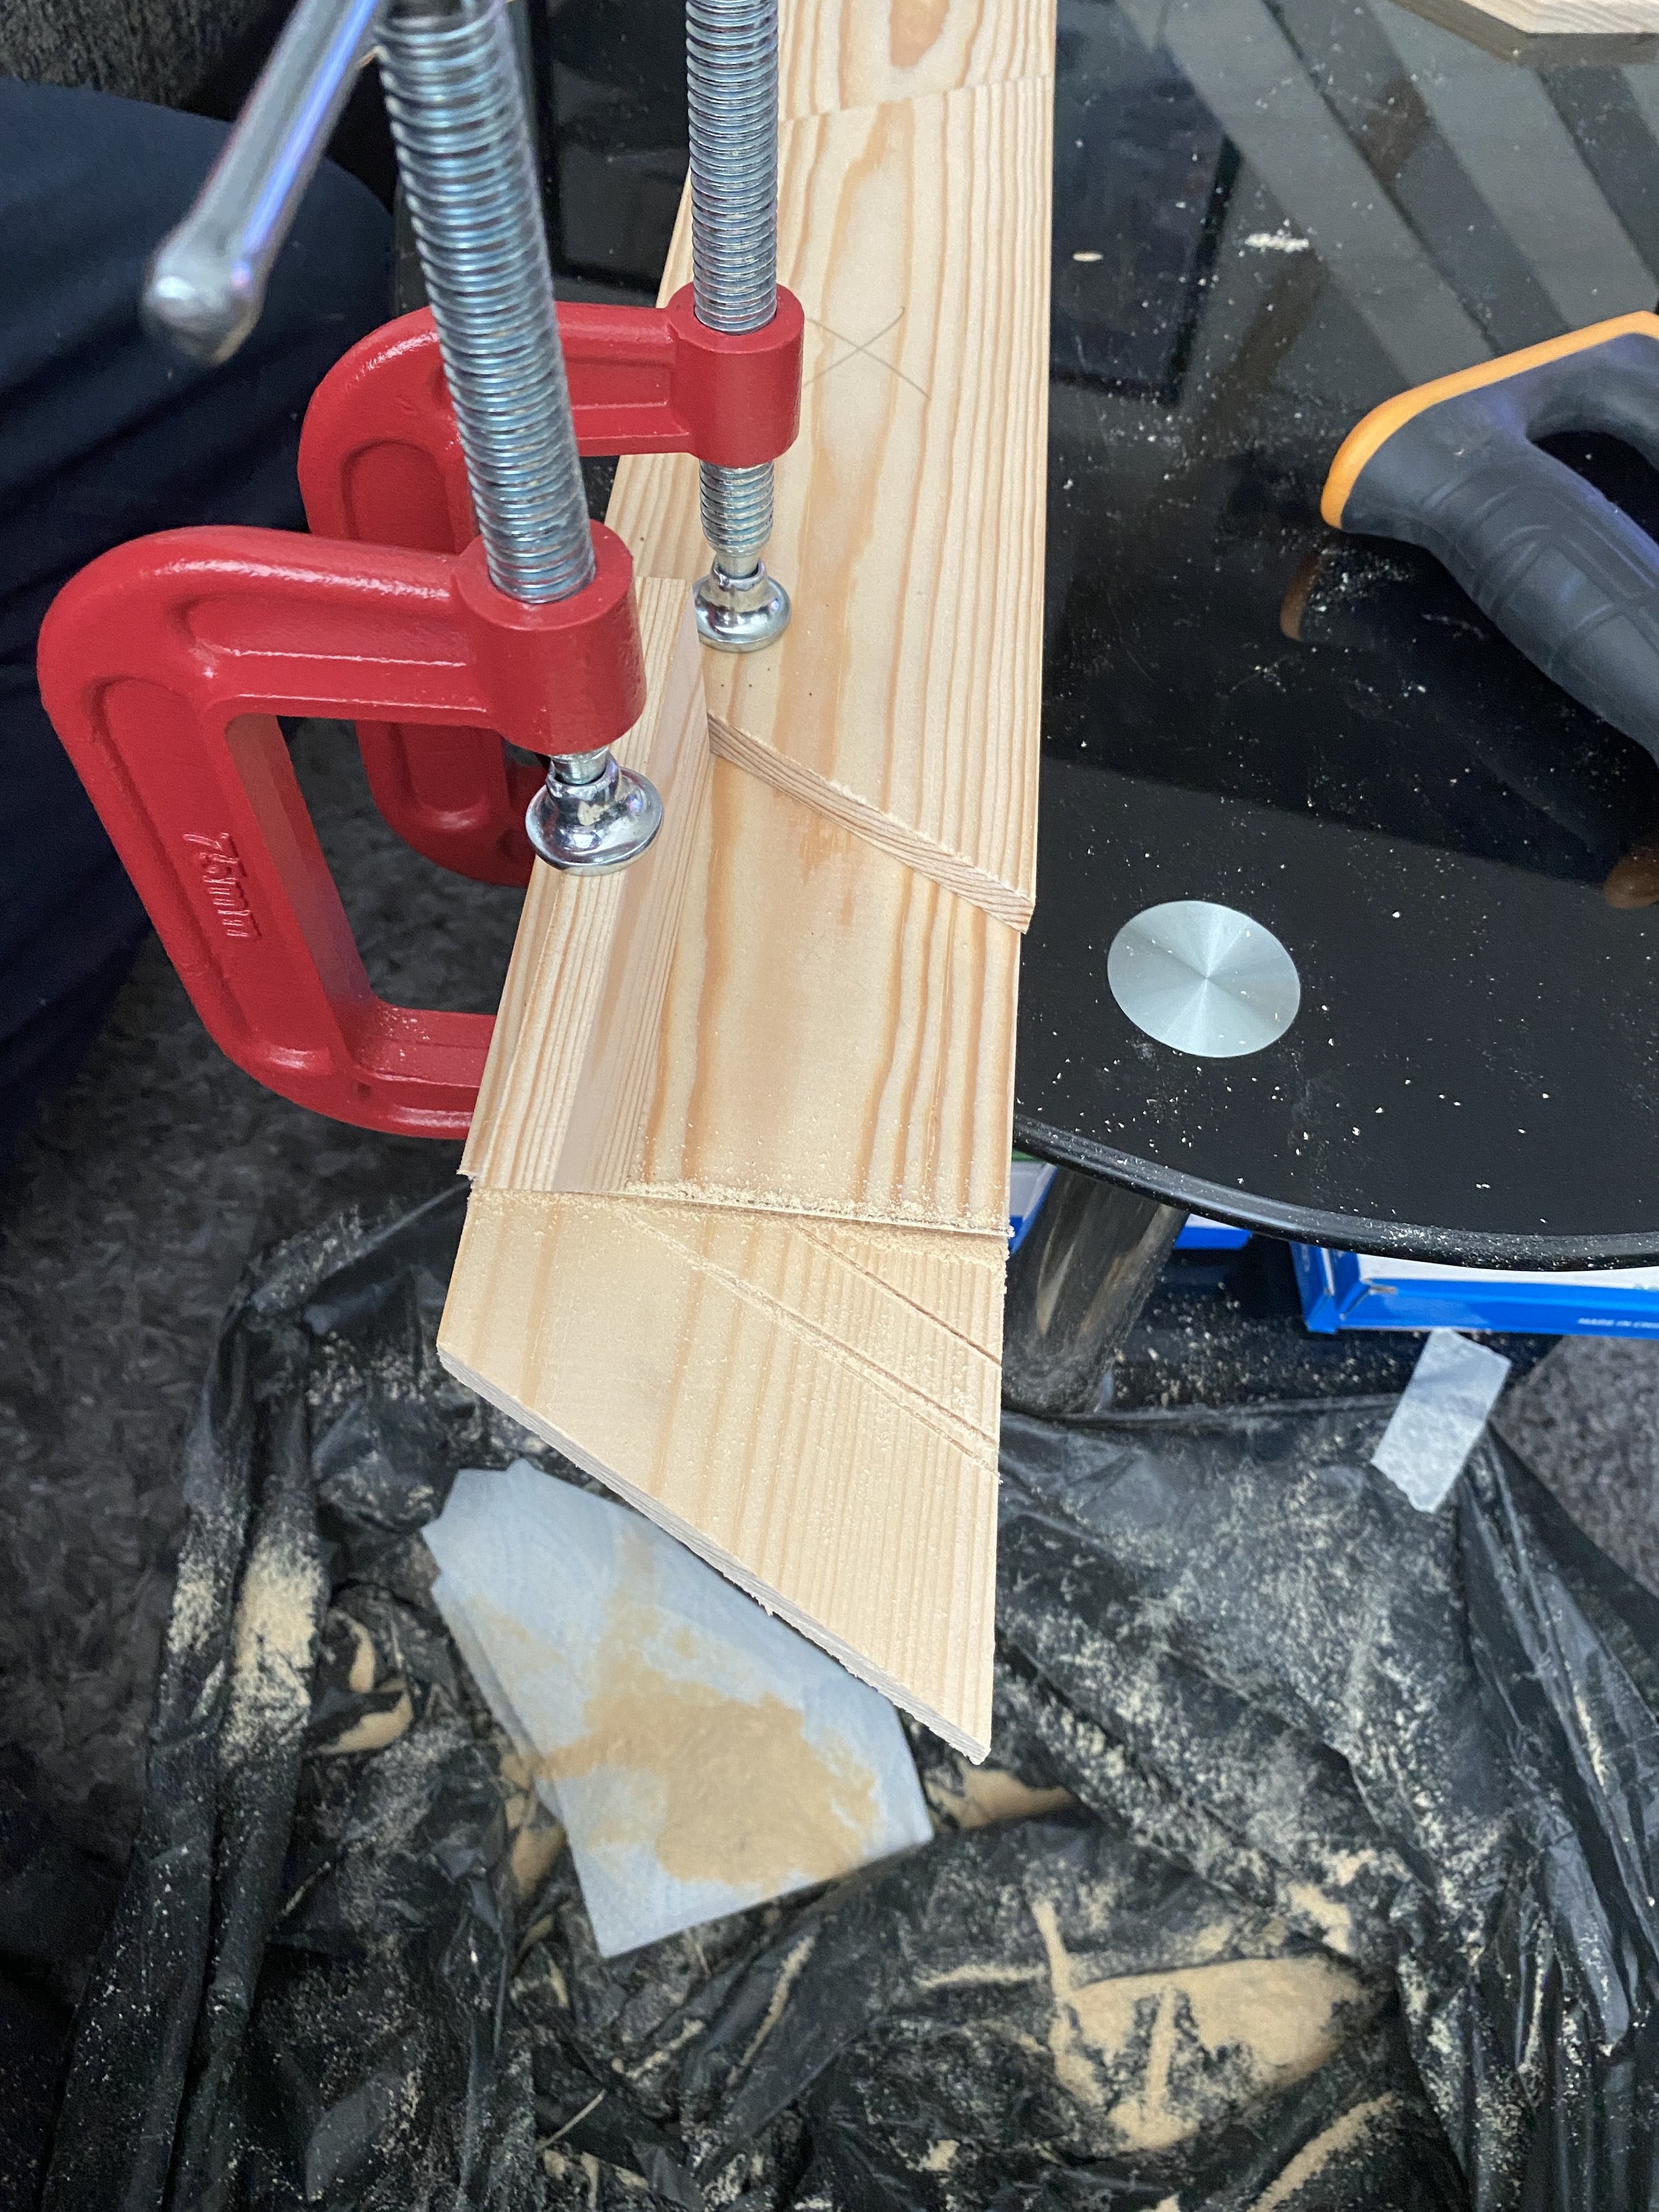


Annoyingly half way through construction I noticed some of the planks were severely bent out of shape, so had to return and swap them for better ones.
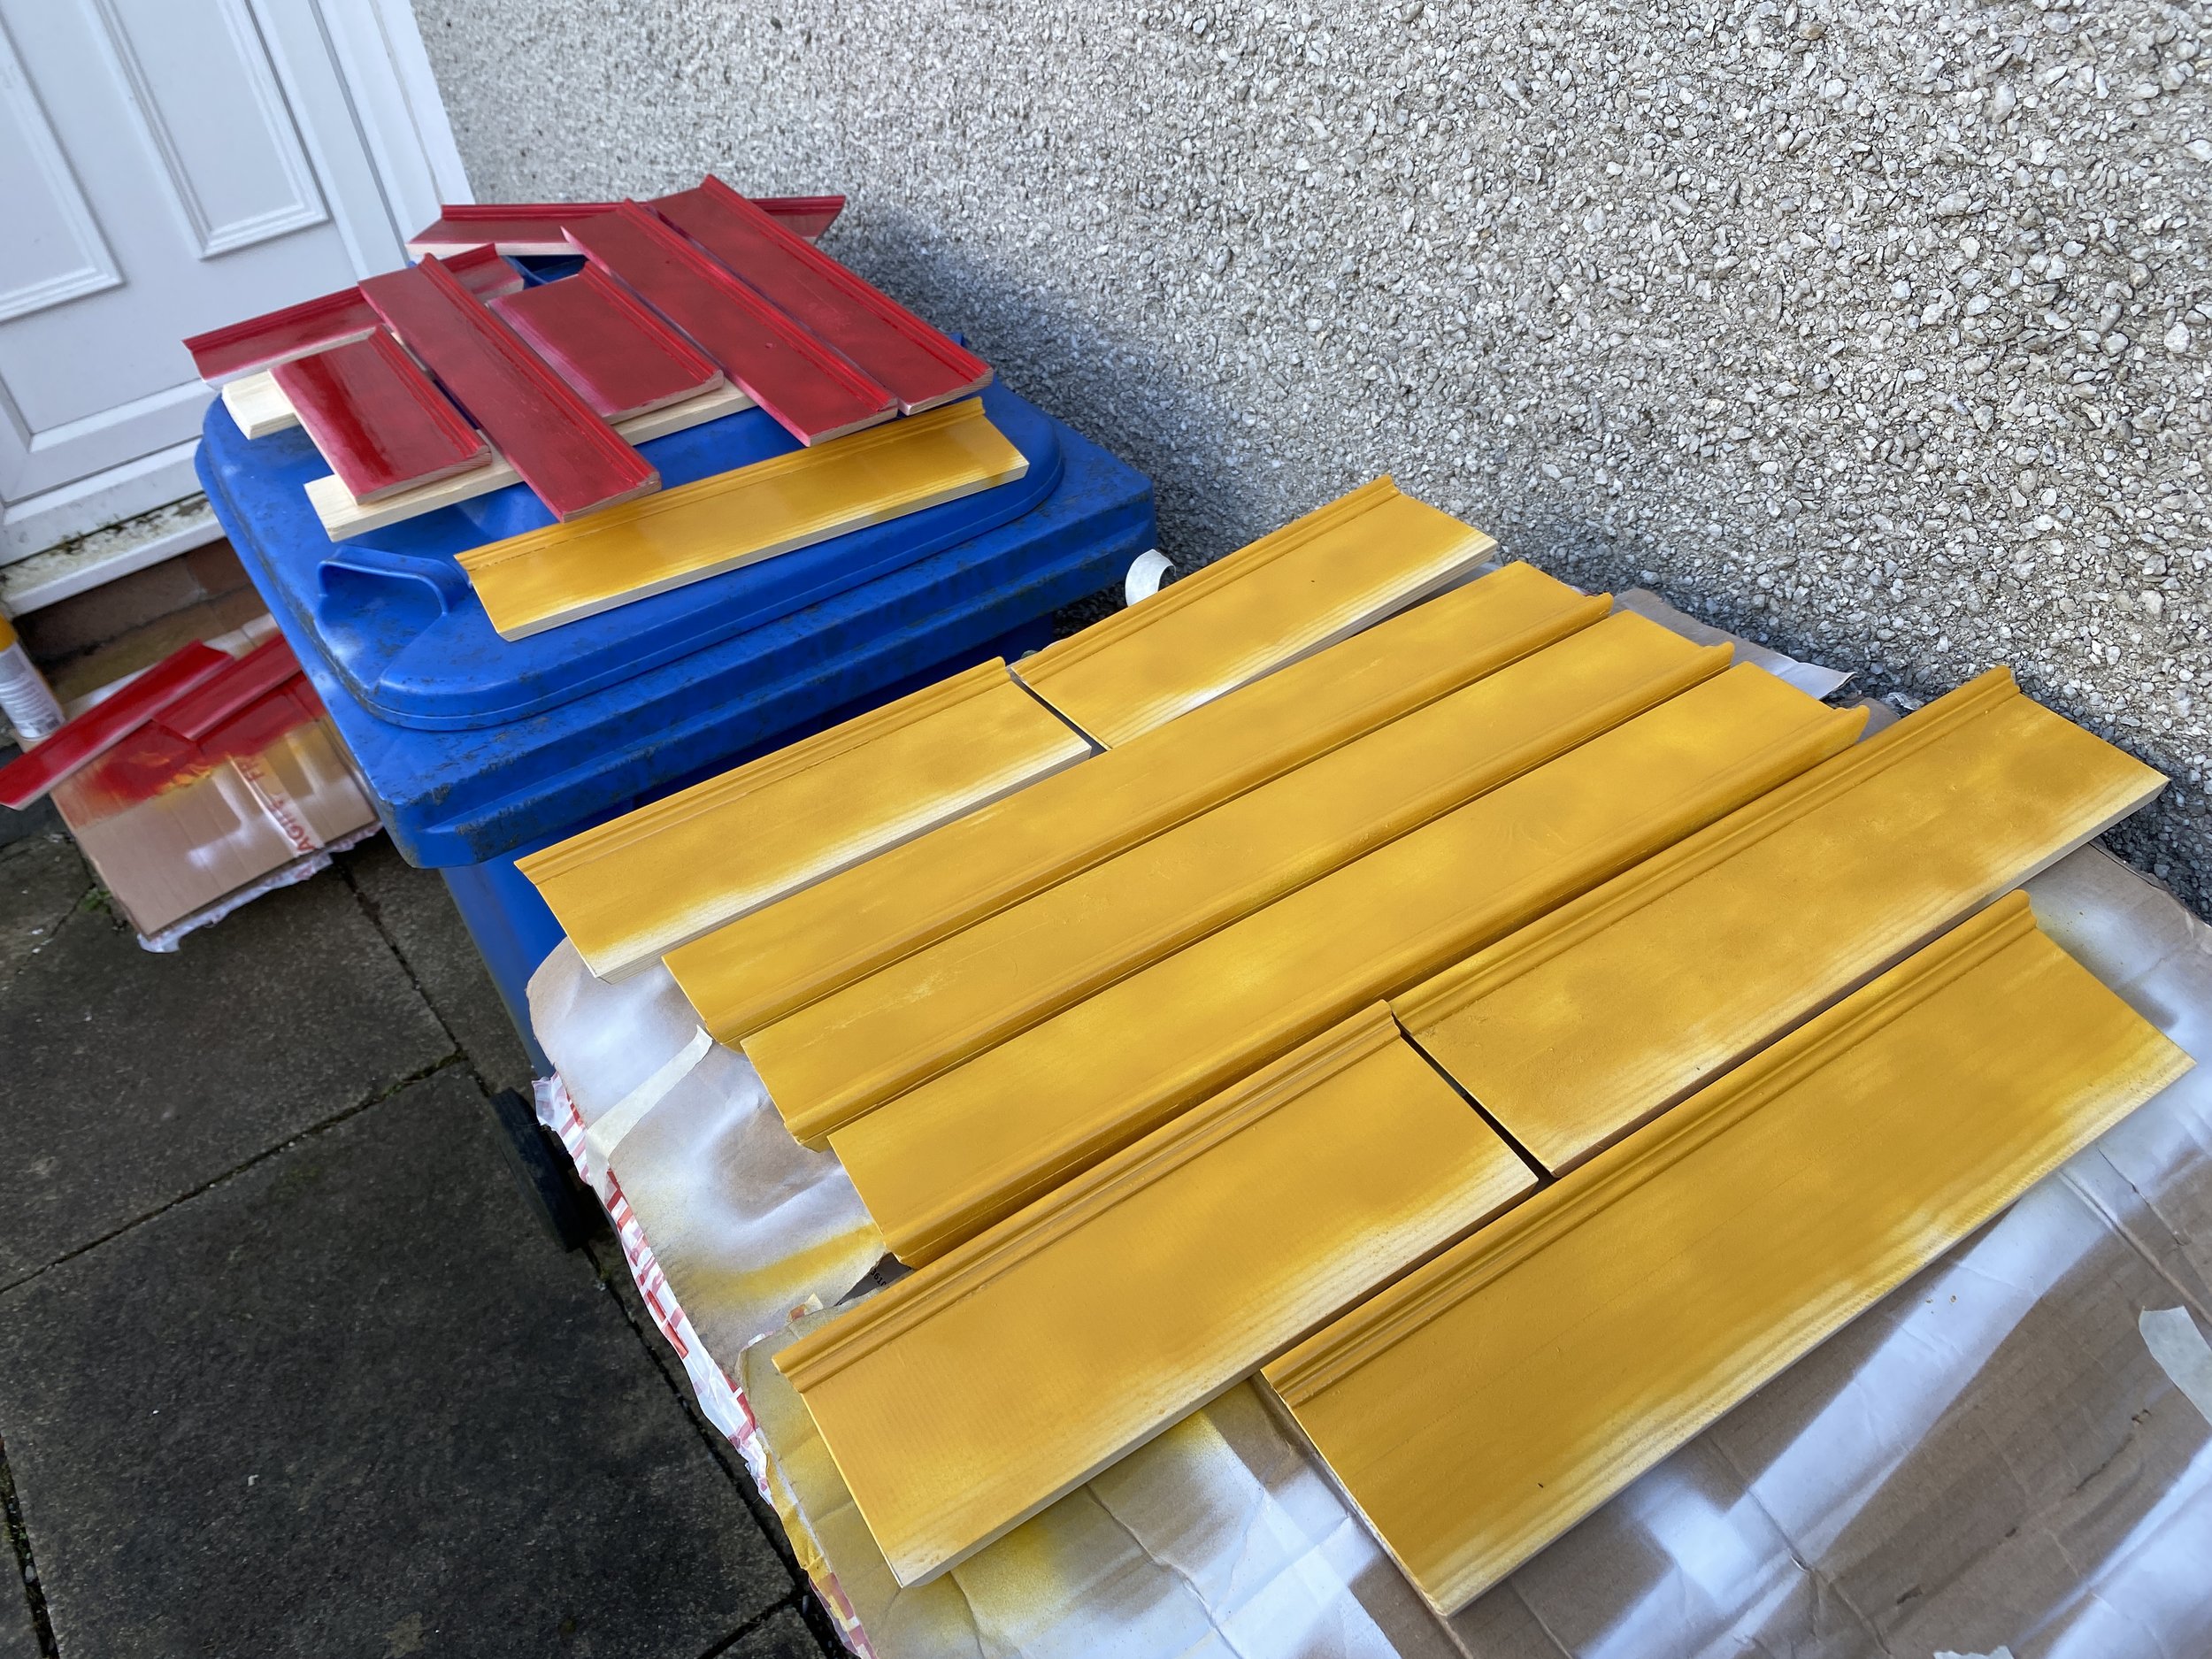
Two coats of spray primer followed by two coats of spray colour. Alternating yellow and red as we move around the stall. Wheelie bins are great outdoor standing work tables by the way!
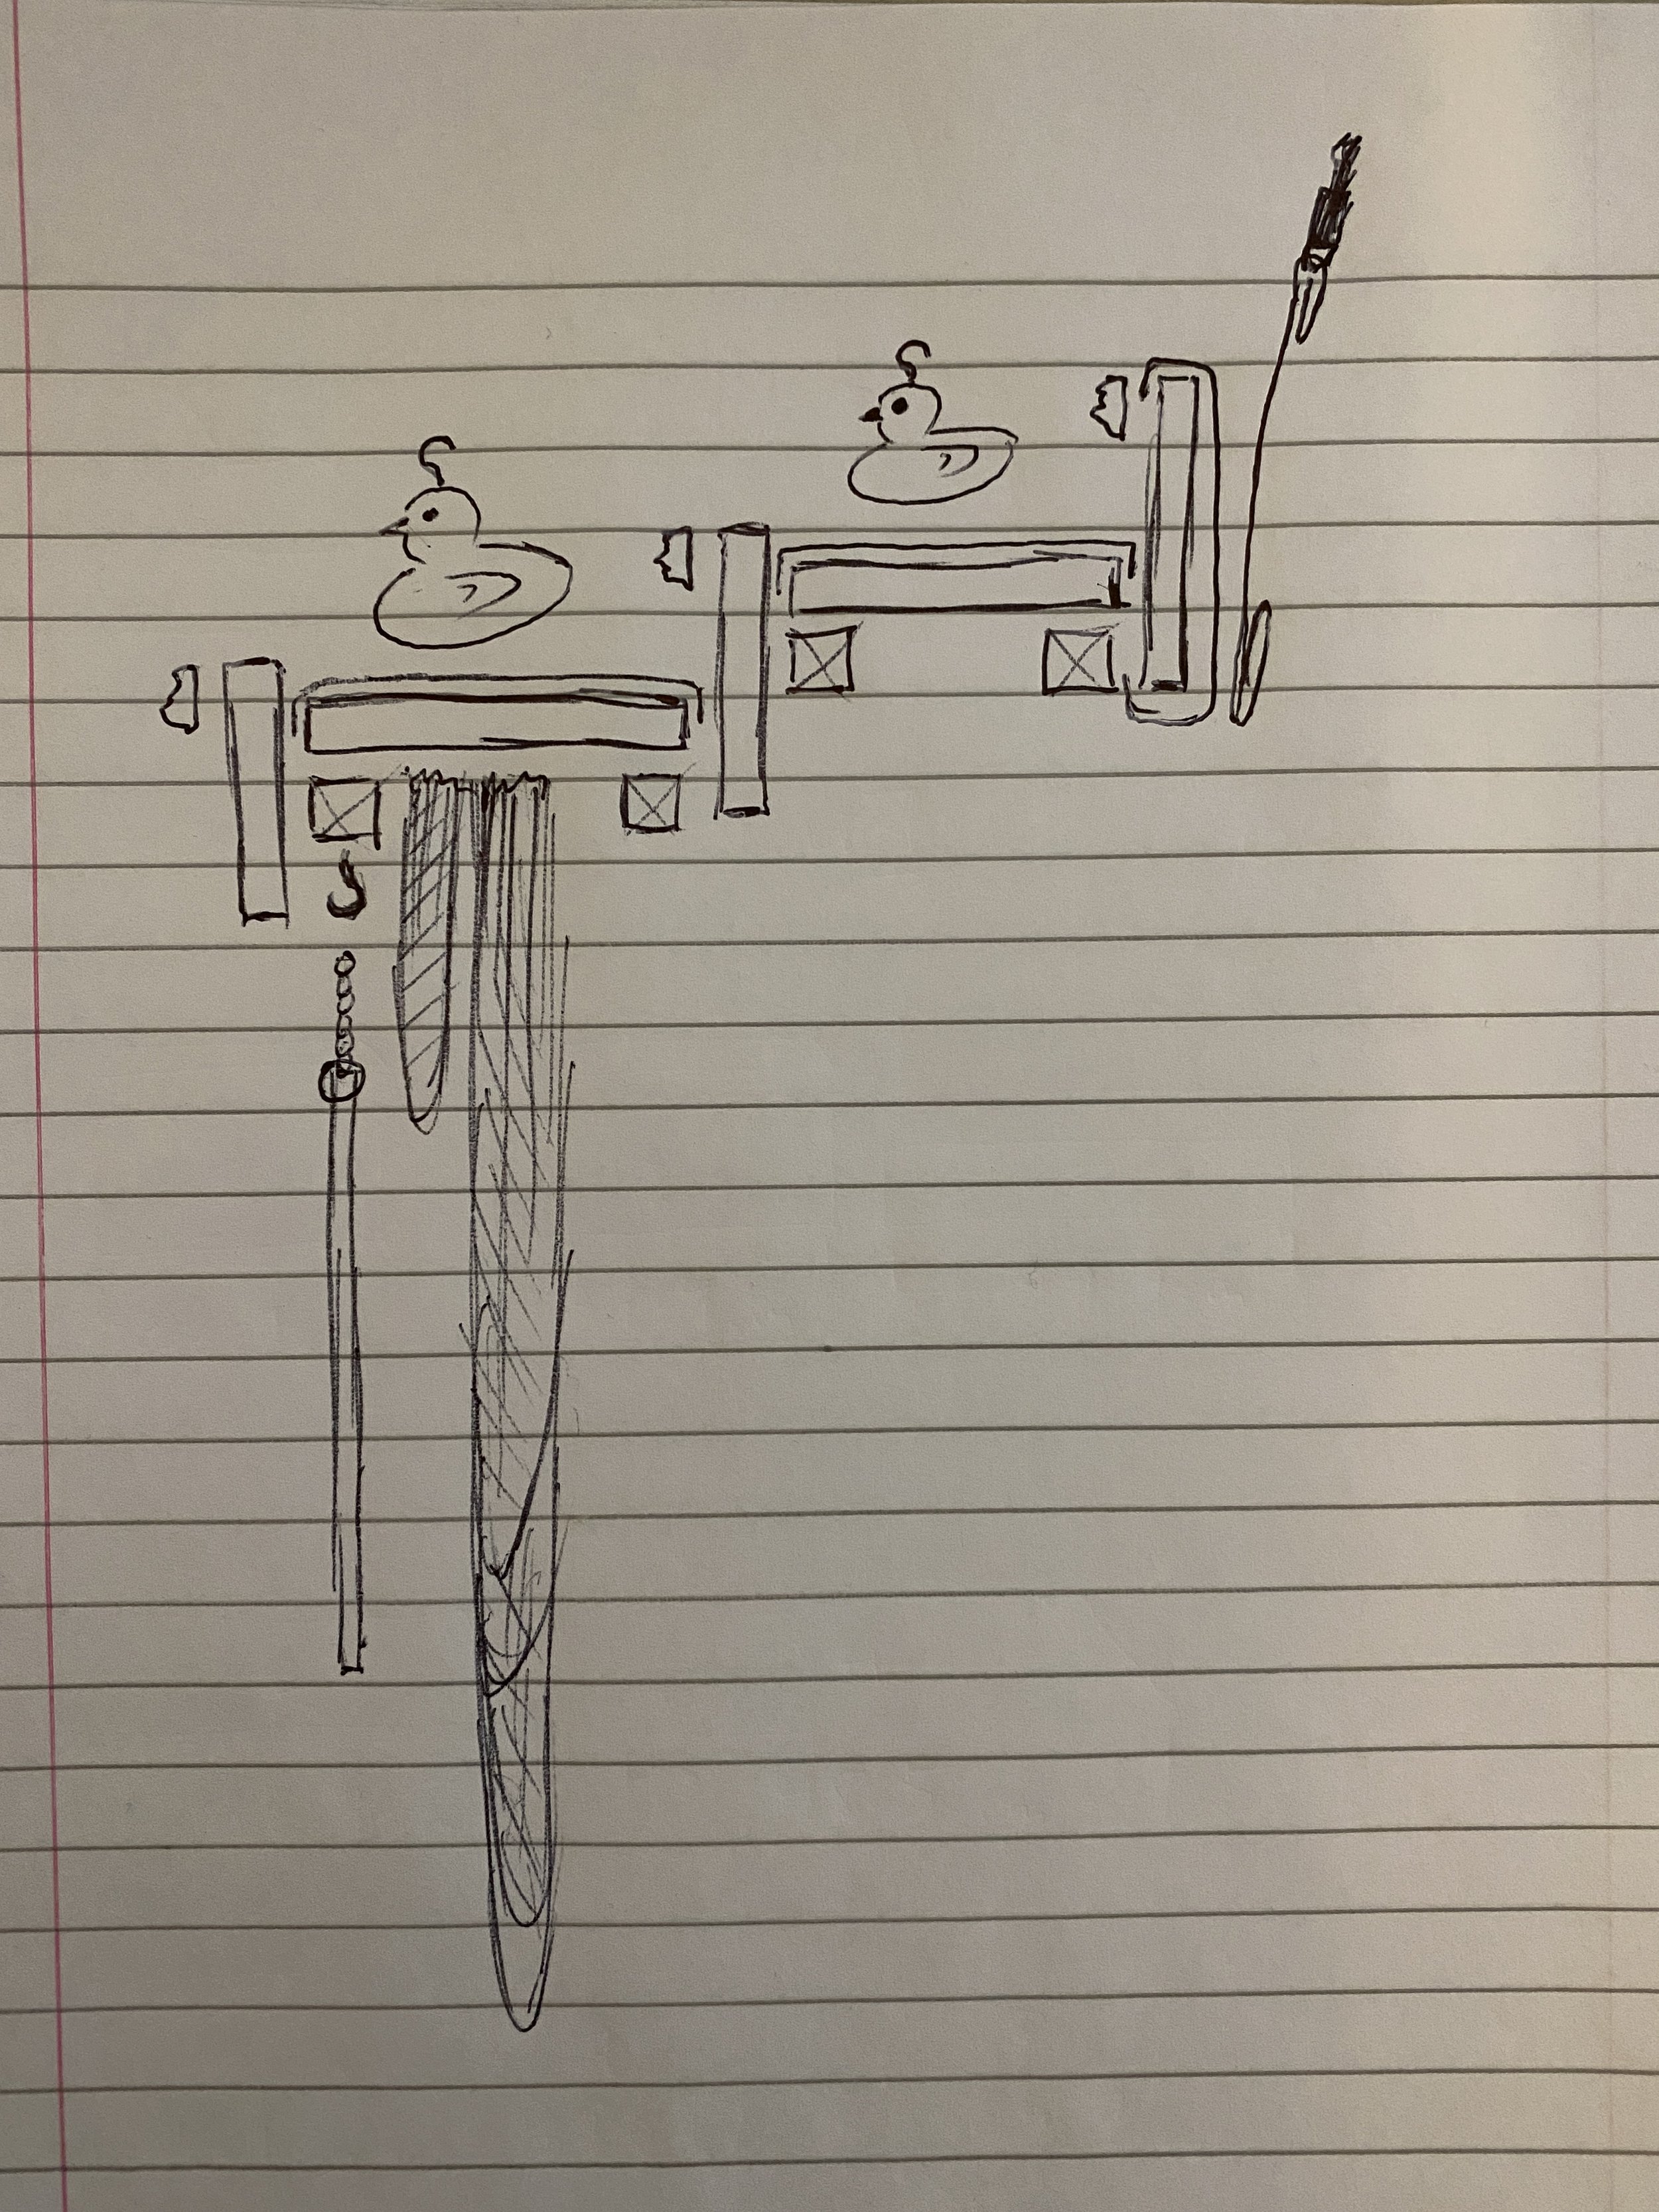
Early sketch for the turntable construction
I felt the duck shelves had to have a little ‘grip’ to them in order to stop them potentially sliding all over the place. So I added a felt fabric to them, in a blue colour to represent ‘water’. Each shelf also has a little rim around them to help keep the ducks in order. So many moving parts with this costume, so every little helps.
Since the main material here was wood, I added a layer of red felt around the interior edges. This was to stop anything getting caught on the fabric of the jumpsuit underneath. Fabric touching fabric instead of potential splinters on fabric!
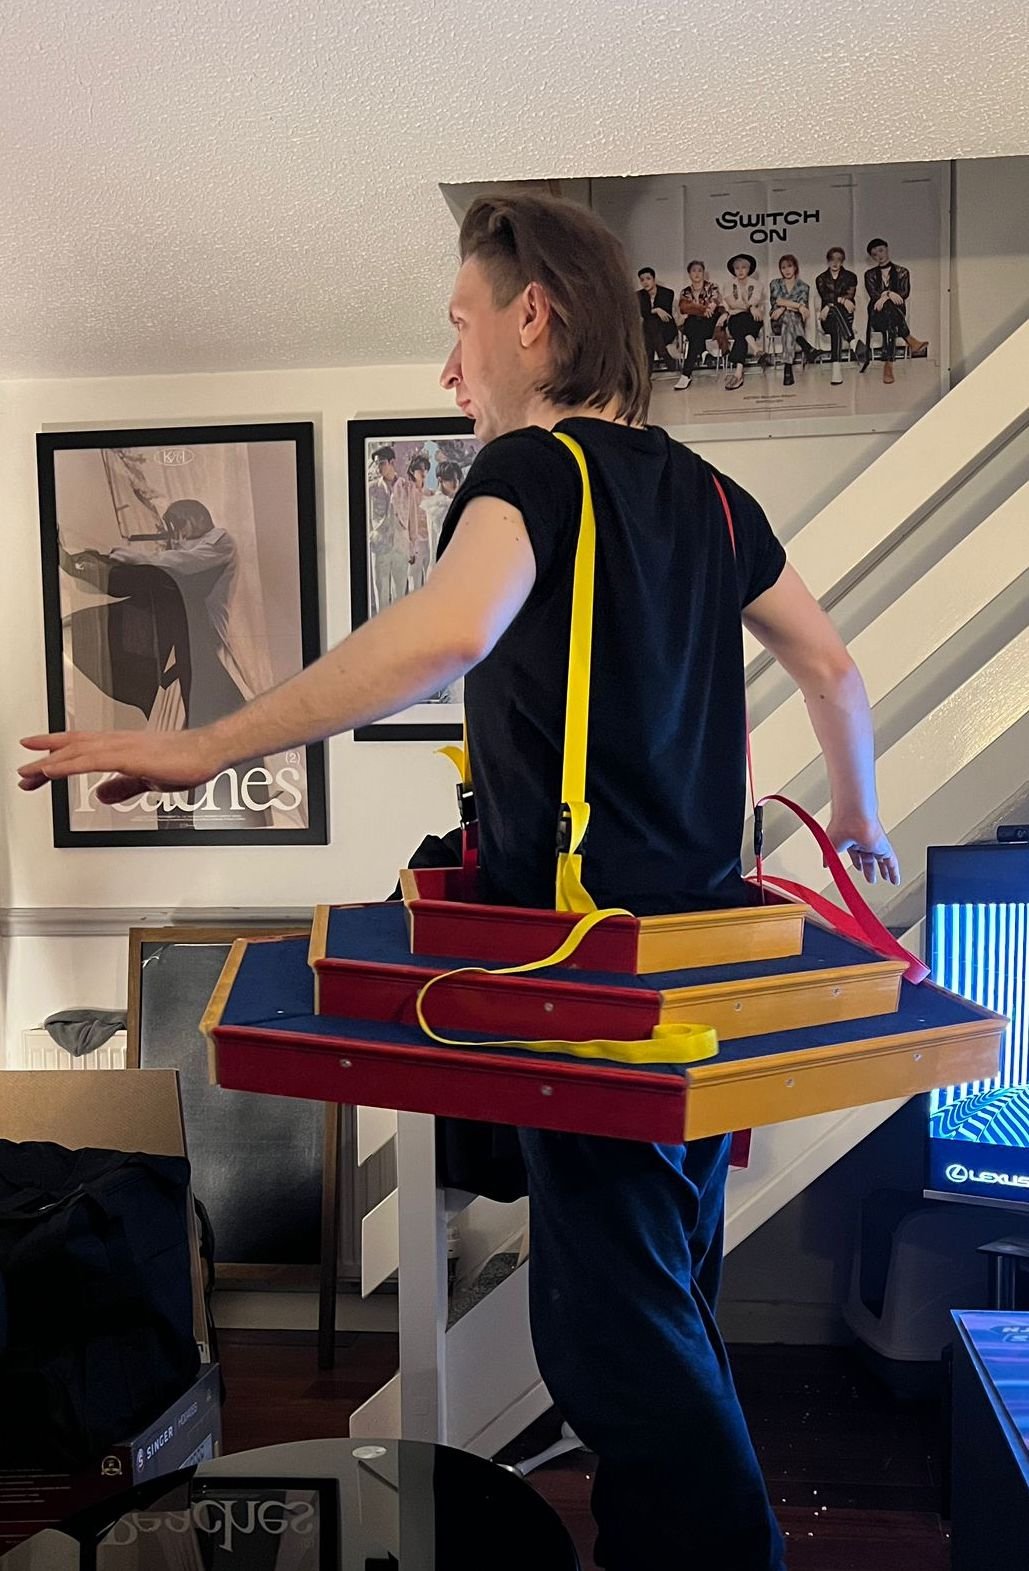
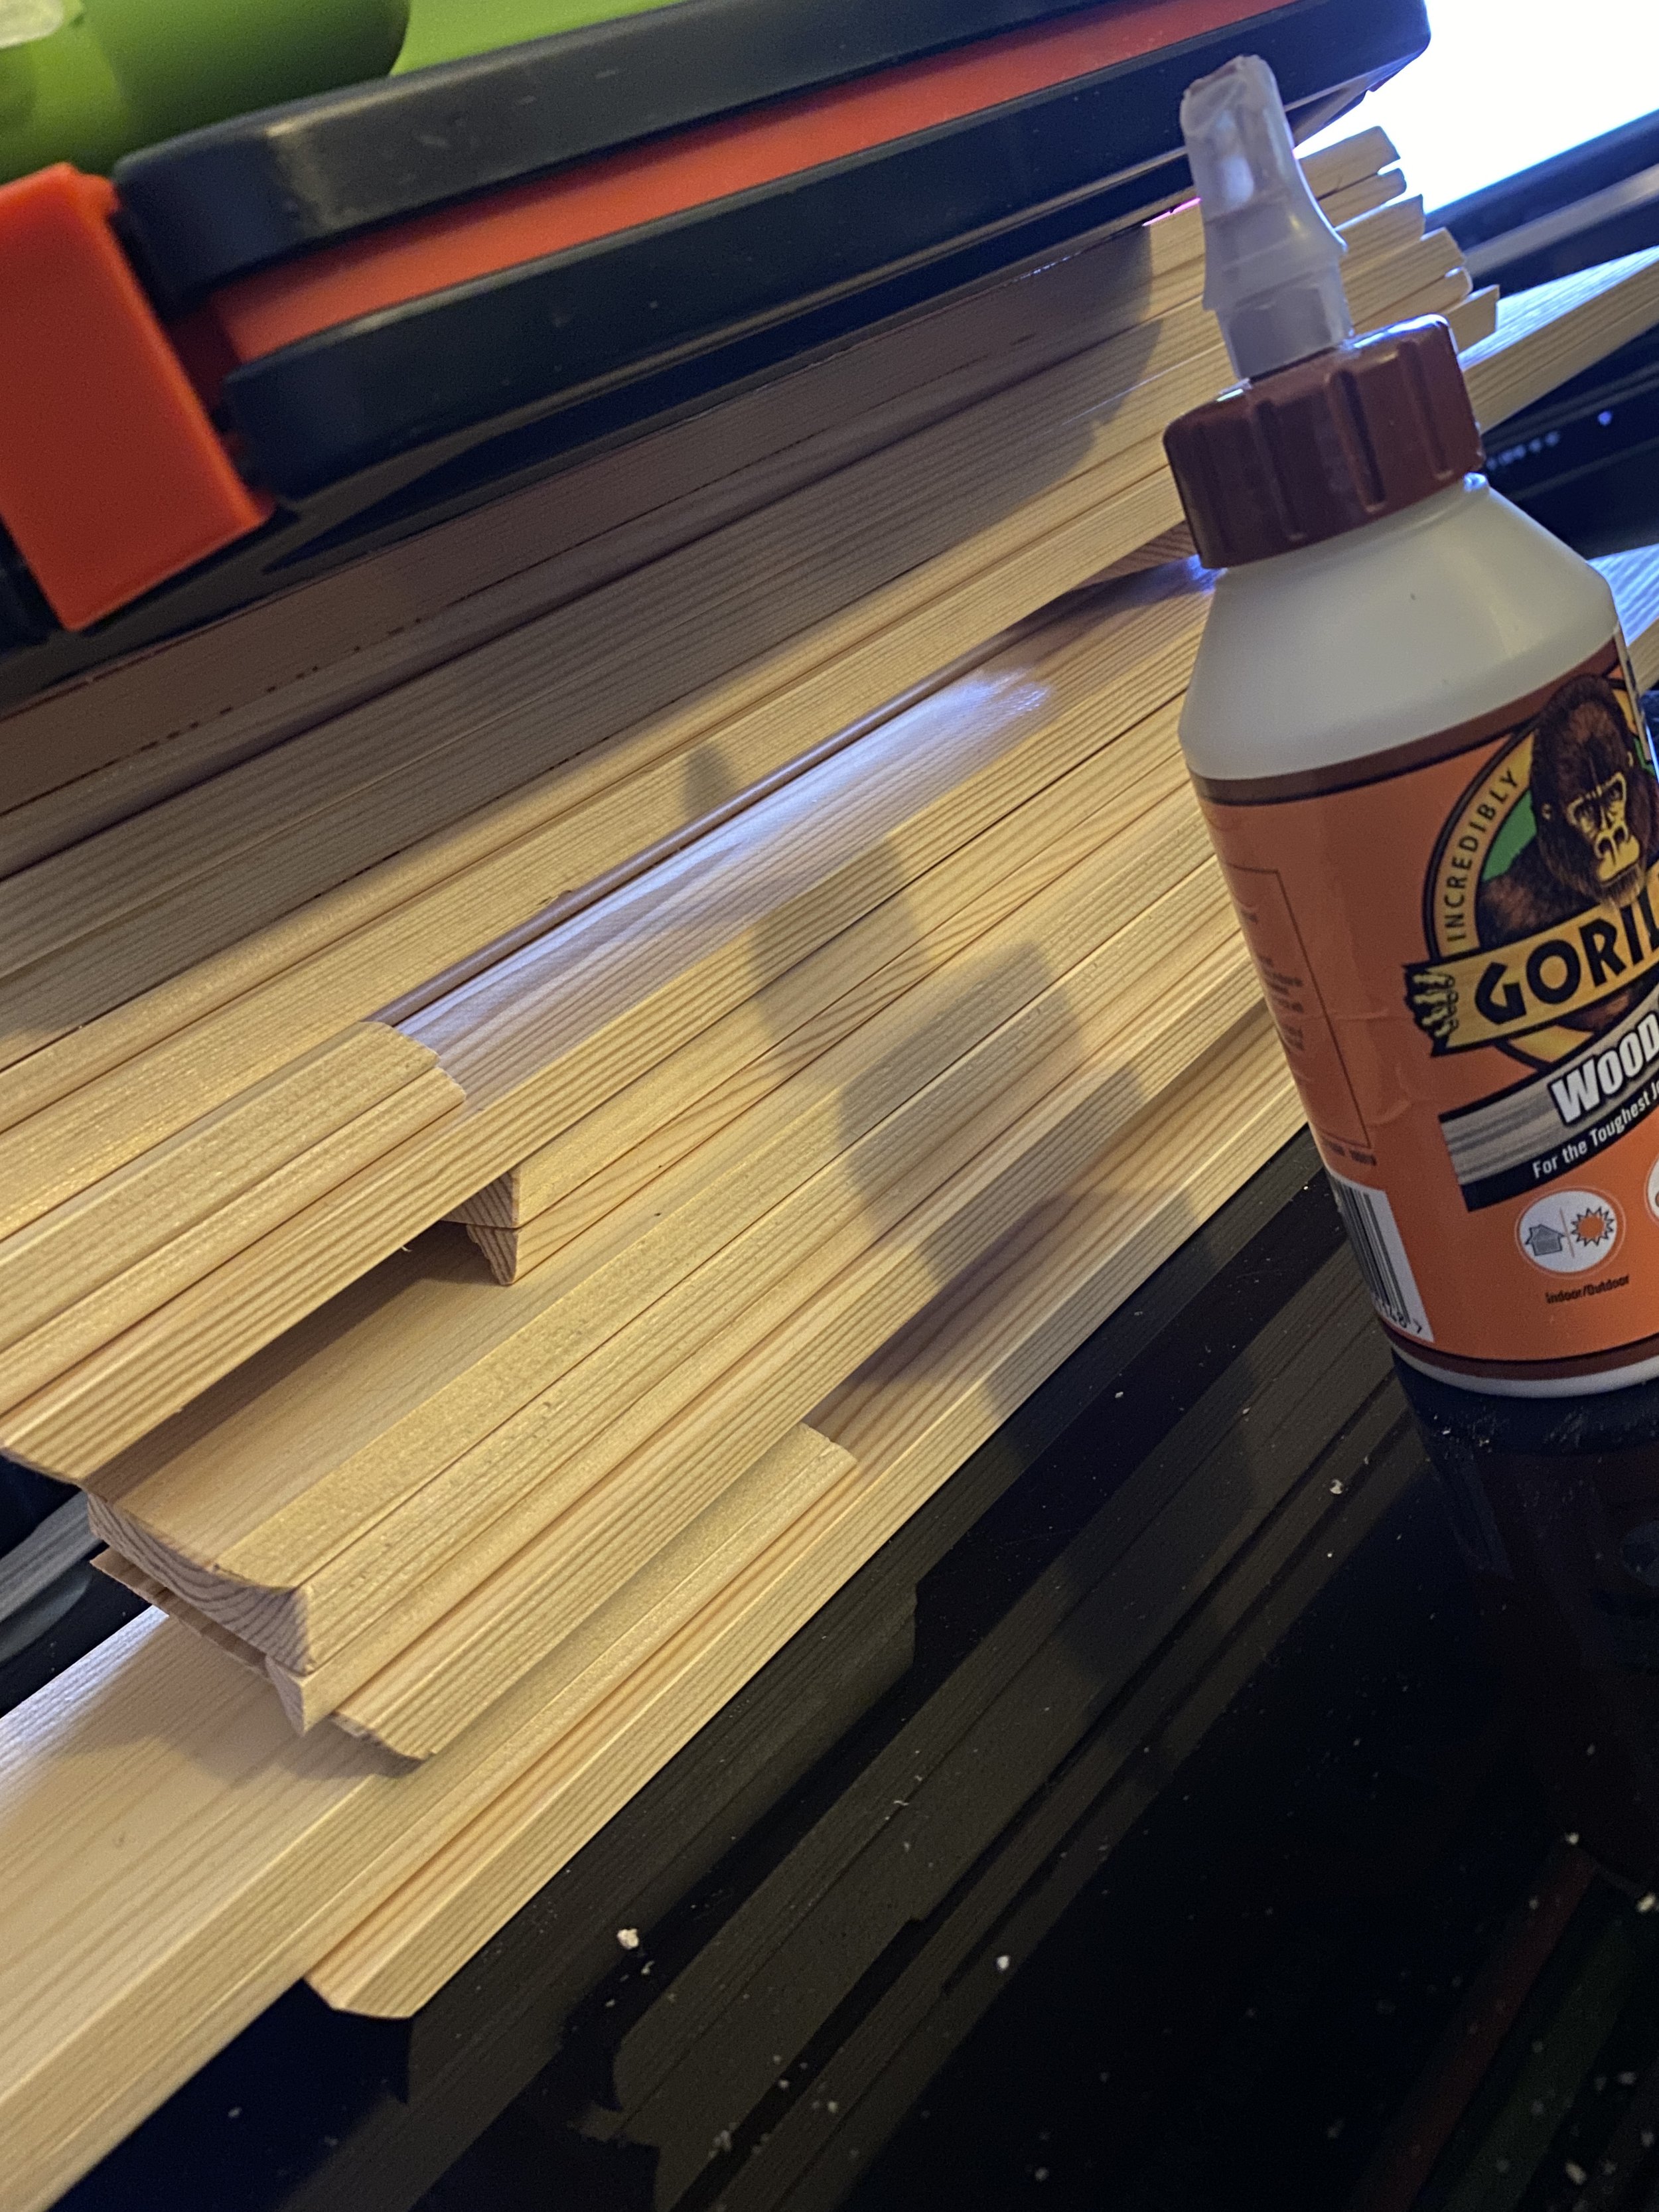
Loads of wood screws involved, each pre-drilled to help strengthen the structure and stop the wood splitting. The final construction is super strong, but it is heavier than anticipated. I’ll take that over a more flimsy construction.

The two sandwich boards were from Amazon and hold the baskets for each player to deposit their ducks during the game. Plus they space out and centre the act nicely on stage. Used acrylic paints for more permanency than chalk or colour markers. A few coats to make the colours pop more. The paint strokes look quite rough which I kind of like.

Last minute dash to finish the head piece
As time often does, it ran away from me as debut night approached. Everything had come together and was ready go, apart from the head piece, which aside from some sketches, was yet to be made.
On the morning of the show, I dove in with some structural cardboard, PVC, my measurements, a glue gun and some hope! I’d made the structure on 3D software and took the sizes from the model. This made the process a whole lot faster. Above was the only photo I got of this. Probably due to the lack of time on show day, but got there eventually.

My favourite inclusion here were the vertical ribbon pieces meant to signify the posts that hold up the whole stall. Helps tie it to the rest of the costume I think. I also toyed with the idea of adding lights to it, but thought there was way too much going on already. The thought of adding powered elements gave me the fear! Plus I found these shiny beaded strips of leather that give a similar effect. I was happy with those.
MUSIC
My standard practice during act development is to make a new Spotify playlist and flood it with inspirational music and sound effects. Anything that helps build the world in my head from an audio perspective. Over time my favourites get pushed to the top of the list and those few eventually reign supreme.
Surprisingly however, this is the first time where the music came together at the END of the process and not at the beginning. I was meandering between two very different vibes for this act. One was very slow, haunting and atmospheric, the other was louder, more direct and in your face. I decided, with two weeks left, to go with Insane Clown Posse’s ‘Here Comes The Carnival’. I just went with my gut feeling in the end.
Now I am not a rapper. The lyrics in this track are laid out so fast like a machine gun. No time to even think between lines. But I had that track on repeat every day for two weeks until it slowly sank its claws into my brain. There was a moment of panic where I thought I’d never get the lyrics down. It’s funny how your body eventually relents to repetitive learning.
I split the track into three ‘mini acts’ using Audacity. ‘Beginning’ for the lip sync, ‘Middle’ for the game and ‘End’ for the exit.
I’m pretty confident I could spew this out at speed now with nothing but a beat and a microphone. Probably ingrained in my muscle memory forever.
DEBUT
It’s show time! You only get to debut something once, a uniquely exciting feeling.

Cauldron of Delights Cabaret was a total blast! Sold out, super-packed, great vibes all round from the audience to backstage. Stage hands were so helpful with my plethora of weird demands with this act. I think they enjoyed ‘decorating’ me with the plushy toys. On stage there were a few ‘danger zones‘ where the ceiling was too small to fit me in heels with the headpiece, so had to avoid those as the act played out.
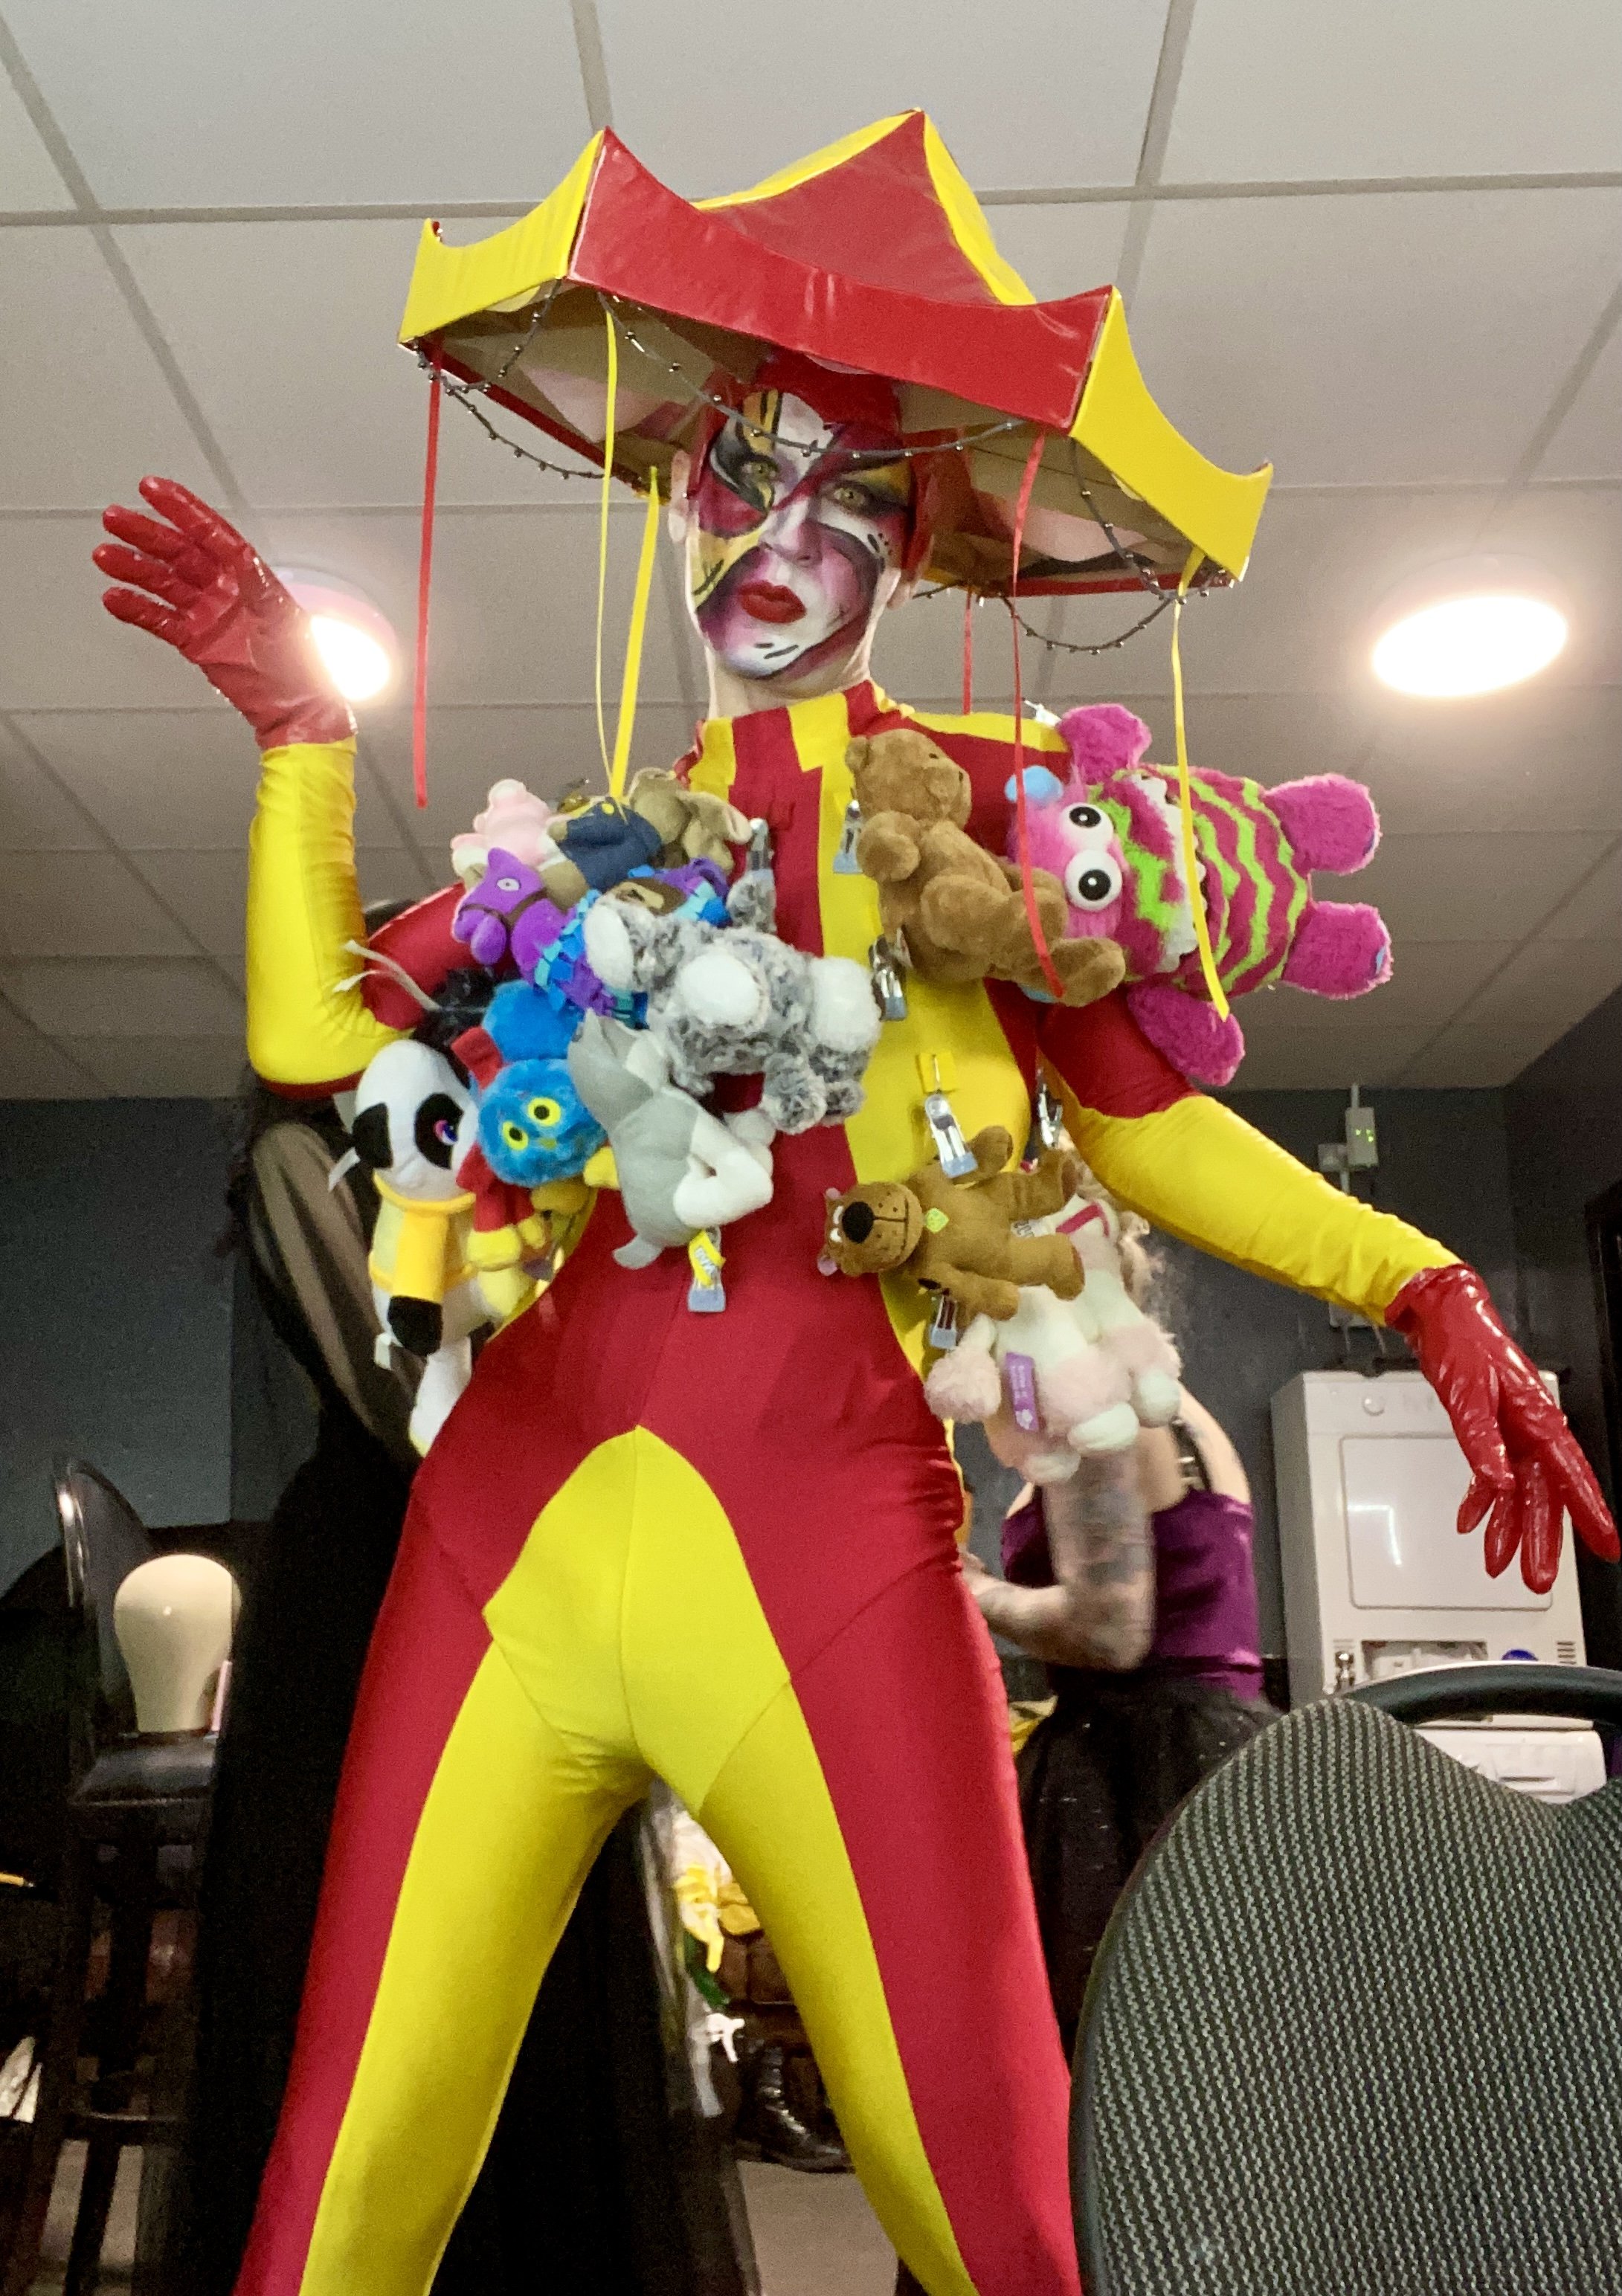
The two game-players. One was super into it and the other was super-not into it, and was kind of forced-up from the crowd. All part of the fun though, gave me something to play off of. I think he cheated too, which the crowd did not forgive lightly! Haha!

Conclusions
In classic ‘Grand Designs’ style I went way over budget in the end. For a grand total of £838.93. However this time I like to think it was a ‘controlled’ explosion in a way and I was watching over the budget the whole time, so they were conscious decisions throughout. It didn’t help that the cost of timber seemingly skyrocketed (like everything else) since the pandemic. Have a look at the Post-It notes for the cost breakdowns. I’d recommend doing something similar to keep tabs on things.

Like I mentioned before things aren’t always going to work perfectly the first time, or even every time. Always worth keeping in mind that things can and will go wrong, adjusting on-the-fly when things do, keep things fun and keep going. Looking back I’ve done this act since with the wrong music cues and incorrect stage setups, all totally manageable in the moment. Also these minor mishaps can help inform how to improve the act going forward.
I like to list things, so let’s look at what I love about the act and what could be improved in the future:
Pros
Think I succeeded in making exactly what was in my mind from the start
It’s so fun to perform this act! Every time is so different, the participants can change the vibe so much
It’s quite a sight to behold once everything comes together
Audience reception has been awesome so far
It spreads out and ‘fills‘ a stage nicely
Little ‘scuffs’ and ‘scrapes’ on the costume will add to the effect over time
Cons
The turntable part of the costume is pretty heavy
The straps can slide a little, making the turntable ‘tilt’ back and forward, might add a rubber grip material to them
It is so large in diameter, to travel with, to store, for stage access
Could ‘elevate’ some of the costume elements
Could work on more specific banter/jokes in-between the lip-sync parts
Hard to walk in sometimes, might shorten the skirt material around the edges
Reward
I’ve started doing this when embarking on larger projects.
I buy myself a small gift. Something I’ve had my eye on or from my wish list. It doesn’t need to be expensive. I keep it in its delivery packaging and don’t open it until after debut night. A mini reward system and something to look forward to once the work is done. It’s like a mini promise to yourself to help you finish things.

I got myself a new ‘Akedo Battle Giants’ figure. Purely as I loved the packaging design and colours. the figure was giving very Dharma energy I thought.
THANK YOU
This is the first time I’ve dug deep to unearth my work like this for public viewing so thank you for visiting my mad little world and making it to the end. This ended up way longer than originally intended.
Feel free to share and leave any comments below. Would you have done anything different? Can you recommend other techniques to try out? Have you seen the act? What do you think? Let me know. Love talking about act development.
I hope you got something out of my ‘MAKING AN ACT’ journey with Hook A Duck, and wish you all the very best with your own creations in the future!
(Photography by Jamie McFadyen and Galactic Carnival)